English – 8
English
INSTALLATION: ASSEMBLY AND CONNECTION OF COMPONENTS
Caution! • All installation operations and con-
nections must be performed with the automation
disconnected from the mains; if the backup bat-
WHU\35LVƄWWHGWKLVPXVWEHGLVFRQQHFWHGs
Incorrect installation could cause serious physi-
cal injury.
ttt67(3ttt
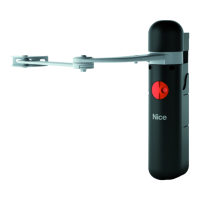
INSTALLING THE GEARMOTORS
ALTO100C / ALTO100M
$ ,167$//$7,21:,7+STANDARD LENGTH ARMS
CAUTION! - This procedure is an alternative to pro-
FHGXUH%7RXQGHUVWDQGZKLFKSURFHGXUHWRIRO-
ORZUHDGWKHLQVWUXFWLRQVVWDWHGLQSDUDJUDSK
IMPORTANT!
7KLVSURFHGXUHLOOXVWUDWHVLQVWDOODWLRQRIWKHJHDUPRWRU$/72&
7KHVDPHLQVWUXFWLRQVDSSO\WRLQVWDOODWLRQRIJHDUPRWRU$/720
if the gate has two leafs.
01. )L[LQJWKHJHDUPRWRUWRWKHSRVWƄJ
a) - Place the gearmotor against the post (*) aligning its central vertical
axis with the vertical line previously traced on the post (paragraph
3.4). Then align the upper edge of the rear gearmotor bracket with
SGDOQDUHNTRKXSQ@BDCGNQHYNMS@KKHMDNMSGDONRSO@Q@FQ@OG
In this phase, ensure that the gearmotor is perfectly level; an offset
gearmotor could cause malfunctions of the automation.
(*) Warning! - If the post surface width is between 80 and 135 mm,
ADENQDOQNBDDCHMFVHSGHMRS@KK@SHNMSGDQD@QFD@QLNSNQjWHMFAQ@BJDS
must be turned through 90°. Then follow the instructions in ƄJ.
b),@QJSGDjWHMFONHMSRCQHKKSGDGNKDRHMSGDONRS@MCHMRDQSSGDOKTFR
then secure the gearmotor using adequate screws and washers.
Note7KHVFUHZVDUHQRWLQFOXGHGLQWKHNLWDVWKHLUW\SHGHSHQGV
RQWKHPDWHULDODQGWKLFNQHVVRIWKHSRVWLQZKLFKWKH\DUHƄ[HG
c) - For increased stability of the gearmotor, adjust its rear feet so that
they are placed against the post. This adjustment can be made later,
VGDMSGDBNMSQNKTMHSHRQDLNUDCEQNLHSRRD@SENQSGDjQRSSHLDO@Q@-
graph 5.4).
02. )L[LQJWKHDUPRQWKHOHDIƄJ
a) - Move the gate leaf to the maximum leaf closing position against the
travel limit stop.
b)$WSDMCSGD@QL@MCLNUDHSTOSNV@QCRSGDKD@EOK@BHMFSGDjWHMF
bracket on the arm. Then, ƄUPO\SUHVVWKHFXUYHGDUPDJDLQVW
WKHOHDIƄJDuntil the two arms are completely extend-
edDSSO\IRUFHDWWKHMRLQLQJSRLQWHOERZƄWWLQJ&DXWLRQ
the arms are completely extended only when the elbow blocks
against its stop.
d) - Ensure that the gearmotor arm is level (ƄJE) and use a pencil
to mark the centre of the slots on the bracket (ƄJ), to enable
RTARDPTDMSjMD@CITRSLDMSRNEKD@EBKNRTQD
e) -
Keeping the bracket in contact with the leaf (for example using a
clamp), attempt a complete leaf opening and closing manoeuvre,
reaching both mechanical stops. Caution! - During this test, if a
Ƅ[HGREVWDFOHEHKLQGWKHJHDUPRWRUSUHYHQWVFRPSOHWHURWD-
WLRQRIWKHDUPVXVSHQGLQVWDOODWLRQDQGSHUIRUPSURFHGXUH
f) - Drill the leaf at the marked points; remove the bracket from the arm
@MCjWHSSNSGDF@SDKD@EVHSG@CDPT@SDRBQDVRNote 7KHVFUHZV
DUHQRWLQFOXGHGLQWKHNLWDVWKHLUW\SHGHSHQGVRQWKHPDWHULDODQG
WKLFNQHVVRIWKHSRVWLQZKLFKWKH\DUHƄ[HG
g)%HWSGD@QLSNSGDAQ@BJDSHMRDQSHMFSGDOHM@MCRSNOADMYHMFImpor-
tant - Check that the bracket and arm are perfectly level. If neces-
sary, loosen the bracket screws and level as required.
h)/DQL@MDMSKX@MBGNQSGDSQ@UDKRSNORSNSGDkNNQin the same position
as established at the beginning of paragraph 3.4.
03. Checking perfect leaf closure.
a) - Close the leaf completely and ensure that it is placed against the trav-
el stop; then shake by hand to check and ensure that the gearmo-
SNQQDL@HMRjQLKXHMONRHSHNM(ESGHRHRMNSRNOQNBDDC@RCDRBQHADC
below; otherwise skip to phase 04:
1.QDLNUDSGDRKNSSDC@QLEQNLSGDjWHMFAQ@BJDSNMSGDKD@E
2. loosen the bracket screws and move it by a few millimetres in the
direction of the gearmotor;
3.QDjSSGDRKNSSDC@QLNMSGDAQ@BJDSBKNRDSGDKD@E@MCDMRTQDSG@S
it is aligned in contact with the travel stop and aligned with the other
leaf (if present). Caution! - If necessary, repeat point 2 to obtain per-
fect closure.
3HUPDQHQWO\Ƅ[LQJWKHEUDFNHWRQWKHOHDI
a) 1DLNUDSGDRKNSSDC@QLEQNLSGDjWHMFAQ@BJDSNMSGDKD@EHEMNS
already performed in phase 03).
b) - Drill a hole in the leaf at the same point as the hole at the centre of the
bracket@MCHMRDQS@RBQDV/DQL@MDMSKXjWSGDAQ@BJDSAXSHFGSDMHMF
the three screws fully down.
c) %HWSGDRKNSSDC@QLSNSGDAQ@BJDSHMRDQSHMFSGDOHM@MCRSNOADMYHMF
05. Manually locking the gearmotor
a) - Manually move the leaf to approximately mid-travel and lock the
gearmotor by means of the special key (refer to chapter “Manually
locking and releasing the gearmotor” in the “Operation Manual”).
Then manually move the leaf by a few centimetres in the opening
direction.
06. On 2-leaf gates.
a) - If the gate has two leafs, install the other gearmotor repeating all
operations described in paragraph 3.4 and in this paragraph.
% ,167$//$7,21:,7+7+(SHORT ARM
CAUTION! - This procedure is an alternative to pro-
FHGXUH$7RXQGHUVWDQGZKLFKSURFHGXUHWRIRO-
ORZUHDGWKHLQVWUXFWLRQVVWDWHGLQSDUDJUDSK
IMPORTANT!
7KLVSURFHGXUHLOOXVWUDWHVLQVWDOODWLRQRIWKHJHDUPRWRU$/72&
7KHVDPHLQVWUXFWLRQVDSSO\WRLQVWDOODWLRQRIJHDUPRWRU$/720
if the gate has two leafs.
01. 6HWWLQJDQHZPD[LPXPOHDIRSHQLQJDQJOHPD[LPXP
a) - Without taking into account the previously established maximum
opening angle (paragraph 3.4), move the leaf to a new maximum
opening position, ensuring that WKHDQJOHGRHVQRWH[FHHG.
+NBJSGDKD@EHMSGHRONRHSHNMVHSG@kNNQLNTMSDCRSNOjWDCOQN-
visionally.
02. Calculating the measurement for shortening the slotted arm.
a) .MSGDRTQE@BDNESGDONRSVGDQDSGDFD@QLNSNQHRSNADjWDCCDKDSD
the previously traced vertical line (paragraph 3.4).
b) - On the post, measure value B (ƄJ), i.e. the distance between the
fulcrum of leaf rotation (centre of the hinge pin) and the post surface
VGDQDSGDFD@QLNSNQHRSNADjWDC
c) - On *UDSK note the obtained value BNMSGDGNQHYNMS@K@WHR@MC
from this point trace a vertical line.
d) - Place the gearmotor on the post, positioning its rear bracket (used for
jWSTQD@RBKNRD@RONRRHAKDSNSGDKD@EGHMFDOHMHD@KHFMDC@MCSQHL
with the post.
e) - Keeping the gearmotor in this position, check that it is perfectly level,
and, using a pencil, trace a vertical line on the post, corresponding
SNSGDBDMSQ@KUDQSHB@K@WHRNESGDjWHMFAQ@BJDS3GDKHMDLTRSHMSDQ-
RDBSSGDGNQHYNMS@KKHMD@KQD@CXOQDRDMSSGDRDSVNKHMDRVHKKRDQUD@R
@QDEDQDMBDENQRTARDPTDMSjWSTQDNESGDFD@QLNSNQ3GDMQDLNUDSGD
gearmotor.
f) - On the post, measure value A (ƄJ), i.e. the distance between
the fulcrum of leaf rotation (centre of the hinge pin) and the previously
traced vertical line.
g) - On *UDSK note value A found on the vertical axis, and from this
ONHMSSQ@BD@GNQHYNMS@KKHMDTMSHKHSHMSDQRDBSRSGDOQDUHNTRKXSQ@BDC
UDQSHB@KKHMD3GDONHMSNEHMSDQRDBSHNMNESGDSVNKHMDRCDjMDRvalue C,
i.e. the distance required between the two pins of the slotted
arm (ƄJ).
03. )L[LQJWKHJHDUPRWRUWRWKHSRVWƄJ
a) - Place the gearmotor against the post (*) aligning its central vertical
axis with the vertical line previously traced on the post. Then align the
upper edge of the rear gearmotor bracket with the previously traced
GNQHYNMS@KKHMDNMSGDONRSO@Q@FQ@OG
In this phase, ensure that the gearmotor is perfectly level; an offset
gearmotor could cause malfunctions of the automation.
 Loading...