7
Step 5: Install the Replacement Motor in the Belly-Band
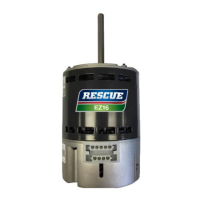
1. Ensure that the voltage on the motor matches that of the replaced ECM motor. The RESCUE
®
EZ13 motor
ships connected for 208-230 Vac systems. No action is needed in the case of a 208-230 Vac requirement.
If 115 Vac is required, change the voltage on the RESCUE
®
EZ13 motor using the mating connector
located to the right of the control connector.
Flip open the plastic door marked 230V and remove the plastic
door.
Locate the 115V plug in the bag of accessory components and
insert the 115V plug into the mating connector. Make sure the
115V plug is pressed firmly into the mating connector. Without
the 115V plug, the motor will not start.
Operating the motor at 230 Vac with the 115V plug installed into the connector will cause significant
damage to the motor.
2. Insert the RESCUE
®
EZ13 motor into the mounting bracket. The belly-band can be positioned anywhere on
the motor shell except on the end bell (control). The preferred position is at the midpoint between the vents.
The RESCUE
®
EZ13 motor can be installed with the mounting bracket from the original ECM motor. If
a replacement bracket is needed, contact your authorized U.S. Motors
®
distributor.
Placing the belly-band on the control housing can damage the motor.
3. When mounting the motor and control into the belly-band ensure that the Drip Slot is positioned at or near
a 6 o’clock position to allow any condensation build-up to drain from the motor.