nokia
CONNECTING PEOPLE
PAGE 13 (25) Approved 1.0
CMO Sales and Marketing Customer Care EMEA
DJk
Service & Support Readiness, Repair Concepts CONFIDENTIAL 13.12.2004
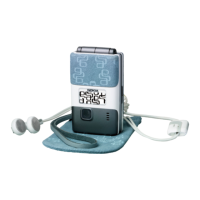
9.) Unlock the Domesheet Sidekey on both sides
carefully.
10.) Prevent damaging the IHF Frontvolume Gasket
when releasing the second sidekey clip.
11.) Lift up the Domesheet Sidekey with the dental
tool, beginning from the left side.
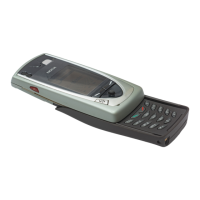
12.) Unscrew and remove the screws in the shown
order, for assembly use the reverse order, always use
new screws and a torque of 21 Ncm.
13.) Carefully separate the A-Frame Assy with the LCD,
take great care of the flex foil. Remove the film from
the LCD.
14.) Push out the LCD with a clean piece of cloth
carefully.
15.) Protect the LCD with a film. Put it onto the A-
Frame Assy, mind the flex foil.
16.) Unscrew the two screws in the shown order, mind
the flex foil. For assembly use the reverse order,
always use new screws and a torque of 21 Ncm.
Service Manual 7710 Level 1&2 Copyright © 2004 Nokia Corporation. All rights reserved.
 Loading...