Page 04/09
˙Remote – Operating Functions
˙Remote – Setting Function
FunctionNO. Description
1.Three ways to wake up Remote:
˙Vibration
˙Press button
˙Spin the remote ring
2.Remote will light up when awakened.
Wake Up Remote1
1. Press one or more Group button (1 to 5) to select shutter groups.
2.Groups can be deselected by pressing the Group button (1 to 5) again.
Select/
Deselect Group
2
1. Hold Group button (1 to 5) for 1 second.
2. The shutters assigned to the group will toggle.
Group Assignment
Check
3
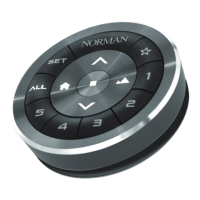
Refer to Button DefinitionsOperation Function4
FunctionNO. Description
Press SET button for 3 seconds. The remote will start blinking once is initiated.Initiate Setup Mode1
Either press SET button for 3 seconds or leave remote idle for 20 seconds.Exit Setup Mode2
Press Reset button for 1 second. The remote will start blinking once is initiated.Initiate Reset Mode3
Either press Reset button for 1 second or leave remote idle for 20 seconds.Exit Reset Mode4
1. Initiate Reset Mode.
2. Press Stop button for 3 seconds.
3. Remote LED will light for 3 seconds after factory reset is completed.
Factory Reset
[Note: User data saved on
the remote will be deleted.]
5
1. Trigger Copy Mode on the new Remote Press RESET hole with a paper clip for 1 second.
The white light will flash.
2. Upload settings from Original Remote to New Remote Press SET button for 3 seconds.
Press ALL button once.
3. New Remote will automatically exit Copy Mode once the information received.
Original Remote: Press SET button for 3 seconds to exit Setup Mode.
Copy Remote6
1. Get New Remote into Reset Mode, and place it near PerfectTilt
™
Motor Module.
2. Reboot one of the Motor Modules, pairing data will be sent.
3. Once Remote has received the pairing data, LED will turn on for 3 seconds and go
back to normal mode.
Backup Remote Data from
PerfectTilt
™
Motor Module
7
1. Select the desired group number for setup of favorite position, and hold down for Tilt
Upward button ( ) 1 second.
2. Move louvers by remote to desired favorite position.
3. Initiate Remote Setup Mode.
4. Press My Favorite button ( ) for favorite setting.
5. Louvers will move up and down once and blink for 1 second after My Favorite has
been set.
6. Exit Remote Setup Mode.
Setup My Favorite 8
˙Method 1
1. Select the desired group number for setup of horizontal position, and hold down for Tilt
Upward button ( ) 1 second.
2. Move the louvers to horizontal position by remote ring with spin anticlockwise direction.
[NOTE: The direction of operation MUST be from up to down. If direction was reversed,
please start over.]
3. Press Remote Reset button for 1 second to initiate Remote Reset Mode.
4. Select the desired group number for setup of horizontal position.
5. Press Best View button( ). Group button LED will turn off and middle buttons will blink
3 times. [NOTE: Best View won’t work if no groups are selected.]
6. Louvers move up and down once.
7. Press Remote Reset button for 1 second to exit Remote Reset Mode.
˙Method 2
1. Select the desired group number for setup of horizontal position, and hold down for Tilt
Downward button ( ) 1 second.
2. Move the louvers to horizontal position by hand. [NOTE: The direction of operation
MUST be from down to up. If direction was reversed, please start over.]
3. Press Remote Reset button for 1 second to initiate Remote Reset Mode.
4. Select the desired group number for setup of horizontal position.
5. Press Best View button( ). Group button LED will turn off and middle buttons will blink
3 times. [NOTE: Best View won’t work if no groups are selected.]
6. Louvers move up and down once.
7. Press Remote Reset button for 1 second to exit Remote Reset Mode.
Setup Louver
Horizontal Position
9
Delete/Clear Louver
Horizontal Position
10
1. Initiate Remote Reset Mode.
2. Select the group(s) you want to delete horizontal position.
3. Press Best Privacy button( ), group LED will turn off and middle buttons will blink
3 times. [NOTE: Best Privacy won’t work if no groups are selected.]
4. Louvers move up and down twice.
5. Press Remote Reset button for 1 second to exit Remote Reset Mode.
 Loading...