3. Product Functions
PerfectTilt
™
Motor Module
˙Module Button
FunctionNO. Description
1. On/Off: Power On/off PerfectTilt
™
Motor Module.
2. Initiate module pairing mode.
3. Reboot PerfectTilt
™
Motor Module.
Module
Button
1
Solar Panel
Module Butto
USB Port
˙PerfectTilt
™
Motor Module Functions
FunctionNO. Description
1. Hold the module button for 3 seconds when module
is powered off.
2. LED will blink in green for 1 second.
3. The panel will start calibrating automatically around
45 seconds.
Power on1
1. Hold the module button for 3 seconds when module
is powered on.
2. LED will blink in red for 1 second.
3. Module will power off.
Power off2
1. Press the module button to initiate pairing mode.LED
will blink, and louvers will move to horizontal position.
2. If no paring command received, motor module will
resume normal operation after 60 seconds.
Pair/Un-Pair3
1. User can charge motor module by Micro USB using a
5V/1A power bank or power supply. (Normally it takes
around 10 hours to recharge.)
2. Green LED will blink while charging and will completely
light green when fully charged.
3. Red LED on indicates the Motor Module charging
abnormal, please stop charging immediately.
USB charging5
1. Press and hold the module button for 10 seconds.
2. Motor module will power off.
3. Press the button again for 3 seconds.
4. Motor module will power on and start calibration.
Hardware
reboot
(in event of
Firmware
crash)
4
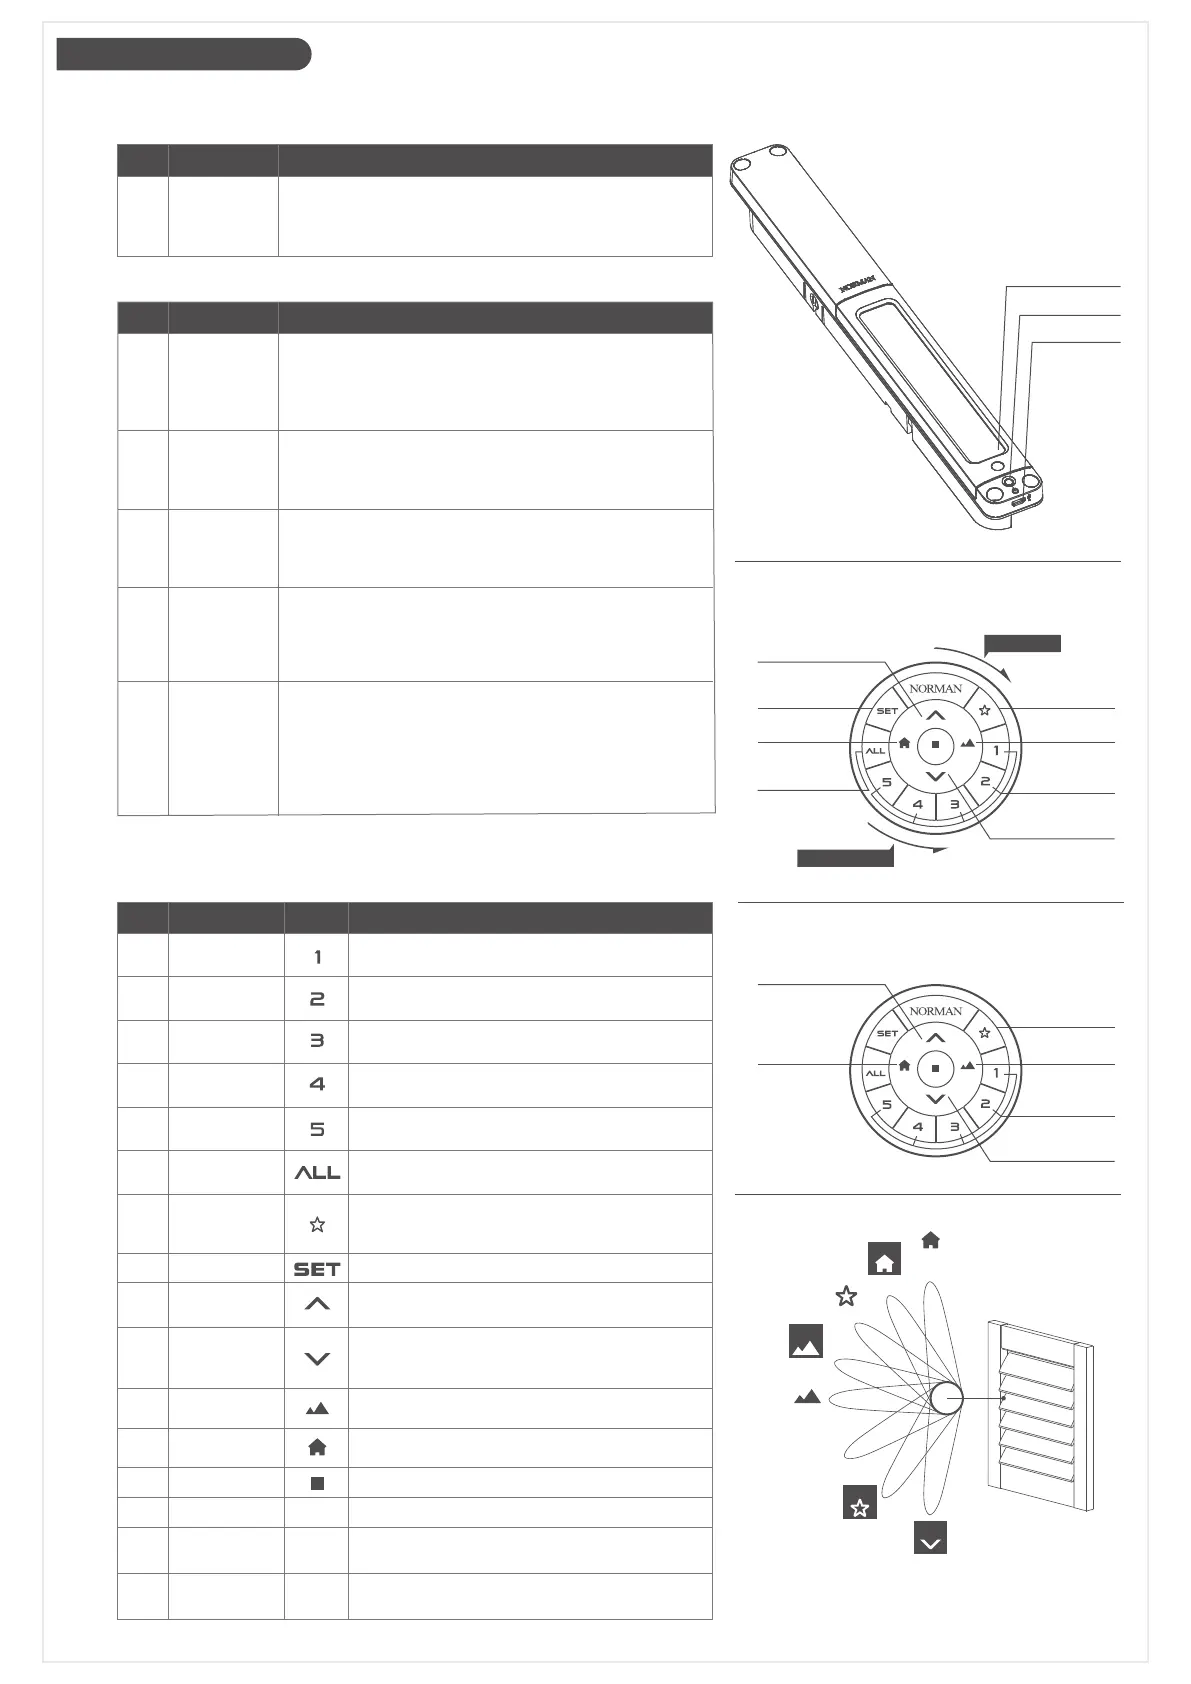
Function ButtonNO. Description
Select/Deselect Group 1,
hold to identify Group 1 shutters
Group11
Select/Deselect Group 2,
hold to identify Group 2 shutters
Group 22
Select/Deselect Group 3,
hold to identify Group 3 shutters
Group 33
Select/Deselect Group 5,
hold to identify Group 5 shutters
Select/Deselect Group ALL
Operate to favorite angle
(Press: Louver Position 2. Hold down for1 second:
Louver Position 6 as default.)
Setup Mode
Tilt louvers up one step.
Hold down for 1 second: Max Upward Tilt (Fully closed)
Tilt louvers down one step.
Hold down for 1 second: Max Downward Tilt
(Louver Position 7)
Press: Fully Open
Hold down for 1 second: Louver Position 3
Press: Fully closed
Hold down for 1 second: Louver Position 1
Stop movement
Reset Mode [Back side]
Spin to tilt louvers downward
Spin to tilt louvers upward
Group 5
Control
All Groups
Favorite
Setup
Tilt Upward
Tilt Downward
Best View
Best Privacy
Stop
Reset
Spin
anticlockwise
Ring
RESET
Ring
5
Select/Deselect Group 4,
hold to identify Group 4 shutters
Group 44
6
7
8
10
9
11
12
13
15
Spin
clockwise
16
14
Remote (SmartDial
™
)
˙Button Definitions
Best View
My Favorite
Tilt Downward
Control Group
1, 2, 3, 4 or 5
Control
All Groups
Tilt Upward
Best Privacy
Setup
STOP
Tilt Upward
Tilt Downward
THE JOY OF DIAL CONTROL
PRESET
ANGLES
Best
Privacy
Position 2
Position 5
Position 1
Hold Down
Position 3
Hold Down
Position 7
Hold Down
Position 6
Hold Down
Best View
Page 03/09
HOLD-DOWN FEATURES
Louver Tilts
to Position 3
Louver Tilts
to Position 6
Max Downward Tilt
Identify
Louver Group
Max Upward Tilt
Louver Tilts
to Position 1
 Loading...