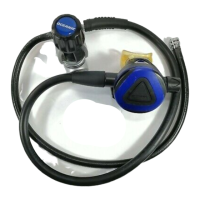
REGULATORS
DELTA II SECOND STAGE
© 2002 Design 1997
OCEANIC® Product Service Guide
Doc. 12-2223-r03 (10/3/10)
PG-10
R = Revision
4. Slowly open the valve to pressurize the regulator, and check
the test gauge to ensure that the intermediate pressure is set as
recommended in the specications for the rst stage being used.
NOTE: If the intermediate pressure is found to be other than
recommended, refer to that regulator's troubleshooting sec-
tion to determine possible cause and treatment.
TUNING
1. Prior to tuning the Delta II regulator, check the following items:
A. 2-3 threads on the shaft of the poppet should extend past
the outer surface of the locking nut inside the housing.
B. The front cover should be secure and properly aligned.
C. The adjustment knob should be turned counter clockwise,
1-1/2 turns from fully open or out.
D. Connect an In-Line Adjustment tool between the low pressure
hose and inlet coupling.
E. The mouthpiece should be cleaned and disinfected with
warm, soapy water.
2. Pressurize the regulator with a pure air source of 3,000PSI, and
listen to determine that a slight airow is initially present. If nec-
essary, use the In-Line Adjustment tool to turn the orice counter
clockwise, slightly out, to initiate this airow.
NOTE: While pressurized, the slotted blade of the In-Line
tool will be held away from the orice, and will therefore
need to be pushed inward and held while turning in either
direction. Locate the slotted head of the orice by touch
before attempting any adjustment.
3. Use the In-Line tool to turn the orice in clockwise using small
fractions of a turn just until airow is no longer present. Pause
to listen carefully for airow or leakage after each adjustment.
NOTE: Turning the orice in further than necessary to stop
airow will result in lever slack and excessive spring load
tension, prohibiting peak performance.
CAUTION: To avoid cutting the LP seat with the knife edge
of the orice,depress the purge button while turning the
orice in or out.
4. Hold the second stage with the mouthpiece facing directly down,
and gently shake up and down. Listen carefully for any rattle
that may be present, indicating lever slack. If found, perform the
following procedure:
A. Remove the front cover, diaphragm washer, and diaphragm
to gain access to the valve assembly.
B. Purge the regulator of air.
C. Depress the lever arm and hold to remove the inlet coupling
from the inlet tube, using a 3/4" open end wrench.