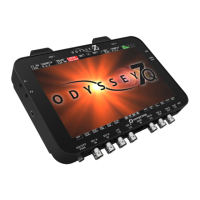
INTRODUCTION // READ THIS FIRST!
BEFORE YOU BEGIN USING THE ODYSSEY7Q, WE STRONGLY
SUGGEST YOU REVIEW THE INCLUDED QUICK START GUIDE. WE
ALSO STRONGLY RECOMMEND THE FOLLOWING:
1. Always record to the INTERNAL MEDIA OF THE CAMERA; this is critical for proper
timecode and ideal for dual media / backup.
2. DO NOT REMOVE THE FOUR SCREWS FROM REAR OF CASE. This may result in
damage to the OLED panel. Such damage is not covered by warranty.
3. Power and Cabling: Make sure you have PROPER POWER (6.5-34VDC), plugged in to
the proper power port (left side of recorder), and that 3G-rated SDI cables are used.
4. Power source must be able to provide up to 24 watts at all times to the Odyssey7Q.
5. When powering the Odyssey7Q from an ARRI ALEXA camera, we recommend using
the 24V R/S Fischer-3 output from the ALEXA using the optional Convergent Design
cable.
6. Familiarize yourself with the equipment and test prior to shooting.
7. Before using the SSDs it is IMPERATIVE TO FORMAT them in the Odyssey7Q.
Formatting SSD media is a DESTRUCTIVE PROCESS; any existing data will be lost
during format.
8. Ensure that the camera’s viewnder data is not being recorded; IF YOU SEE
VIEWFINDER DATA ON THE ODYSSEY7Q monitor, then it will be recorded! In a future
update, if your camera can provide both clean and data-overlayed video feeds, it will be
possible to monitor one while recording the other.
9. NEVER DELETE ANY FILES OFF AN SSD FROM A COMPUTER, except when going
through a rmware update procedure.
10. While we recommend that you always maintain the latest rmware on your Odyssey7Q,
WE DO NOT RECOMMEND UPDATING FIRMWARE IF YOU ARE IN THE MIDDLE OF
A SHOOT (unless specically instructed to do so by our Technical Support staff).
11. When ofoading media, ALWAYS MAKE A BACKUP COPY, ideally to a RAID1 drive.
12. Be sure to allow the Odyssey7Q to nish closing a Record le before taking any further
action.
13. Always safely eject SSD Media by pressing the button before removing SSD media
from the Odyssey7Q.
2