11
2.7 Initial Setup (Cont.)
2.7.3 Load Cell Capacity Information
Review the specifications of the scale base to be used with the Indicator. Make sure the settings you select in the
indicator are compatible with the scale base. Below is a Load Cell Scale Capacity (lb or kg) table. Use this table to
determine the settings of the Indicator based on the capacity and resolution of the scale base.
LOAD CELL SCALE CAPACITIES (LB OR Kg)
Grad
1000d 1200d 1500d 2000d 2500d 3000d 4000d 5000d 6000d 7500d 10000d 20000d
0.001 - - - - - - - 5 - - 10 20
0.002 - - - - - - - 10 - - 20 40
0.005 5 - - 10 - - - 20 25 30 50 100
0.005 5 6 7.5 10 12.5 15 20 25 30 37.5 50 100
0.01 10 - - 20 25 30 40 50 60 75 100 200
0.02 20 - 30 40 50 60 - 100 120 150 200 400
0.05 50 60 75 100 - 150 200 250 300 - 500 1000
0.1 100 120 150 200 250 300 400 500 600 750 1000 2000
0.2 200 - 300 400 500 600 - 1000 - 1500 2000 -
0.5 500 600 750 1000 - 1500 2000 2500 3000 - 5000 10000
1 1000 1200 1500 2000 2500 3000 4000 5000 - 7500 10000 20000
2 2000 - 3000 - 5000 - - 10000 - - 20000
-
5 5000 - 7500 10000 - - 20000 - - - - -
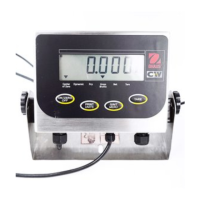
CD-11 Indicator
12
2.7 Initial Setup (Cont.)
2.7.4 Setup Menu
The CD-11 Indicator Setup Menu
must be entered the first time
the Indicator is used to set the scale base param-
eters to match the Indicator. Do not attempt to calibrate the Indicator before setting up the Setup Menu. All other
menus should be entered and set up the first time the Indicator is used.
Procedure
• With the Indicator ON, press and hold the Zero/Menu
button until MENU is displayed. When you release
Zero/Menu button, CAL is displayed when the CAL
jumper on the PC board is in place. When the CAL
jumper is removed, the Indicator will not permit cali-
bration. This jumper should be in place initially.
• Press Print/Units button, SETuP is displayed.
• Press Zero/Menu button, LFTOFF is displayed. legal
for trade selections are:
'ON' - LFT is ON
'OFF' - LFT is OFF.
• Press Print/Units button and select either ON or
OFF.
• Press Zero/Menu button, 0 2 is displayed. This is
the Zero 2%, 18% or 100% setting. 2% - zero opera-
tion range is - 2% to + 2%. 18% - zero operating
range is -2% to +18%, 100% - zero operation range
is -2% to +100%. NOTE: If LFT is ON, only 2% and
18% are available.
• Press Print/Units button, and select either 2%, 18% or
100%.
• Press Zero/Menu button, CAL Un kg is displayed.
This is the calibration unit setting. Selections are:
'lb' - calibration unit is lb
'kg' - calibration unit is kg.
• Press Print/Units button, and select either kg or lb.
• Press Zero/Menu, F xx is displayed. This is full
scale capacity selections. xx= value last set.
Selections are:
5, 10, 20, 25, 30, 40, 50, 60, 75, 100, 120, 200, 250,
300, 400, 500, 600, 750, 1000, 1500, 2000, 2500,
3000, 5000, 7500, 10000, 20000 (lb or kg).
• Press Print/Units button until desired capacity value
is reached.
• Press Zero/Menu button, Gd0.01 is displayed. This
is the graduation size. Refer to paragraph 2.7.3 Load
Cell Capacity Information table. For available selec-
tions, press Print/Units button until desired gradua-
tion value is reached.
• Press Zero/Menu button, CP 30 kg is displayed.
This is the full scale calibration point setting. The
range is from 20% to 100% Full scale capacity. Press
Print/Units button until desired calibration value is
reached.
• Press Zero/Menu button to end this block, END is
displayed.
• Press Zero/Menu button, rEAD is displayed which is
the next menu or press Print/Units button to return to
Setup menu.
The Indicator is now matched up with the scale base and
the Indicator parameters may now be set and calibrated.
CD-11 Indicator