17
Connecting Your Speakers
—Continued
The FRONT L/R and SURR BACK L/R terminal posts
can be used with front speakers and surround back
speakers respectively, or bi-amped to provide separate
tweeter and woofer feeds for front speakers, providing
improved bass and treble performance.
• When bi-amping is used, the AV receiver is able to
drive up to 5.1 speakers in the main room.
•For bi-amping, the FRONT L/R terminal posts con-
nect to the front speakers’ tweeter terminals. And the
SURR BACK L/R terminal posts connect to the front
speakers’ woofer terminals.
• Once you’ve completed the bi-amping connections
shown below and turned on the AV receiver, you must
set the Sp Type setting to Bi-Amp to enable bi-amping
(see page 38).
Important:
• When making the bi-amping connections, be sure
to remove the jumper bars that link the speakers’
tweeter (high) and woofer (low) terminals.
• Bi-amping can only be used with speakers that support
bi-amping. Refer to your speaker manual.
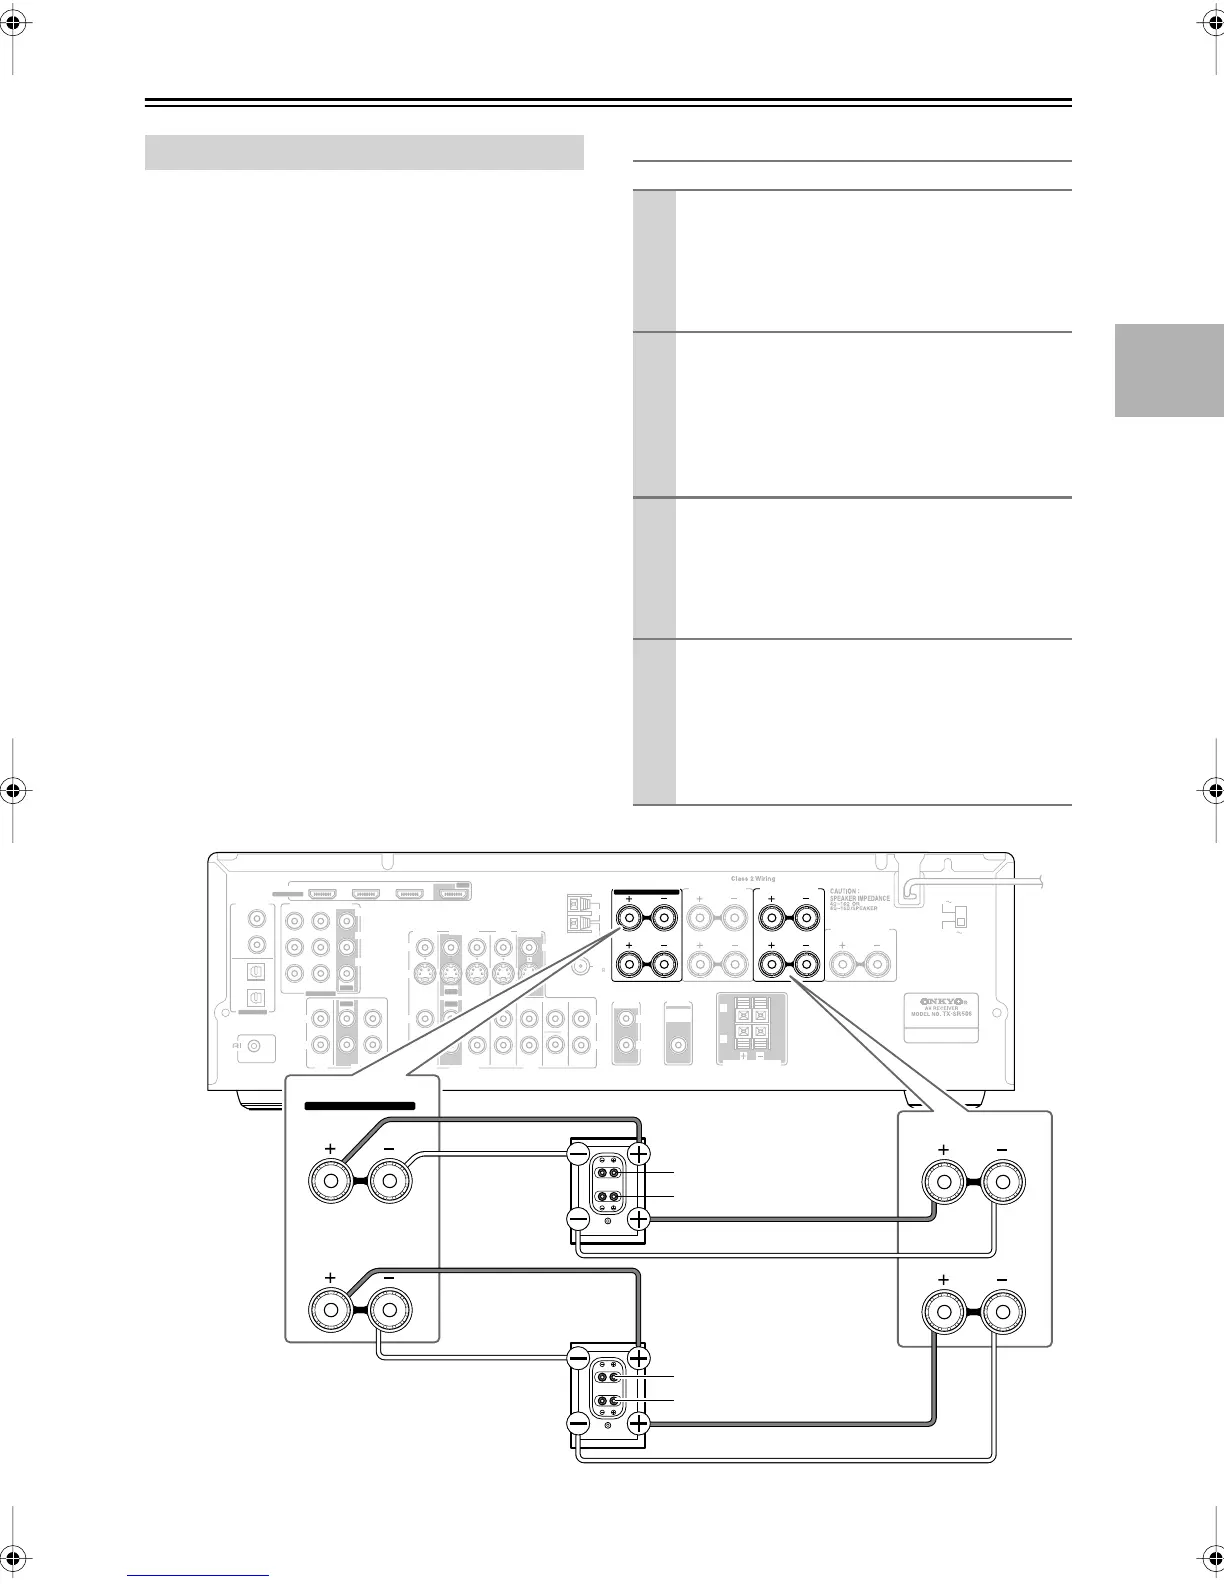
Bi-amping Speaker Hookup
Bi-amping Front Speakers
1
Connect the AV receiver’s FRONT R positive (+)
terminal to the right speaker’s positive (+) tweeter
(high) terminal. And connect the AV receiver’s
FRONT R negative (–) terminal to the right
speaker’s negative (–) tweeter (high) terminal.
2
Connect the AV receiver’s SURR BACK R posi-
tive (+) terminal to the right speaker’s positive (+)
woofer (low) terminal. And connect the AV
receiver’s SURR BACK R negative (–) terminal to
the right speaker’s negative (–) woofer (low) ter-
minal.
3
Connect the AV receiver’s FRONT L positive (+)
terminal to the left speaker’s positive (+) tweeter
(high) terminal. And connect the AV receiver’s
FRONT L negative (–) terminal to the left
speaker’s negative (–) tweeter (high) terminal.
4
Connect the AV receiver’s SURR BACK L posi-
tive (+) terminal to the left speaker’s positive (+)
woofer (low) terminal. And connect the AV
receiver’s SURR BACK L negative (–) terminal to
the left speaker’s negative (–) woofer (low) ter-
minal.
220-240V
VOLTAGE
SELECTOR
120V
IN IN
IN
IN
IN IN
IN
IN 1(DVD)IN 2
OUT
OUT
COMPONENT VIDEO
Y
C
B/PB
CR/PR
SUB
WOOFER
FRONT
SURR
SURR BACK
CENTER
CD
R
L
TAPE
CBL/SAT
CBL/SAT
VCR/DVR
VCR/DVR
DVD
DVD
R
L
R
L
R
L
R
L
S
V
MONITOR
OUT
S
V
PRE OUT
ZONE 2
LINE OUT
SUB
WOOFER
ZONE 2 SPEAKERS
REMOTE
CONTROL
L
R
L
R
SURR BACK SPEAKERS
SURR SPEAKERS
FRONT SPEAKERS
CENTER SPEAKER
ASSIGNABLE
COAXIAL
OPTICAL
1
(DVD)
2
(CBL/SAT)
1
(VCR/DVR)
2
(CD)
DIGITAL IN
ASSIGNABLE
ANTENNA
FM
AM
75
OUT
OUT
Bi-AMP for FRONT SPEAKERS
HDMI
IN 1
IN 2IN 3
ASSIGNABLE
OUT
L
R
FRONT SPEAKERS
L
R
SURR BACK SPEAKERS
Bi-AMP for FRONT SPEAKERS
Right speaker
Left speaker
Tweeter (high)
Woofer (low)
Tweeter (high)
Woofer (low)
TX-SR506En.book Page 17 Friday, February 29, 2008 5:31 PM
 Loading...