14
• Copying to your computer
Please notice that the video clips are recorded in MOV format and are
compiled as CLIPxxxx.mov (xxxx are four serial numbers).
Before viewing these videos on your PC, you may need to install
some media programs.
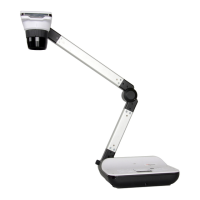
1. Turn on the document camera.
2. Connect the product to your computer with USB cable.
3. Press MENU (
) → select “USB Connect“ → choose “Disk“.
The built-in memory or external memory will be detected.
Then, You can view the image data on a SD card on the PC’s
viewer software or simply cut/copy and paste the file to your PC.
• Using product as a PC cam
1. Connect the product to your computer.
Turn on your computer, then connect the accessory USB cable to
the USB port of your computer.
Make sure the connector and the port are aligned correctly.
Switch to PC Cam mode.
Connect the other end of the USB cable to the main unit.
Power on press MENU (
) → Setting → select USB Connect →
select PC Cam (
) and press OK button to confirm.
2. Launch PC Camera
After the product is correctly connected to and detected by your
PC, you are ready to use PC Camera function.
• Connect via USB
Press MENU ( ) button → select "USB Connect".
Choose "Disk" to connect mass storage.
Choose "PC Cam" to use as a PC-Cam.
The USB flash drive can't be read in the disk mode, please insert the USB flash
drive directly to your computer to read the image data.