EasyManua.ls Logo

Orion COMBI 3601VT - Page 28

Orion COMBI 3601VT
69 pages
Print Icon
To Next Page IconTo Next Page
To Previous Page IconTo Previous Page
Loading...
MECHANICAL
ADJUSTMENTS
2-2:
CONFIRMATION
AND
ADJUSTMENT
OF
AUDIO/
CONTROL
HEAD
When
the
Tape
Running
Mechanism
does
not
work
well,
adjust
the
following
items.
1.
Playback
the
VHS
Alignment
Tape
(JG001C
or
JGOO1E).
(Refer
to
SERVICING
FIXTURE
AND
TOOLS)
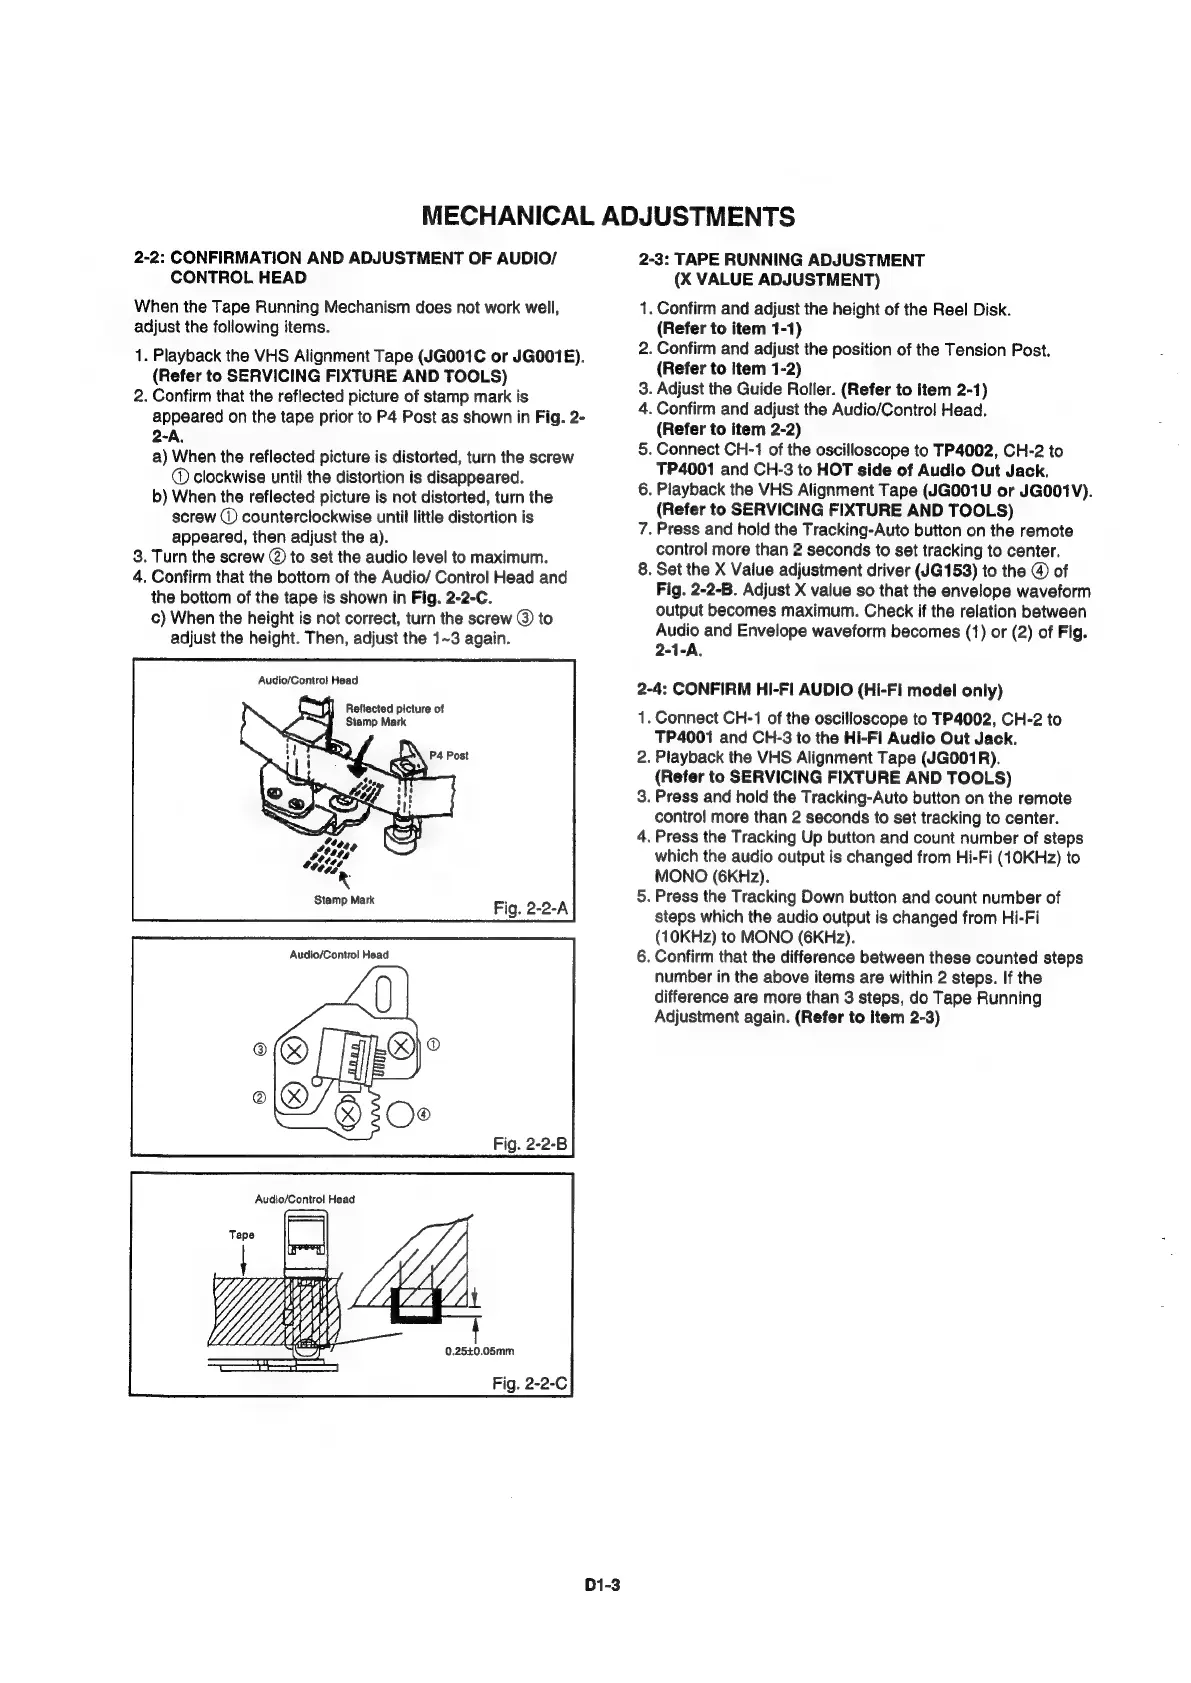
2.
Confirm
that
the
reflected
picture
of
stamp
mark
is
appeared
on
the
tape
prior
to
P4
Post
as
shown
in
Fig.
2-
2-A,
a)
When
the
reflected
picture
is
distorted,
turn
the
screw
@
clockwise
until
the
distortion
is
disappeared.
b)
When
the
reflected
picture
is
not
distorted,
turn
the
screw
@
counterclockwise
until
little
distortion
is
appeared,
then
adjust
the
a).
3.
Turn
the
screw
@
to
set
the
audio
level
to
maximum.
4.
Confirm
that
the
bottom
of
the
Audio/
Control
Head
and
the
bottom
of
the
tape
is
shown
in
Fig.
2-2-C.
c)
When
the
height
is
not
correct,
turn
the
screw
@
to
adjust
the
height.
Then,
adjust
the
1~3
again.
Audio/Contro!
Head
Reflected
picture
of
Stamp
Mark
Fig.
2-2-B
Ld
0.25£0.05mm
Fig.
2-2-C
D1-3
2-3:
TAPE
RUNNING
ADJUSTMENT
(X
VALUE
ADJUSTMENT)
1.
Confirm
and
adjust
the
height
of
the
Reel
Disk.
(Refer
to
item
1-1)
2.
Confirm
and
adjust
the
position
of
the
Tension
Post.
(Refer
to
Item
1-2)
3.
Adjust
the
Guide
Roller.
(Refer
to
item
2-1)
4.
Confirm
and
adjust
the
Audio/Contro!
Head.
(Refer
to
item
2-2)
5.
Connect
CH-1
of
the
oscilloscope
to
TP4002,
CH-2
to
TP4001
and
CH-3
to
HOT
side
of
Audio
Out
Jack.
6.
Playback
the
VHS
Alignment
Tape
(JGO01U
or
JGO0TV).
(Refer
to
SERVICING
FIXTURE
AND
TOOLS)
7.
Press
and
hold
the
Tracking-Auto
button
on
the
remote
control
more
than
2
seconds
to
set
tracking
to
center.
8.
Set
the
X
Value
adjustment
driver
(JG153)
to
the
@
of
Fig.
2-2-B.
Adjust
X
value
so
that
the
envelope
waveform
output
becomes
maximum.
Check
if
the
relation
between
Audio
and
Envelope
waveform
becomes
(1)
or
(2)
of
Fig.
2-1-A.
2-4:
CONFIRM
HI-FI
AUDIO
(Hi-Fi
model
only)
1.
Connect
CH-1
of
the
oscilloscope
to
TP4002,
CH-2
to
TP4001
and
CH-3
to
the
Hi-Fi
Audio
Out
Jack.
2.
Playback
the
VHS
Alignment
Tape
(JGO01R).
(Refer
to
SERVICING
FIXTURE
AND
TOOLS)
3.
Press
and
hold
the
Tracking-Auto
button
on
the
remote
control
more
than
2
seconds
to
set
tracking
to
center.
4.
Press
the
Tracking
Up
button
and
count
number
of
steps
which
the
audio
output
is
changed
from
Hi-Fi
(10KHz)
to
MONO
(6KHz).
5.
Press
the
Tracking
Down
button
and
count
number
of
steps
which
the
audio
output
is
changed
from
Hi-Fi
(10KHz)
to
MONO
(6KHz).
6.
Confirm
that
the
difference
between
these
counted
steps
number
in
the
above
items
are
within
2
steps.
If
the
difference
are
more
than
3
steps,
do
Tape
Running
Adjustment
again.
(Refer
to
item
2-3)