EasyManua.ls Logo

Orion COMBI 3601VT - Purity and Convergence Adjustments

Orion COMBI 3601VT
69 pages
Print Icon
To Next Page IconTo Next Page
To Previous Page IconTo Previous Page
Loading...
ELECTRICAL
ADJUSTMENTS
4.
PURITY
AND
CONVERGENCE
4-3:
STATIC
CONVERGENCE
ADJUSTMENTS
NOTE
NOTE
Adjust
after
performing
adjustments
in
section
4-2.
1.
Turn
the
unit
on
and
let
it
warm
up
for
at
least
30
1.
Receive
the
crosshatch
pattern
from
the
color
bar
minutes
before
performing
the
following
adjustments.
generator
:
2.
Place
the
CRT
surface
facing
east
or
west
to
reduce
the
2.
Combine
red
and
blue
of
the
3
color
crosshatch
pattern
terrestrial
magnetism.
on
the
center
of
the
screen
by
adjusting
the
pair
of
4
3.
Turn
ON
the
unit
and
demagnetize
with
a
Degauss
Coil.
pole
magnets.
3.
Combine
red/blue
(magenta)
and
green
by
adjusting
the
4-1:
STATIC
CONVERGENCE
(ROUGH
ADJUSTMENT)
pair
of
6
pole
magnets.
1.
Tighten
the
screw
for
the
magnet.
Refer
to
the
adjusted
CRT
for
the
position.
(Refer
to
Fig.
4-1)
4-4:
DYNAMIC
CONVERGENCE
If
the
deflection
yoke
and
magnet
are
in
one
body,
NOTE
untighten
the
screw
for
the
body.
2.
Receive
the
green
raster
pattern
from
the
color
bar
Adjust
after
performing
adjustments
in
section
4-3.
generator.
F
;
F
3.
Slide
the
deflection
yoke
until
it
touches
the
funnel
side
-
Satta
Sloot
ete
ae
or
of
the
CRT.
;
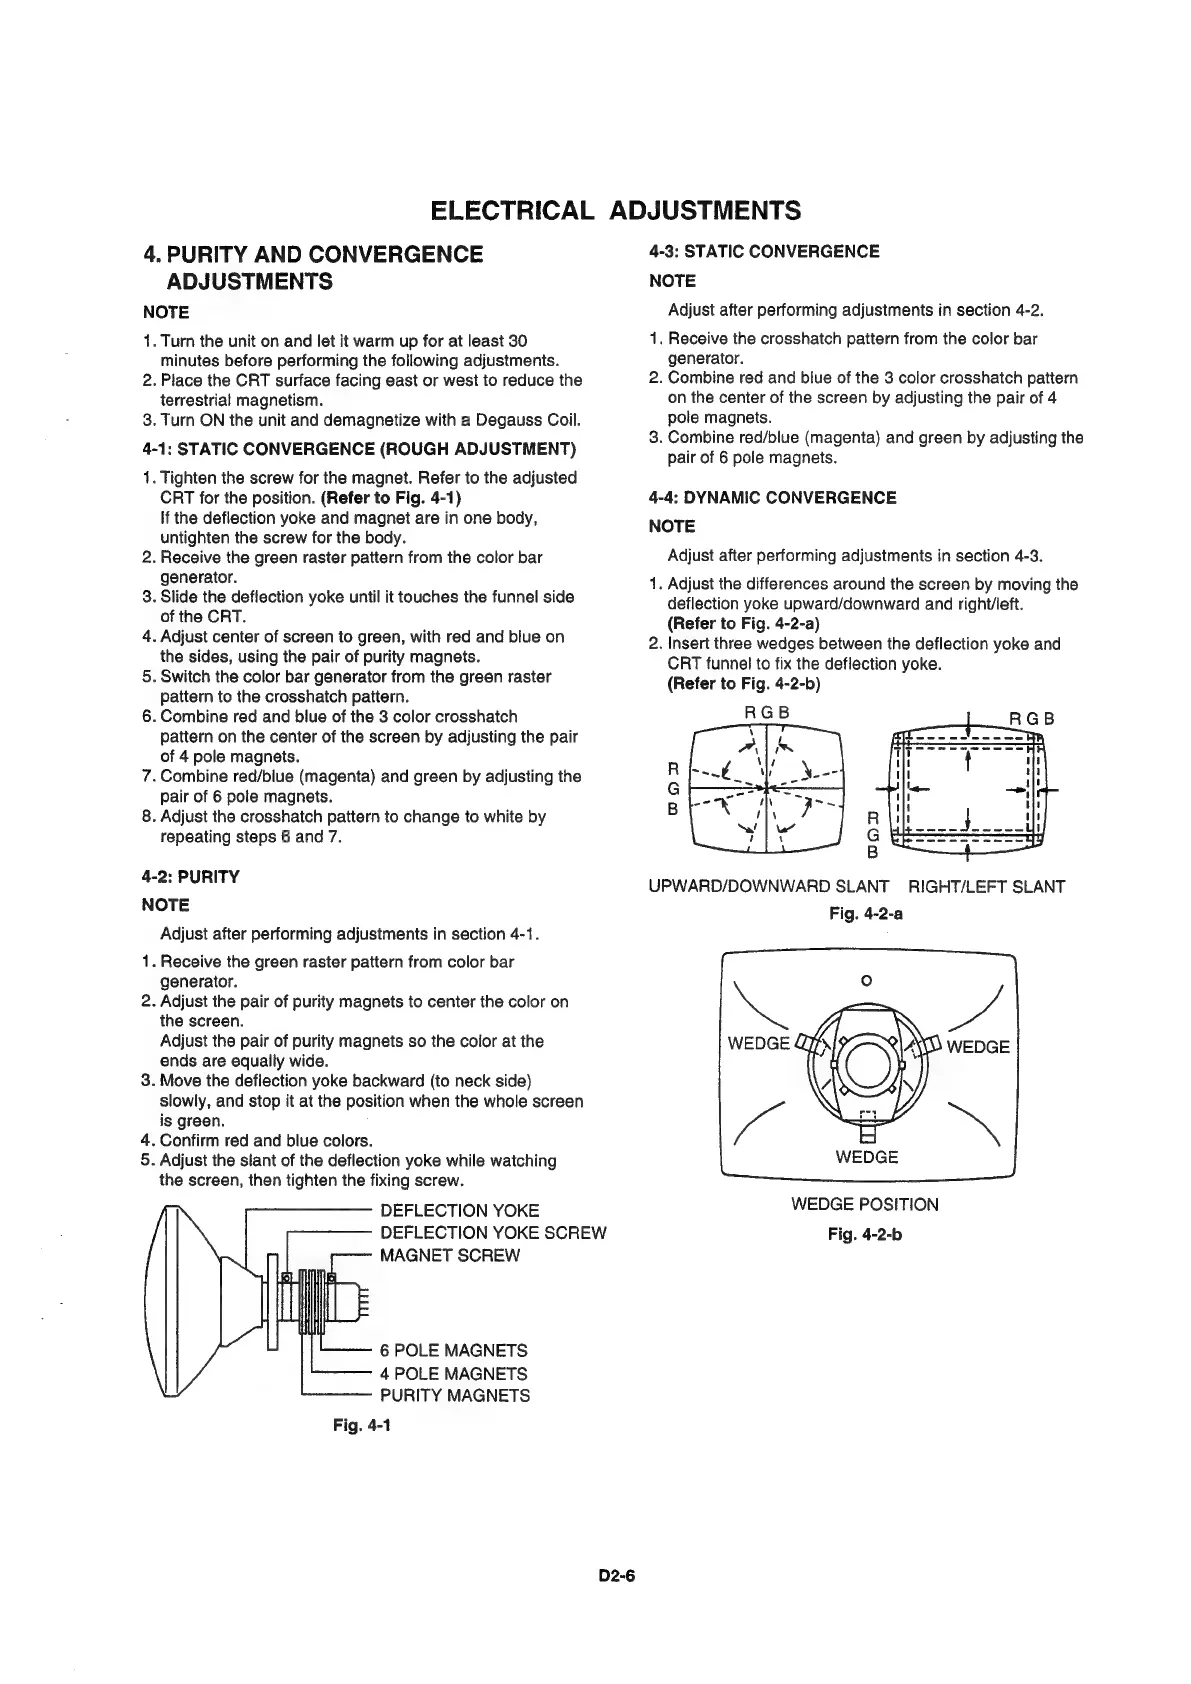
(Refer
to
Fig.
4-2-a)
4.
Adjust
center
of
screen
to
green,
with
red
and
blue
on
2.
Insert
three
wedges
between
the
deflection
yoke
and
the
sides,
using
the
pair
of
purity
magnets.
CRT
funnel
to
fix
the
deflection
yoke.
5.
Switch
the
color
bar
generator
from
the
green
raster
(Refer
to
Fig.
4-2-b)
pattern
to
the
crosshatch
pattern.
6.
Combine
red
and
blue
of
the
3
color
crosshatch
RGB
pattern
on
the
center
of
the
screen
by
adjusting
the
pair
of
4
pole
magnets.
7.
Combine
red/blue
(magenta)
and
green
by
adjusting
the
pair
of
6
pole
magnets.
8.
Adjust
the
crosshatch
pattern
to
change
to
white
by
repeating
steps
6
and
7.
eee
PURITY.
UPWARD/DOWNWARD
SLANT
RIGHT/LEFT
SLANT
NOTE
Fig.
4-2-a
Adjust
after
performing
adjustments
in
section
4-1.
1.
Receive
the
green
raster
pattern
from
color
bar
generator.
2.
Adjust
the
pair
of
purity
magnets
to
center
the
color
on
the
screen.
Adjust
the
pair
of
purity
magnets
so
the
color
at
the
ends
are
equally
wide.
3.
Move
the
deflection
yoke
backward
(to
neck
side)
slowly,
and
stop
it
at
the
position
when
the
whole
screen
is
green.
4.
Confirm
red
and
blue
colors.
5.
Adjust
the
slant
of
the
deflection
yoke
while
watching
the
screen,
then
tighten
the
fixing
screw.
DEFLECTION
YOKE
WEDGE
POSITION
DEFLECTION
YOKE
SCREW
Fig.
4-2-b
MAGNET
SCREW
6
POLE
MAGNETS
4
POLE
MAGNETS
PURITY
MAGNETS
Fig.
4-1
D2-6