24 pages 105mm x 148mm (A6) 160gsm Gloss Art Stock 4 colour process double sidedDC55HA Series 2 - CPIN005156/4
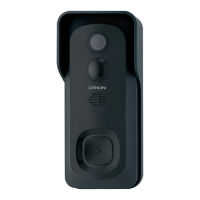
1.2m Ideal
Mounting Height
Wi-Fi Coverage
Camera Field
of View 140˚
Motion Detection
Range up to 8m
FIG. 01
16
Before choosing your location, check the Wi-Fi strength/coverage in that area.
IMPORTANT: Do not mount the doorbell unit on metal or near metal door
frames, security door, or proximity any metal door furniture. It might affect
the functionality of the doorbell.
Do not place doorbell at direct sunlight or extreme weather.
Please note below image for doorbell angle view. Install it in
a suitable location with Wi-Fi coverage (Fig.01).
CHARGING DEVICE
1. Plug DC power adaptor into a power
source and connect it with doorbell using
provided USB cable (Fig.02 & 03).
2. During charging, the charging indicator
should turn red and will turn blue when
fully charged. We suggest charging the
doorbell for 6-8 hours before installation.
17
11 CHARGING & INSTALLATION
Note:
• This doorbell requires network device (e.g. wireless/non-wireless router, network
switch etc.) that is connected to internet or internal network for setup and use.
Network device is not supplied with this kit.
• This doorbell might experience network, motion command and live transmission
delay issues. This is normal, due to the connected network, 3G/4G mobile network,
server overow or internet upstream speed, download speed and video resolution.
To reduce delay, it is recommended to reduce the video quality, or contact your
mobile/network service provider.
INSTALLATION
Note: Product should be fully charged
before installation.
1. Mark screw position through the bracket
holes (Fig.04).
2. Fix the mounting bracket on the wall by
using the included screws and wall plugs.
3. Install the doorbell to the bracket and
secure with the included grub screw and
screwdriver (Fig.05).
Wall Mount
Wall
Plugs
Mounting
Screw
Mounting
Screw
Grub
Screw
FIG. 04
FIG. 05
DC Power
Adaptor
Micro USB
Cable
FIG. 02
FIG. 03
 Loading...