If it is found that there is damage to the appearance of the instrument, or
the instrument can not work normally, or fails in the performance test,
please get in touch with our distributor responsible for this business or
our local offices. If there is damage to the instrument caused by the
transportation, please keep the package. With the transportation
department or our distributor responsible for this business informed
about it, a repairing or replacement of the instrument will be arranged by
us.
3.3 Power Inspection
(1) Use the power cord supplied with the accessories to connect the
instrument to the AC power.
(2) Press the power button on the front panel, the button light will be on, and
the startup screen will be displayed on the screen.
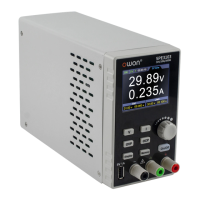
3.4 Output Inspection
Output inspection is to ensure that the instrument can achieve its rated outputs
and properly respond to operation from the front panel. For the procedures
below, it is suggested that you read "Turn On/Off the Channel Output" on page
8 and "Set the Output Voltage/Current" on page 8.
3.4.1 Voltage Output Inspection
The following steps verify basic voltage functions without load:
(1) When the instrument is under no load, select a channel and ensure the
output current setting for this channel is not at zero.
(2) Turn on the channel output, then ensure the channel is in Constant
Voltage output mode.
(3) Set some different voltage values on this channel; check if the actual
voltage value displayed is close to the set voltage value, and also that the
actual current value displayed is nearly to zero.
(4) Check that if the output voltage can be adjusted from zero to the maximum
rating, When it is set to the maximum or minimum, a beep is heard,
indicating that the limit has been reached.
3.4.2 Current Output Inspection
 Loading...