18
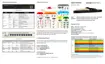
5. For the Incoming Interface, we will select the WAN port being used. We will use wan1 in our
example. Enter All as the Source Address. This will tell the router to allow connections from any
public IPs through for this policy. Outgoing Interface refers to the interface the destination
device is on. In our example, the IP camera is on the internal network so we will select internal.
Leave the Source Users and Source Device Type fields blank.
The Destination Address is the device that we are forwarding the port to. In our example, we
will select the virtual IP that we created earlier. Schedule allows us to select a time at which the
policy will be active. In our example, we will select always. Service allows us to specify the
allowed port for this policy. We select ACCEPT as the Action. The Enable NAT option would
allow the router to perform a network address translation on this policy when the traffic is
coming into the router from the internet. We normally don’t need this so we will leave it
disabled. We will leave logging and traffic shaping disabled. Make sure that Enable this policy is
set to on. Click OK. Port Forwarding is now complete.