EasyManua.ls Logo

Panasonic FX-301 Series - User Manual

Panasonic FX-301 Series
9 pages
Print Icon
To Next Page IconTo Next Page
Loading...
1
n
MEUML-FX301 V1.1
Thank you for purchasing products from Panasonic Electric Works SUNX
Co., Ltd. Please read this Instruction Manual carefully and thoroughly for
the correct and optimum use of this product. Kindly keep this manual in a
convenient place for quick reference.
1
For further details on the fiber sensor amplifier, please refer to our
Web site: www.panasonic-electric-works.com, or contact our office.
This product has been developed / produced for industrial use only.
Make sure to carry out wiring with the power OFF.
Verify that the supply voltage including the ripple is within the rating.
Do not connect the sensor to voltage that exceeds the rated range or
directly to an AC power supply: it may damage or burn the sensor.
Incorrect wiring or short-circuiting the load may damage or burn the
sensor.
When the emitting level function is turned from OFF to ON for any level,
the output may be unstable. Do not use the output control for at least
0.5s after starting emission. (See “PRO1” on page 6.)
If power is supplied from a commercial switching regulator, ensure that
the frame ground (F.G.) terminal of the power supply is connected to an
actual ground.
In case noise generating equipment (switching regulator, inverter motor,
etc.) is used in the vicinity of this product, connect the frame ground
(F.G.) terminal of the equipment to an actual ground.
Do not run the wires together with high-voltage lines or power lines or put
them in the same raceway. This can cause malfunction due to induction.
Do not use during the initial transient time (0.5s) after the power supply is
switched on.
This sensor is suitable for indoor use only.
You can extend the cable up to 100m max. with 0.3mm
2
or more cable. If
5 to 8 units are connected in cascade, the limit is 50m; for 9 to 16 units in
cascade, 20m. However, in order to reduce noise, make the wiring as
short as possible.
Note that extending the cable increases the residual voltage.
Be sure to use the optional quick-connection cable when connecting to
the connector type sensor FX-301(P).
Avoid dust, dirt and steam.
Take care that the sensor does not come in contact with oil, grease,
organic solvents such as thinner, etc., strong acid, or alkaline.
Do not use this sensor in an environment containing inflammable or
explosive gases.
Never disassemble or modify the sensor.
You may break the spring hook if you do not follow the mounting
instructions carefully.
How to mount the amplifier
How to remove the amplifier
INSTRUCTION MANUAL
Photoelectric Sensor Digital Fiber Sensor
FX-301 Series
1
The digital fiber sensor FX-301(P) has been modified since production in June,
2004. Hence, this instruction manual has been changed to reflect the modifica-
tions.
WARNING
Never use this product as a sensing device for personnel protection.
In case of using sensing devices for personnel protection, use
products which meet laws and standards, such as OSHA, ANSI or IEC
etc., for personnel protection applicable in each region or country.
1 CAUTIONS
2 PART DESCRIPTION
No. Part Description
Q Operation indicator
(orange)
Lit when output is on.
W Stability indicator
(green)
Lit when detection is stable according
to the parameters set.
E RUN mode indica-
tor (green)
Lit when FX-301 is in RUN mode.
R TEACH mode indi-
cator (yellow)
Lit when FX-301 is in TEACH mode.
T ADJ mode indicator
(yellow)
Lit when FX-301 is in ADJ (threshold
value adjustment) mode.
Y Digital display (red) Displays incident light intensity under
normal circumstances. Also displays
sub-modes and settings.
U L/D mode indicator
(yellow)
Lit when FX-301 is in L/D mode (Light-
ON, Dark-ON) mode.
I TIMER mode indica-
tor (yellow)
Lit when FX-301 is in TIMER mode.
O PRO mode indica-
tor (yellow)
Lit when FX-301 is in PRO mode.
P Jog switch The jog switch allows you to select the
various sub-modes and confirm set-
tings.
{ Mode key The mode key allows you to switch
from mode to mode, or to cancel set-
tings and return to RUN mode.
3 MOUNTING
1 Fit the spring hook on a 35mm DIN rail and
push forward.
2 Slip the front part of the mounting section over
the DIN rail and release.
1 Push the amplifier forward
2 Lift up the front part of the amplifier.
RUN
TEACH
ADJ
MODE
CANCEL
PUSH
TIMER
WE OIYUTRPQ{
Ԙ
ԙ
35mm
1
2
Question and Answer IconNeed help?

Do you have a question about the Panasonic FX-301 Series and is the answer not in the manual?

Summary

Warning and Precautions

Part Description

Operation Indicator

Orange indicator that lights up when the output is on.

Stability Indicator

Green indicator that lights up when detection is stable according to parameters.

RUN Mode Indicator

Green indicator that lights up when the FX-301 is in RUN mode.

TEACH Mode Indicator

Yellow indicator that lights up when the FX-301 is in TEACH mode.

ADJ Mode Indicator

Yellow indicator for ADJ (threshold value adjustment) mode.

Digital Display

Red display showing incident light intensity and sub-mode settings.

L;D Mode Indicator

Yellow indicator for Light-ON/Dark-ON mode.

TIMER Mode Indicator

Yellow indicator that lights up when the FX-301 is in TIMER mode.

PRO Mode Indicator

Yellow indicator that lights up when the FX-301 is in PRO mode.

Jog Switch

Switch to select sub-modes and confirm settings.

Mode Key

Key to switch modes or cancel settings and return to RUN mode.

Mounting and Dismounting

How to Mount the Amplifier

Instructions for attaching the amplifier to a 35mm DIN rail.

How to Remove the Amplifier

Steps for detaching the amplifier from the DIN rail.

Connecting the Fiber Cable

Fiber Cable Insertion

Steps to correctly insert fiber cables into the amplifier inlets.

Wiring Procedures

Connection Method

Aligning the projection and inserting the connector until it clicks.

Disconnection Method

Procedure to safely disconnect the quick-connection cable.

Cascading Amplifiers

Cascade Mounting

Mounting multiple amplifiers in sequence on a DIN rail.

Cascade Dismantling

Steps to remove cascaded amplifiers from the DIN rail.

I;O Circuit Diagrams and Terminals

Terminal Arrangement

Diagram showing terminal connections for the FX-301 connector type.

NPN Output Type Wiring

Circuit diagram for NPN output type sensors.

PNP Output Type Wiring

Circuit diagram for PNP output type sensors.

Operation Procedure and Navigation

Navi Mode Operation

Sequence of modes navigated via MODE and Jog switches.

General Navigation Tips

Tips for switching modes and returning to RUN mode.

Teaching Modes

2-Point Teaching

Sets threshold by teaching object present and absent conditions.

Limit Teaching

Sets threshold for object absent condition for stable light.

Full-Auto Teaching

Sets threshold values without stopping the assembly line.

Threshold Value Adjustment

ADJ Mode Operation

Fine adjustment of the threshold value using the jog switch.

Output Operation Mode

Light-ON; Dark-ON Selection

Selects between Light-ON or Dark-ON output operation.

Timer Operation Mode

Timer Mode Selection

Choose between no timer, one-shot, ON-delay, or OFF-delay timers.

PRO Mode Settings

PRO1: Response Time and Stability

Settings for response time, stability, and emission levels.

PRO2: Display Control

Controls for digital display, peak/bottom hold, and ECO mode.

PRO3: Configuration Data Management

Load and save configuration settings to/from data banks.

PRO4: Communication Configuration

Configure communication with sub units.

PRO5: Lock Functions and Reset

Adjust lock functions and reset the unit.

Key Lock Function

Error Indication

Unit Versions

Specifications

Overview

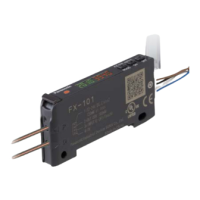
The Panasonic FX-301 Series is a range of photoelectric and digital fiber sensors designed for industrial applications. This instruction manual provides comprehensive details on its function, technical specifications, usage, and maintenance.

Function Description

The FX-301 Series sensors are primarily used for sensing applications in industrial environments. They feature a digital display that shows incident light intensity, sub-modes, and settings, along with various indicators for operation, stability, and different modes (RUN, TEACH, ADJ, L/D, TIMER, PRO). The device allows for precise threshold value adjustment, output operation selection (Light-ON or Dark-ON), and configurable timer functions. It also incorporates an interference prevention function, allowing multiple units to be mounted adjacently without mutual interference.

Modes of Operation:

  • RUN Mode: Normal sensing operation, displaying incident light intensity and the current threshold value.
  • TEACH Mode: Used for setting the threshold value through "2-point teaching," "limit teaching," or "full-auto teaching."
    • 2-point teaching: Sets the threshold based on both object present and object absent conditions, with the threshold value set halfway between the two incident light intensities.
    • Limit teaching: Sets the threshold value for the object absent condition only, useful for detecting objects in the presence of a background or small objects. The shift amount for the threshold can be adjusted.
    • Full-auto teaching: Sets the threshold value without stopping the assembly line, by continuously pressing the jog switch while the sensor samples incident light.
  • ADJ Mode: Allows for fine adjustment of the threshold value, increasing or decreasing sensitivity.
  • L/D Mode: Configures the output operation to either Light-ON or Dark-ON.
  • TIMER Mode: Configures various timer operations including no timer, one-shot timer, ON-delay timer, and OFF-delay timer. The timer interval can be set in PRO1 mode.
  • PRO Mode: Provides access to various detailed settings organized into sub-modes (PRO1, PRO2, PRO3, PRO4, PRO5).
    • PRO1: Includes settings for response time (Ultra high speed, Fast, Reduced intensity, Standard, Long-range), timer delay functions (ON-delay, OFF-delay, One-shot), hysteresis (Small, Standard, Large), margin width (±5%, ±10%, ±15%), shift for limit teaching (0-80% in 5% increments), and emission level (Level 1 to 4, or emission halt).
    • PRO2: Controls digital display settings (incident light intensity, percent above threshold, peak hold, bottom hold), digital display inversion, and ECO mode (ON/OFF).
    • PRO3: Manages data bank load and save settings.
    • PRO4: Offers settings for copying conditions, remote data bank load/save, communication lock, and backup.
    • PRO5: Includes code setting, adjust lock, and reset functions.

Important Technical Specifications

  • Supply Voltage: 12 to 24V DC ± 10% (Ripple P-P 10% or less).
  • Power Consumption:
    • Normal operation: 960mW or less (Current consumption 40mA or less at 24V supply voltage).
    • ECO mode: 600mW or less (Current consumption 25mA or less at 24V supply voltage).
  • Output:
    • NPN Output Type (FX-301, FX-301-C1): NPN open-collector transistor, maximum sink current 100mA, applied voltage 30V DC or less (between output and 0V), residual voltage 1.5V or less (at 100mA sink current).
    • PNP Output Type (FX-301P, FX-301P-C1): PNP open-collector transistor, maximum source current 100mA, applied voltage 30V DC or less (between output and +V), residual voltage 1.5V or less (at 100mA source current).
    • Output Operation: Light-ON or Dark-ON, selectable.
    • Short-circuit Protection: Incorporated.
  • Response Time: Selectable in PRO1 mode.
    • H-SP: 65µs or less.
    • FAST: 150µs or less.
    • S-D: 250µs or less.
    • STD: 250µs or less.
    • LONG: 2ms or less.
  • Display: 4-digit red LED display.
  • Sensitivity Setting: 2-point teaching, limit teaching, full-auto teaching, manual adjustment.
  • Sensitivity Adjustment Function: Incorporated.
  • Timer Function: Incorporated. Available modes: off, ON-delay, OFF-delay, ONE-SHOT timer. Timer interval range: approx. 0.5 to 9999ms.
  • Interference Prevention Function: Incorporated. Up to four fibers can be mounted adjacently. For H-SP response time, the maximum is two fibers.
  • Ambient Temperature:
    • 1 to 3 units in cascade: -10 to +55°C.
    • 4 to 7 units in cascade: -10 to +50°C.
    • 8 to 16 units in cascade: -10 to +45°C.
    • No dew condensation or icing allowed.
    • Storage: -20 to +70°C.
  • Ambient Humidity: 35 to 85% RH. Storage: 35 to 85% RH.
  • Emitting Element: Red LED (modulated).
  • Material: Enclosure: Heat-resistant ABS. Transparent cover: Polycarbonate. Mode key: Acrylic. Jog switch: Heat-resistant ABS.
  • Cable: 0.3mm² 3-core cabtyre cable, 1m long.
  • Weight: Approx. 20g (sensor), Approx. 60g (cable type).
  • Accessory: FX-MB1 (Amplifier protection seal): 1 set.

Usage Features

  • Mounting: The amplifier can be easily mounted on a 35mm DIN rail by fitting the spring hook and pushing forward, then slipping the front part of the mounting section over the DIN rail. Removal involves pushing the amplifier forward and lifting the front part.
  • Fiber Cable Connection: Fibers are inserted into the amplifier after fitting attachments. The fiber lock lever is snapped down, cables are slowly inserted until they stop, and then the lever is returned to the original position. For coaxial reflective type fibers, specific inlets ("P" for single-core, "D" for multi-core) must be used to avoid performance deterioration.
  • Wiring: Quick-connection cables are used for wiring. Ensure the power supply is off during connection/disconnection. Align the projection with the groove and insert until it clicks. To disconnect, press the projection and gently pull.
  • Cascading: Up to 16 amplifiers can be connected in cascade on a DIN rail. Optional end plates (MS-DIN-E) are used to prevent movement. Sub cables (CN-71-C1, CN-71-C2, CN-71-C5) are used for connecting more than two amplifiers. When mounting modified and conventional version units, modified units should be placed to the right of conventional units as viewed from the connector side.
  • Navigation: The device uses a "MODE" key and a "jog switch" for navigation. The MODE key switches between modes and returns to RUN mode (long press). The jog switch confirms settings and navigates between sub-modes.
  • Key Lock Function: Prevents accidental changes to settings. Activated by pressing + jog switch for at least 2s in RUN mode. When locked, only threshold value confirmation and adjustment functions are valid.
  • Error Indication: Displays error codes (e.g., "Er-1" for short-circuit, "Er-5" for communication error in cascade) to indicate issues.

Maintenance Features

  • Cautions:
    • Not for personnel protection.
    • Wiring must be done with power off.
    • Verify supply voltage is within rating.
    • Avoid connecting to excessive voltage or AC power.
    • Prevent incorrect wiring or short-circuiting.
    • Ensure stable output after emitting level changes (wait at least 0.5s).
    • Connect frame ground (F.G.) of power supply and noise-generating equipment to actual ground.
    • Avoid running wires with high-voltage or power lines.
    • Do not use during initial transient time (0.5s) after power supply switch-on.
    • Suitable for indoor use only.
    • Cable extension limits: up to 100m for single unit, 50m for 5-8 units in cascade, 20m for 9-16 units in cascade (use shortest possible wiring to reduce noise).
    • Use optional quick-connection cables for connector type sensors.
    • Avoid dust, dirt, steam, oil, grease, organic solvents, strong acid, or alkaline contact.
    • Do not use in inflammable or explosive gas environments.
    • Do not disassemble or modify the sensor.
  • Error Troubleshooting: The manual provides measures for displayed error codes, such as turning off power and checking the load for "Er-1," or checking amplifier contact for "Er-5."

Panasonic FX-301 Series Specifications

General IconGeneral
BrandPanasonic
ModelFX-301 Series
CategoryAccessories
LanguageEnglish

Related product manuals