14
PROG.AE OFF
57
N½¼
RETURN ---- YES
PROGRESSIVE OFF ON AUTO
D.ZOOM
CINEMA
OFF 20 100
CAMERA SETUP
PRESS MENU TO EXIT
1)
2)
3)
4)
5)
6)
7)
8)
9)
10)
DATE/TIME
C.DISPLAY COUNTER MEMORY
TIME CODE
RETURN ---- YES
OFF TIME DATE
C.RESET ---- YES
DISPLAY ALL PARTIAL OFF
LCD/EVF SET
LCD MODE NORMAL BRIGHT
---- YES
DISPLAY SETUP
PRESS MENU TO EXIT
23)
24)
25)
26)
27)
28)
REC-SPEED
AUDIO REC 12bit
16bit
RETURN ---- YES
SP LP
SCENE INDEX 2HOUR DAY
WIND CUT OFF ON
RECORDING SETUP
PRESS
MENU TO EXIT
REMOTE
REC LAMP OFF ON
RETURN ---- YES
VCR1 VCR2 OFF
BEEP SOUND OFF ON
SHTR EFFECT OFF ON
SELFSHOOT NORMAL MIRROR
CLOCK SET
---- YES
OTHER FUNCTIONS
PRESS MENU TO EXIT
15)
16)
17)
18)
29)
30)
31)
32)
33)
34)
CARD SETUP
PRESS MENU TO EXIT
PICTURE SIZE
1280 960 640 480
RETURN ---- YES
---- YES
PICTURE QUALITY
FINE NORMAL ECONOMY
CREATE TITLE
WIPE MIX STROBE
GAINUP TRACER
MOSAIC MIRROR
EFFECT1
B/W SOLARI
OFF MULTI P-IN-P
EFFECT2 OFF NEGA SEPIA
RETURN ---- YES
DIGITAL EFFECT
PRESS MENU TO EXIT
11)
12)
13)
14)
SCAN MODE
SPEED FAST NORMAL SLOW
RETURN ---- YES
STROBE MANUAL
SWING OFF ON
P-IN-P 1234
MULTI-PICTURES
PRESS MENU TO EXIT
OFF ON
OFF ON
ZOOM MIC
FLASH
ON AUTO
RED EYE REDUCTION
OFF ON
OWNER ID SET
---- YES
20)
21)
19)
35)
VOICE POWER SAVE OFF ON
36)
RETURN ---- YES
DEMO MODE
PRESS MENU TO EXIT
37)
DEMO MODE
OFF ON
FLASH LEVEL
22)
s
NORMAL
r
List of Menus
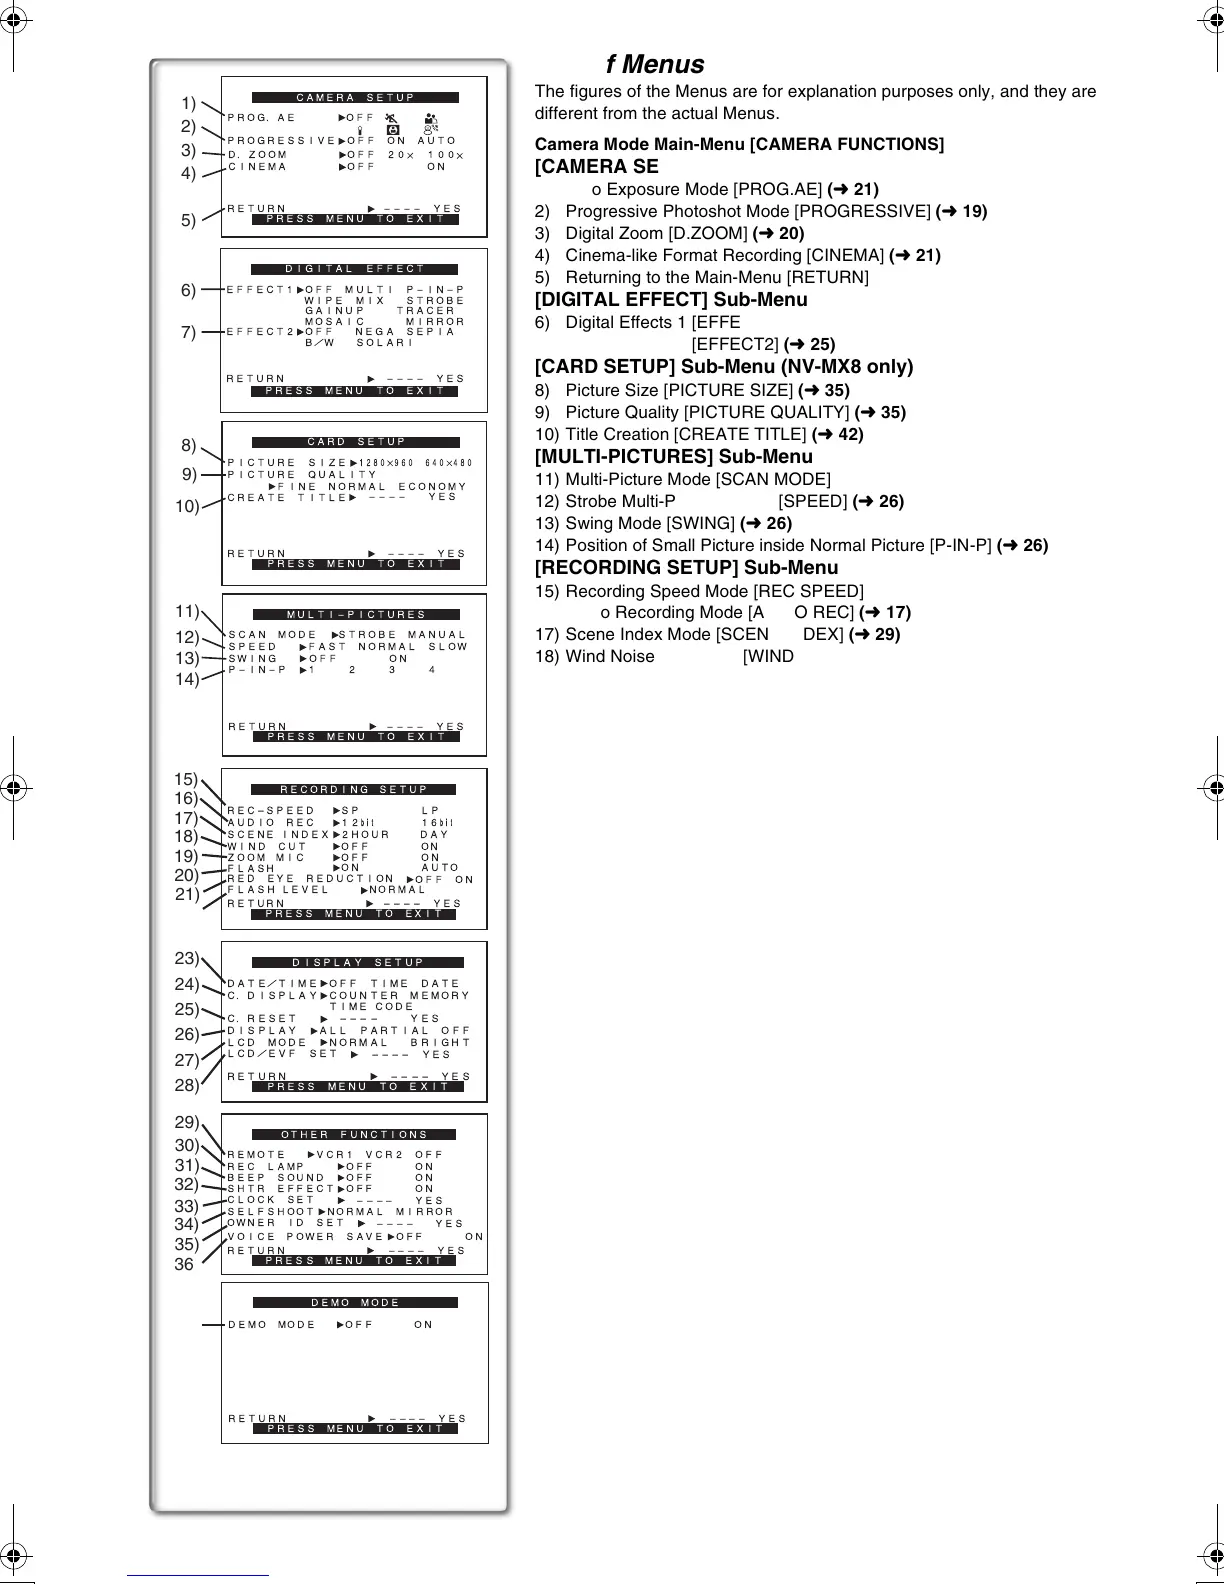
The figures of the Menus are for explanation purposes only, and they are
different from the actual Menus.
Camera Mode Main-Menu [CAMERA FUNCTIONS]
[CAMERA SETUP] Sub-Menu
1) Auto Exposure Mode [PROG.AE]
(
l
21)
2) Progressive Photoshot Mode [PROGRESSIVE]
(
l
19)
3) Digital Zoom [D.ZOOM]
(
l
20)
4) Cinema-like Format Recording [CINEMA]
(
l
21)
5) Returning to the Main-Menu [RETURN]
[DIGITAL EFFECT] Sub-Menu
6) Digital Effects 1 [EFFECT1]
(
l
25)
7) Digital Effects 2 [EFFECT2]
(
l
25)
[CARD SETUP] Sub-Menu (NV-MX8 only)
8) Picture Size [PICTURE SIZE]
(
l
35)
9) Picture Quality [PICTURE QUALITY]
(
l
35)
10) Title Creation [CREATE TITLE]
(
l
42)
[MULTI-PICTURES] Sub-Menu
11) Multi-Picture Mode [SCAN MODE]
12) Strobe Multi-Picture Speed [SPEED]
(
l
26)
13) Swing Mode [SWING]
(
l
26)
14) Position of Small Picture inside Normal Picture [P-IN-P]
(
l
26)
[RECORDING SETUP] Sub-Menu
15) Recording Speed Mode [REC SPEED]
(
l
17)
16) Audio Recording Mode [AUDIO REC]
(
l
17)
17) Scene Index Mode [SCENE INDEX]
(
l
29)
18) Wind Noise Reduction [WIND CUT]
(
l
24)
19) Zoom Microphone [ZOOM MIC]
(
l
19)
20) Flash [FLASH]
(NV-MX8 only) (
l
24)
21) Red Eye Reduction [RED EYE REDUCTION]
(NV-MX8 only) (
l
24)
22) Flash Level [FLASH LEVEL]
(NV-MX8 only)
[DISPLAY SETUP] Sub-Menu
23) Date and Time Indication [DATE/TIME]
(
l
46)
24) Counter Display Mode [C.DISPLAY]
(
l
46)
25) Counter Reset [C.RESET]
(
l
57)
≥It resets the counter to zero. However, it cannot reset the Time Code.
26) Display Mode [DISPLAY]
(
l
46)
27) LCD Lighting Mode [LCD MODE]
(
l
12)
28) LCD and Viewfinder Adjustment [LCD/EVF SET]
(
l
12)
[OTHER FUNCTIONS] Sub-Menu
29) Remote Controller Mode [REMOTE]
(
l
9)
30) Recording Lamp [REC LAMP]
(
l
18)
31) Beep Sound [BEEP SOUND]
(
l
47)
32) Shutter Effect [SHTR EFFECT]
(
l
19)
33) Date and Time Setting [CLOCK SET]
(
l
17)
34) Self-Recording [SELFSHOOT]
(
l
18)
35) Owner ID Set [OWNER ID SET]
(
l
46)
36) Voice Power Save [VOICE POWER SAVE]
(NV-MX8 only)
[DEMO MODE] Sub-Menu
37) Demonstration Mode [DEMO MODE]
≥If no operation takes place for approximately 10 minutes after the AC
Adaptor was connected to the Movie Camera and the [OFF/ON/MODE]
Switch was turned to [ON] without inserting a Cassette, the Movie
Camera is automatically set to Demonstration Mode for introducing its
functions. If any button is pressed or operated, the Demonstration Mode
is cancelled. The Demonstration Mode can be started by setting
[DEMO MODE] to [ON] and by exiting the Menu. To terminate the
Demonstration Mode, insert a Cassette or set the [DEMO MODE] to
[OFF].
B.book14ページ2001年8月27日 月曜日 午前10時14分