Chapter 2 Getting Started — Setting up
ENGLISH - 37
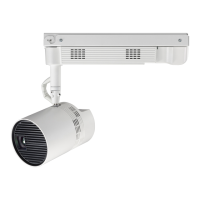
2) Adjust the orientation of the main unit.
f Adjust the ball joint movable part to the direction to tilt the main unit, and adjust the orientation of the main
unit.
360°
360°
Ball joint fixing
screws
Shaft holder
Ball joint movable part
The shaft holder will rotate 360° when the rotating
fixing screw is loosened.
Move the ball joint movable part to the direction to
tilt the main unit.
The ball joint will become free when the ball joint fixing screws (2
locations) are loosened.
The main unit can be rotated 360° or the main unit can be tilted 90° at
the ball joint movable part.
Ball joint movable range:
Approximately 90°
Main unit
Rotating fixing
screw
3) Tighten the fixing screws.
f While supporting the main unit, securely tighten the rotating xing screw and ball joint xing screws (2
locations) using the supplied Allen wrench (opposite side size 3.0 mm (1/8")).
Attention
f The main unit and the power supply unit are connected with cables, etc. Do not rotate or tilt the main unit more than necessary.
Note
f After adjusted roughly, ne adjust the projection position while projecting.
f The rotating xing screw and the ball joint xing screws are hexagonal socket head xing screws (M6). Note that they will come off the
projector if they are loosened too much.
f Note that your hand may get caught in between the pole and the main unit when the pole joint xing screw is loosened while holding the
pole section when setting the projector on the oor.

 Loading...