Do you have a question about the Panasonic RR-930 and is the answer not in the manual?
Covers essential controls like Power, Play, Record, Stop, FF/REW, and Pause.
Describes LEDs, speaker, built-in microphone, and tone control.
Details the tape counter, speed selector, and speed control features.
Information on jacks for external devices and the foot controller.
Details on connecting the AC power cord to a wall outlet.
Procedure for correctly inserting a microcassette into the holder.
Procedure for safely removing a microcassette from the holder.
Setting for optimal sound quality and 60-minute recording on an MC-60 tape.
Setting for longer recording times, up to 120 minutes on an MC-60 tape.
How to adjust tape speed during playback using the speed control.
Guidelines on using compatible microcassette tapes and proper storage.
How to quickly advance or rewind the tape without monitoring.
How to monitor sounds while fast forwarding or rewinding.
Feature that automatically stops the tape at its end.
Detailed steps for operating the unit using the foot controller.
Explains the automatic tape rewinding feature when the pedal is released.
Method for rapidly erasing recorded content from a tape.
How recorded audio is automatically erased when new audio is recorded.
Listening to recorded audio through headphones during recording.
How to prevent accidental recording by removing cassette tabs.
How to instantly review the last recorded segment.
How to start recording during playback mode.
Functionality of the pause button for stopping and resuming tape movement.
How to clean the tape heads for optimal sound quality.
Recommends demagnetizing the head assembly to resolve sound issues.
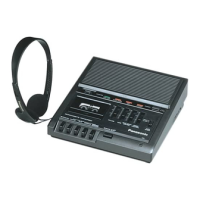
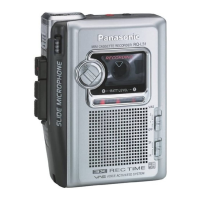
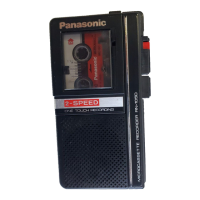
This document provides operating instructions for the Panasonic Microcassette Transcriber, Model RR-930. It covers essential information for safe and effective use, including controls, power source, tape handling, playback, recording, connections, and maintenance.
The Panasonic RR-930 is a microcassette transcriber designed for recording and playing back audio. It supports two tape speeds: Standard Play (SP) at 2.4 cm/s for 60 minutes of recording on an MC-60 tape, and Long Play (LP) at 1.2 cm/s for 120 minutes on an MC-60 tape. The device features a built-in microphone for direct recording and an external microphone jack for connecting an optional external microphone. It also includes a monitor jack for connecting a headset, allowing private listening during playback or monitoring during recording. A foot controller can be connected for hands-free operation during transcription, enabling start, stop, and backspace functions.
Power and Basic Operation: To begin, connect the AC power cord to a grounding-type power outlet (120 V/60 Hz). The unit is turned on and off using the Power Switch, indicated by the Power Indicator light.
Microcassette Handling: To insert a microcassette, press the Stop/Eject Button to open the Cassette Holder. Carefully place the tape inside, ensuring it is not inserted backward, and then close the holder. To remove a cassette, first press the Stop/Eject Button to stop the tape, then press it again to open the holder, remove the cassette, and close the holder. Only microcassette tapes bearing the "(MICROCASSETTE)" logo and designated as NORMAL should be used for optimal performance. Tapes should not be stored in high temperature, high humidity, or direct sunlight, nor near magnetic sources, as this can affect performance. If a tape loosens, the slack can be taken up by turning the reel with a pencil.
Tape Speed Selection: The Tape-Speed Selector allows you to choose between "SP (2.4)" for standard play, which offers better sound quality, and "LP (1.2)" for long play, which doubles the recording time. The tape speed cannot be varied during recording. During playback, the Tape Speed Control can be adjusted to increase or decrease the tape speed by approximately 20% from the standard speed. For standard listening, set this control to the center click-stop position.
Playback: After inserting a tape and setting the correct tape speed, press the Playback Button. The Tape Running Indicator will light up. Adjust the Volume and Tone Controls to your preference. Sound will be heard through the built-in speaker. If a headset is connected to the Monitor Jack, the speaker sound will be cut off, allowing for private listening.
Fast Forward and Rewind: In stop mode, pressing the Fast Forward/Cue Button or Rewind/Review Button will quickly move the tape without monitoring the audio. During playback, these buttons enable "Cue and Review," allowing you to quickly scan through the tape while monitoring the sounds. Always press the Stop/Eject button before changing tape operation during fast forward or rewind.
Silent Auto-Stop: The unit features an auto-stop mechanism that automatically stops tape travel when the tape reaches its end during playback, record, fast forward, or rewind. The Running Indicator will turn off.
Foot Controller Usage: For hands-free operation, connect the Foot Controller to the Foot Controller Jack. In playback mode, step on the Start Pedal (right side) to begin playback; holding it down continues playback, and releasing it stops it. Step on the Backspace Pedal to rewind the tape; releasing it stops the rewind. The "Auto Back Space Function" allows for automatic backspacing when the Start Pedal is released, with the amount controlled by the "Back Space Control" on the main unit. When the foot controller pedals are released, the unit enters pause mode. It is important not to leave the machine in this mode for extended periods; always press the Stop/Eject Button and Power Switch to turn the unit off.
Recording: To record, set the desired tape speed, insert a microcassette, and press the Power Switch. Reset the Tape Counter to zero if needed. Press the Record Button; the Recording and Running indicators will light up. Speak into the Built-in Microphone or an external microphone connected to the External Microphone Jack. When an external microphone is connected, the built-in microphone is automatically cut off. To stop recording, press the Stop/Eject Button.
Quick Erase: To quickly erase a tape, press the Pause Button to the "LOCK" position, then simultaneously press the Record Button and the Rewind/Review Button (or Fast Forward/Cue Button). The Quick Erase Indicator will light up. Press the Pause Button again to the "OFF" position; the tape will rewind (or fast forward) at high speed and erase. The Quick Erase Indicator and Tape Running Indicator will light up. To stop quick erase, press the Stop/Eject Button. Note that new recordings automatically erase previously recorded material.
Monitoring During Recording: The monitor system allows listening through a headset to the sound being recorded. The volume can be adjusted using the Volume Control. If howl occurs when monitoring through an external microphone, place the microphone as far as possible from the headset.
Record-Prevention System: To prevent accidental erasure, plastic tabs on the microcassette can be removed with a screwdriver. If a tab has been removed and you wish to record, cover the hole with adhesive tape before pressing the Record Button.
Quick Review and Edit Function: After recording, you can quickly review the last recorded sound by pressing the Rewind/Review Button, rewinding the tape, and then releasing the button. Recording can also be started during playback by simply pressing the Record Button (Edit Function).
Pause Button: During tape running, pressing the Pause Button to the "LOCK" position stops tape travel without releasing the function paused (Tape Running Indicator turns off). To resume, press the Pause Button again to the "OFF" position.
Head Cleaning: To clean the heads, press the Erase Prevention Lever while simultaneously pressing the Record Button. This moves the heads outward for easier access. Use a soft cloth dampened with a little alcohol to clean the heads, capstan, pressure roller, and cotton swab. After cleaning, press the Stop/Eject Button.
Head Demagnetization: To maintain good sound quality, it is recommended to demagnetize the head assembly when distortion or poor sound quality persists after cleaning. Magnetized heads can cause noise, loss of high-end frequency response, or erasure of recordings. Various types of Head Demagnetizers are available and should be used according to their instructions. Avoid bringing any metal objects or magnetic tools near the head assembly.
Cabinet Cleaning: The plastic cabinet should not be cleaned with benzine, thinner, or abrasive powder. Instead, use a soft cloth moistened with a mild soap and water solution. Avoid spray-type insecticides, as some chemicals can cause cabinet deformation.
General Care: Keep the unit free of dust, moisture, and vibration, and away from direct sunlight, heating appliances, and electrical noise-generating devices like fluorescent lamps and motors. Do not spill any liquid on the product or push objects into cabinet slots. For safety, do not attempt to service the product yourself; refer all servicing to qualified personnel. Unplug the product from the wall outlet before cleaning.
| Type | Microcassette Recorder |
|---|---|
| Recording Media | Microcassette |
| Power Supply | 2 x AA Batteries |
| Speaker | Built-in |
| External Microphone Jack | Yes |
| Earphone Jack | Yes |
| Tape Speed | 2.4 cm/s |
| Headphone Jack | Yes |
| Voice Activated Recording | Yes |
| Microphone | Built-in |
| Frequency Response | 300 - 4000 Hz |
| Battery Life | Approx. 10 hours |