13
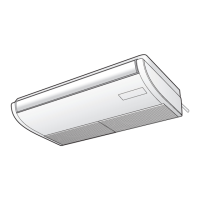
(2) Refrigerant tubing • drain hose position
(3) Unit opening position (Refrigerant tubing • drain hose • power inlet port • remote controller wiring inlet port)
Fig. 3-12
B
C
A
170
320
680
27.5
27.5
Air intake
Air
Unit: mm
Ceiling side
(Suspension bolt pitch)
(Suspension
bolt pitch)
■
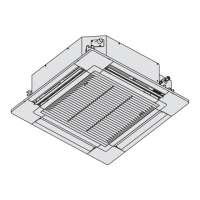
Ceiling Type (T1 Type)
3-6. Required Minimum Space for Installation and
Service
(1) Dimensions of suspension bolt pitch and unit
Length
Type
ABC
36, 45, 56 855 910 210
73 1125 1180 210
106, 140 1540 1595 210
Unit: mm
Fig. 3-13
Unit: mm
251 84 146 161
75 97 216
39
39
171
105
171
251
Rear (Figure shows view from front)Left side
Closed with rubber stopper at time of shipment.
Left drain position
Right drain position
(Liquid tubing •
Gas tubing)
Right side
Liquid
tubing
Gas tubing
Unit: mm
53
70
123
110 76
216
50130
84
32
32
60
171
347
125 72
85106
90
262
*1
*1
*2
*3
Left-side drain hose
outlet port
Side panel
Remote controller
wiring inlet port
(ø30, knock-out)
Top outlet port
Power inlet port
(ø40, knock-out)
Knock-out
Right-side drain
hose outlet port
Side panel
Position of plate
inside side panel
*3
Remote controller wiring
inlet port
(ø30, rubber grommet on
right side only)
Rear outlet port
Outside air intake duct connection port
(ø100, knock-out)
Power inlet port
(ø40, knock-out)
Rear tubing hole
Left-side drain
hose outlet port
*1 Use a compass saw, jig saw or similar tool
and cut along the indented portion of the side
panel.
*2 If the optional drain up kit is installed, this
becomes the upper tubing outlet port.
For details, refer to the manual for the
optional part.
*3 If the remote controller wiring inlet port is
changed to the left side or the left top side,
relocate the rubber grommet to the left side.
Use aluminum tape or similar material to seal
the unused inlet port on the right side.
Fig. 3-14
Panaindoor336013Eng.indb13Panaindoor336013Eng.indb13 2012/03/2121:07:052012/03/2121:07:05
 Loading...