23
3-18. Preparations Before Installation
(1) Confirm the positional relationship between the unit and
suspension bolts. (Fig. 3-56)
● Install the inspection opening on the control box side where
maintenance and inspection of the control box and drain
pump are easy. Install the inspection opening also in the
lower part of the unit.
700
800
Fig. 3-56
(2) Make sure the range of the unit’s external static pressure is
not exceeded.
(See the technical documentation for the range of the
external static pressure setting.)
(3) Open the installation hole. (Pre-set ceilings)
● Once the installation hole is opened in the ceiling where the
unit is to be installed, pass refrigerant piping, drain piping,
transmission wiring, and remote controller wiring (It is not
necessary if using a wireless remote controller) to the unit’s
piping and wiring holes.
See “5. HOW TO PROCESS TUBING”, “3-22. Installing the
Drain Pipe” and “4. ELECTRICAL WIRING”.
● After opening the ceiling hole, make sure ceiling is level if
needed. It might be necessary to reinforce the ceiling frame
to prevent shaking.
Consult an architect or carpenter for details.
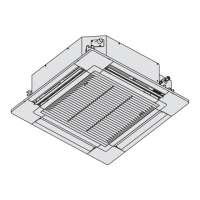
3-19. For Bottom Intake
For bottom intake, replace the chamber lid and protection net in
the procedure shown in the diagram.
(1) Remove the frame filter assy.
Remove the chamber lid. (Fig. 3-57-1)
Fig. 3-57-1
(2) Refer to the diagram to attach the chamber lid and frame
filter assy in the direction of the arrow. (Fig. 3-57-2)
Note: Attach the lid with the dummy holes downward.
Fig. 3-57-2
(3) Attach the frame filter assy (supplied) in the manner shown
in the diagram. (Fig. 3-57-3)
Fig. 3-57-3
Air intake
Air discharge
A
Ceiling
Allow view A
Inspection access
(Field supply)
Unit: mm
(Inspection access)
Air intake
Frame
Filter Assy
Chamber lid
Dummy hole
Air discharge
Air intake
Chamber lid
Dummy hole
Frame
Filter Assy
Air discharge
Main unit
Frame Filter Assy
In case of bottom side In case of back side
Attach the Frame Filter Assy to
the main unit while pushing the tip
of the latches in the direction of
the arrow.
Panaindoor336013Eng.indb23Panaindoor336013Eng.indb23 2012/03/2121:07:092012/03/2121:07:09
 Loading...