SQT0935
33
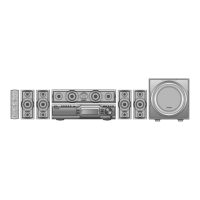
∫ Operation with this system
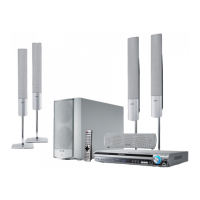
Preparation
≥ Turn this system and SC-ALL2 on.
1 Press [SETUP] on the remote control
repeatedly to select “REAR PAIRING”.
2Press [4][3] on the remote control to
select “YES” and then press [OK].
≥
This system enters the pairing mode and “REAR1
PAIRING” is displayed on the display of the main unit.
3 Start the pairing mode on SC-ALL2.
≥ Refer to the operating instructions for SC-ALL2.
≥ When pairing with the first speaker finishes, pairing
starts with the second speaker and “REAR2
PAIRING” is displayed on the display of the main
unit.
≥ Make the left and right surround speaker settings on
SC-ALL2.
When pairing with both speakers finishes,
“PAIRED” is displayed on the display of the
main unit.
≥ When pairing is successful, “REAR SPEAKER”
(> 30) comes “ON” automatically and the output
setting changes to 5.1 ch.
≥ If you try to set left and right surround speakers to
the same channel on SC-ALL2, pairing fails and
“NOT COMPLETED” is displayed on the display of
the main unit. Repeat the procedure from the
beginning if this occurs.
≥ The pairing mode is cancelled after about 120 seconds
elapses. You can also press [Í/I] to cancel it.
≥ You cannot cancel pairing on this system. Cancel pairing
on SC-ALL2.
≥ The power on paired SC-ALL2 is linked to this system.
– They remain linked even when the “REAR SPEAKER”
(> 30) is “OFF”.
≥ There is no way of adjusting delay time with this system.
≥ If one of the speakers fails to pair, repeat the procedure
from the beginning. When you do so, “REAR PAIRING” is
displayed during pairing and “PAIRED” is displayed when
pairing is successful.
≥ You can adjust the output level of the rear surround
speakers. (> 31, “REAR LEVEL”)
Linked operations
with the TV
(VIERA Link “HDAVI
Control
TM
”)
Preparation
1 Confirm that the HDMI connection has been
made. (> 9, 10, 11)
2 Set the “HDAVI Control” operations on the
connected equipment (e.g., TV).
3 For the optimal “HDAVI Control” operations
change the following settings on the
connected TV
§1
.
≥ Set the default speaker settings to this system.
§2
≥ Set the speaker selection settings to this system.
4 Turn on all “HDAVI Control” compatible
equipment and select the TV’s input for this
system so that the “HDAVI Control” function
works properly.
5 If a device is connected to the HDMI AV IN
terminal, start play to check that the picture
is displayed on the TV correctly.
When the connection or settings are
changed, repeat this procedure.
§1 The availability and function of the settings may vary
depending on the TV. Refer to the operating
instructions for the TV for details.
§2 If the TV has a default speaker setting within the VIERA
Link setting items, choosing this system as the default
speaker will automatically change the speaker selection
to this system.
What is VIERA Link “HDAVI
Control”?
VIERA Link “HDAVI Control” is a convenient
function that offers linked operations of this
system, and a Panasonic TV (VIERA) under
“HDAVI Control”.
You can use this function by connecting the
equipment with an HDMI cable. See the
operating instructions for connected
equipment for operational details.
SC-ALL70T-SQT0935.book 33 ページ 2015年4月28日 火曜日 午前10時5分

 Loading...