EasyManua.ls Logo

Panasonic TH-42PV80M

Panasonic TH-42PV80M
126 pages
To Next Page IconTo Next Page
Loading...
© 2008 Matsushita Electric Industrial Co., Ltd. All
rights reserved. Unauthorized copying and distribu-
tion is a violation of law.
ORDER NO.MD0804018CE
Plasma Television
Model No. TH-42PV80D
TH-42PV80H
TH-42PV80HM
TH-42PV80M
TH-42PV80MR
TH-42PV80MS
TH-42PV80MT
GPH11DA Chassis

Table of Contents

Question and Answer IconNeed help?

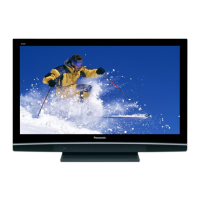
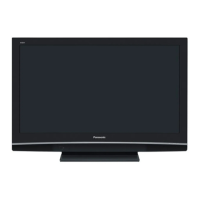
Do you have a question about the Panasonic TH-42PV80M and is the answer not in the manual?

Panasonic TH-42PV80M Specifications

General IconGeneral
BrandPanasonic
ModelTH-42PV80M
CategoryPlasma TV
LanguageEnglish

Summary

1 Safety Precautions

1.1 General Guidelines

General safety guidelines for servicing, including lead dress, protective devices, and leakage current checks.

1.2 Touch-Current Check

Procedures and specifications for measuring touch currents to prevent shock hazards.

2 Warning

2.1 Prevention of Electrostatic Discharge (ESD) to Electrostatically Sensitive (ES) Devices

Techniques to reduce component damage from ESD, including handling precautions and protective measures.

4 Specifications

5 Service Mode

5.1 How to enter into Service Mode

Instructions on how to access the service mode by pressing specific buttons on the unit and remote control.

5.1.2 Contents of adjustment mode

5.2 Service tool mode

6 Troubleshooting Guide

6.1 Check of the IIC bus lines

How to check the IIC bus lines for proper operation and identify potential issues.

6.2 Power LED Blinking timing chart

6.3 No Power

6.4 No Picture

6.5 Local screen failure

7 Disassembly and Assembly Instructions

7.2 Remove the P-Board

Caution and steps for removing the P-Board, including waiting for capacitor discharge and disconnecting connectors.

7.5 Remove the A-Board

Instructions for removing the A-Board after the tuner unit has been removed.

7.19 Replace the plasma panel (finished)

8 Measurements and Adjustments

8.1 Driver Set-up

Preparation and adjustment procedures for driver sections, including inputting signals and setting picture controls.

8.1.2 Adjustments

Procedures for adjusting driver section voltages using a multimeter, referring to panel data.

8.1.3 P.C.B. (Printed Circuit Board) exchange

8.1.3.2 Quick adjustment after P.C.B. exchange

Adjustments to be made after PCB exchange, specifically regarding voltage checks with a multimeter.

11 Schematic Diagram

11.2 P-Board (16) Schematic Diagram

11.3 P-Board (26) Schematic Diagram

11.4 P-Board (36) Schematic Diagram

11.5 P-Board (46) Schematic Diagram

11.6 P-Board (56) Schematic Diagram

11.7 P-Board (66) Schematic Diagram

11.9. A-Board (119) Schematic Diagram

11.10. A-Board (219) Schematic Diagram

11.11. A-Board (319) Schematic Diagram

11.12. A-Board (419) Schematic Diagram

11.13. A-Board (519) Schematic Diagram

11.14. A-Board (619) Schematic Diagram

11.15. A-Board (719) Schematic Diagram

11.16. A-Board (819) Schematic Diagram

11.17. A-Board (919) Schematic Diagram

11.18. A-Board (1019) Schematic Diagram

11.19. A-Board (1119) Schematic Diagram

11.20. A-Board (1219) Schematic Diagram

11.21. A-Board (1319) Schematic Diagram

11.22. A-Board (1419) Schematic Diagram

11.23. A-Board (1519) Schematic Diagram

11.24. A-Board (1619) Schematic Diagram

11.25. A-Board (1719) Schematic Diagram

11.26. A-Board (1819) Schematic Diagram

11.27. A-Board (1919) Schematic Diagram

13 Exploded View and Replacement Parts List

13.1. Exploded View and Mechanical Replacement Parts List

Introduction to the exploded view and mechanical replacement parts list for the unit.

13.2. Electrical Replacement Parts List

13.2.2. Electrical Replacement Parts List

Related product manuals