PBFS01 EXS00 BASE UNIT ASSEMBLY INSTRUCTIONS iL~i~r ~.)
TIIE INSTRUCTIONS FOP, STEP #4 A_~.E TO BE USED WITH DI%4.W~NG SI-~:ETS #S & #6 OF
6.
Assemble the SWIVEL PULLEY BRACKETS using (1) 3/8 Dia x 3/4 BOLT, (2) :511 5 WASHER,
3/8 WASHER and (1) 3/8 LOCKNUT (TIGHTEN TILL LOCKED THEN BACK[ NUT OFF 1/4
TURN).
Loosely assemble two (2) 3/8 DIA. x 1 IN. LG. BUSHING PULLEYS into the SWIVEL PULLEY
BRACKET ASSEMBLY, using two (2) 3/8 x 1-3/4 BOLT, m~o (2) 3/8 LOCK WASHERS, m~d two
3/8 NTJTS (SEE DETAIL H A/~D E, SHEET #5).
NOTE: BEFORE PROCEEDING WITH CABLE INSTALLATION, UNRAVEL CA3LE, AND REMOVE
AS MUCH SPIRALING AS POSSI-BLE.
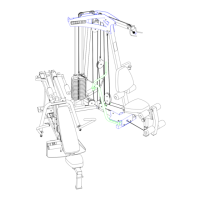
To route the PRIMARY CABLE ASSEMBLY start by inserting the end of the cable with the threaded
fitting between the TOP PULLEY and the LAT BAR HOOK. (REMOVE PULLEY l~OR EASE OF
INSTALLATION) Continue to route cable around the PULLEYS in the confi~ration shown in
CABLE ROUTING DIAGRAM, SHEET #5).
4.
NOTE:
To attach the PRIMARY CABLE to the HEAD PLATE ASSEMBLY, thread the ~md into the WEIGHT
STACK SHAFT and tighten completely. (SEE DETAIL K)
IF TI-IE PEC DEC ATTACHIVIENT IS TO BE ~%SSENIBLED AT THIS TIME, SE3[P SEQUENCE
#4 AND #5 OF THIS PAGE. SAVE ALL TIIE HARDWARE FROM THESE SEQUENCES. TO BE
USED WITH THE PEC-DEC. GO TO THE PEC-DEC ATTACHhTENT ASSEIM:BLY
INSTRUCTIONS AND COMPLETE STEP #I, AND CONTINUE ON TO STEP W2, ( SK/P
SEQUENCE #5 ON STEP #2.) TI-~N RETURN TO STEP #4 (THIS PAGE) elf "ITIE EX500 BASE
UNIT AND COIVfPLETE SEQUENCE #6,#7 AND #8.
To route the SECONDARY CABLE ASSEMBLY start by inserting the end ofth~ cable into the front end
of the SWIVEL PULLEY MOUNT, and around the PULLEY. (TI.EMOVE PULLEY :FOP, EASE OF
INSTALLATION) Continu~ to route cable around PULLEYS in the configuration sho~vn in th~ CABLE
ROUTING DIAGRAM, SHEET #5).
Attach the end of the SECONDARY CABLE ,*.SSEMBLY (c**d WITHOUT plastic ball) to the LEG
CURL EXTENSION, using one (I) 5/16 x 1 BOLT, ~wo (2) 5/~6 WASHERS, one (I) 5/16 LOCK
WASHER, and one (I) ~/16 NUT (SEE DETAIL L, SIIEET #6).
Tighten all remaining loose PULLEY connections.
Slip the two (2) ROD END COVERS over the ends of tim LAT BAR HOLDER on the, TOP BOOM
SECTION.
Attach four (4) 1 DIA. x 8 LG. GRIPS onto each end of the LAT BAR, and LOW ROW BAR. NOTE:
a lubricant is required, RUBBING ALCOHOL thoroughly coating the inside oi"the grip is the best
material to use.
10. Attach the LAT BAR to the PidMARY CABLE ASSEMBLY, using one (1) 5/I 6 SNAP HOOK. Also
attach the LOW ROW BAR to the ADJUSTMENT CHAIN on the SECONDARY (:ABLE
ASSEMBLY, using two (2) 5/16 SNAP HOOK.S.
13