PBFS01 EXS00 BASE ~IT ASSEMBLY INSTRUCTIONS (STEP #I)
TIIE INSTRUCTIONS FOR STEP #I ARE TO BE USED WITH DRAWING SHEET #I OF 6.
THE PARABODY EXS00 BASE UNIT M’L!ST BE ASSEMBLED ON A FLAT LEVF, L SURFACE
TO ASSURE ITS PROPER FUNCTION.
PARABODY INC. STRONGLY RECOMMENDS THAT TI-IIS PRODUCT BE ASSEMBLED BY
TWO PERSONS TO AVOID POSSIBLE INJURY
*** IMPORTANT ***
KEEP ALL LOOSE FRAME,
CONNECTIONS
LO,OSE UNTIL INSTRUCTED IN TI-~
ASSEMBLY STEP SEQUENCES TO
" - SECURELY TIGHTEN-
I ..........
J___ I, , , I .....
.
- ~-.1 .... ~I
, .= ’
~
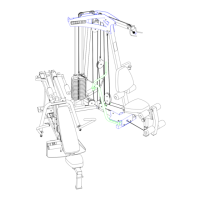
Insert four (4) 2 IN. SQ. END CAPS into the ends of the WEIGHT STACK SUPPORT BASE. Also
fnsert one (I) 1-112 x 2-1/2 END CAP into the SWIVEL PULLEY MOLrNT EXTENSION on the
VVEIGI-IT STACK SUPPORT BASE.
LOOSELY assemble one (I) 318 DIA. x I IN. LG. BUSI-IING PULLEY into the SWIVEL PULLEY
MOUNT using one (I) 3/8 x 2 BOLT, one (]) 3/8 LOCI( WASHER, and one (I) 318 NUT (SEE
"A"). Insert two (2) 112 x 3/4 LG. FLANGE BEARINGS into the SWIVEL PULLEY iViOUNT from
bottom and top.
Assemble the SWIVEL PULLEY MOUNT to the WEIGHT STACK SUPPORT BASE using one (I)
I/2 x 4-I/9_ BOLT, one (I). I/°- WASHER, and one (l) I/2 LOW HEIGHT LOCK NUT (SEE DETAIL
"A"). Tighten connection so that it swivels smoothly and freely. Place the WEIGHT S’rACK
SIIPPORT BASE fiat on the floor.
Insert four (4) 2 IN. SQ. END CAPS into the ends of the TGP BOOM SECTION. Cm’efully place the
TOP BOOM SECTION on its side on the floor.
:5. Carefully place the NIALN BACK SUPPORT on its side on the floor and loosely assemble the MAIN
BACK SUPPORT to the TOP BOOM SECTION, using two (2) 1/2 x 7. BOLTS, four (4)
WASHERS, two (2) 1/2 LOCI( WASHERS, and two (2) 1/2