i0.
12.
13.
14.
15.
16.
17.
]9.
20.
EXS00 BASE UNIT ASSEMBLY INSTRUCTIONS (~TEP #2)
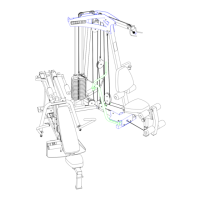
Insert two (2) 2 IN. SQ. END CAP into the TOP and BOTTOM ends of the LEG CUI~ EXTENSION.
Securely assemble the LEG CURL EXTENSION onto the BASE SEAT SUPPORT, using one (1) I/2
.3 BOLT, and one (I) I/2 LOW HEIGHT LOC]:,I NUT.
Attach one (1) RUBBER BUMPER to thefront of the neck tube of the BASE SEAl[’ S]/PPORT
approximately where shown, giving sufficient contact.
Assemble the two (2) ROLLER PADS to the LEG CURL EXTEN:SION, using one ([) 15 IN. ROLLER
PAD SHAFT, two (2)BLACKPLASTIC WASHERS, and two (2)PUSH-ON COLLARS. NOTE:
Sl/RE TO INSERT ROLLER PAD SHAFT THROUGH LARGE HOLE ON THE AD,[USTABLE
ROLLER PAD SLEEVE. (SEE DETAIL N)
Securely assemble fl~e ADJUSTABLE PRE STI[ETCII SUPPORT to the BASE ’FEE SECTION, using
two (2) I/2 X 3-I/2 BOLTS, four (4) I/2 WASHERS, two (2) I/2 LOCI( WASHERS, ;mcl two (2)
NUTS.
Slide th¢ ADJUSTABLE PRE STRETCH SLIDE. o\,~r the ADJUSTABLE PRE STRETCH
SUPPORT until the SPRING PIN ASSEMBLY engages the second hole.
Assemble one (1) 1/4 3/4 BOLT through th e to p hole on the ADJUSTABLE PRE STP~ETCI-I SLIDE
and tighten with one (1) I/4 NUT.
.Insert one (1) 1-3/4 inch SQ. END CAP into the top end ofthe ADJUSTAB.LE PRE STRETCH
SUPPORT.
Insert one (I) ]-IP- inch SQ. END CAP into the top end el’the SPRING PIN’FIOUSING of the
ADJUSTABLE PRE STRETCFI SUPPORT. Repeat th~s sequence for the SPRING PIN IlOUSING of
the BASE SEAT SUPPORT, and LEG CI/RL EXTENSION. (SEE DETAIL C).
Assemble the two (2) ROLLER PADS to the NSLIN BACK SUPPORT, using one (1) :Z0 IN. ROLLER
PAD SHAFt, and two (2) PUSH-ON COLLARS.
Insert two (2) 2 IN. SQ. END CAPS into each end of the ADJUSTABLE SEAT F.RANIE.
Attach the two (2) SEAT HANDLES onto the ADJUSTABLE SEAT FRAME, using two (2) 3/8 x 3-1/4
BOLTS, four (4) 3]8 WASHERS, two (2) 3/8 LOCK WASIiERS, and two (2) 3/8
Slip two (2) 5 inch GRIPS onto .fl.~e SEAT HANDLES, NOTE: If a lubricant is req~lired, RUBBING
ALCOHOL thoroughly coating the inside of [l~e grip is tb~" best material to use..
Assemble the two (2) ROLLER PADS to the ADJUSTABLE SEAT FRAME, using one (I) 16 IN."
ROLLER PAD SHAFT, and two (2) PUSH-ON COLLARS.