Bulletin HY25-1135-M1/US
Owner’s Manual
Parker Hannifin Corporation
Chelsea Products Division
Olive Branch, MS 38654 USA
8
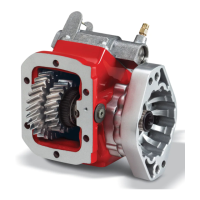
General Installation
6 and 8-Bolt PTOs
Mounting the PTO (Continued)
4. Install the proper studs (furnished with PTO) in the PTO
aperture pad using a stud driver. Studs may have either
interference fit threads (plain) or preapplied locking/
sealing compound For installation method (Fig. 6).
Where holes are tapped through the transmission case,
use studs with preapplied locking & sealing compound
Loctite 290 to prevent leaks.
NOTE: Avoid contact of Permatex with automatic transmission
fluid in automatics. Always check to be sure that the studs do
not interfere with transmission gears.
5. Studs should be threaded into the transmission holes
until the stud shank is even with transmission mounting
surface. DO NOT install studs with shank below the
aperture surface. Install studs with hand tools. DO NOT
use power tools to install studs.
CAUTION: Over tightening of studs or running the shoulder
past the transmission mounting surface may damage
stud and/or transmission. Use of air impact tools is not
recommended (Fig. 7).
6. Place the correct number of gaskets over studs (Fig. 8).
Do not use Permatex between gaskets because you may
want to add or subtract gaskets to obtain proper backlash.
• When mounting a PTO use gaskets between all
mounting surfaces.
• Do not stack more than 3 gaskets together.
• Usually one thick gasket .020 (.50mm) will be required.
• Remember the lubricant in the transmission also
lubricates the PTO. Therefore, at least one gasket must
always be used on either side of filler blocks, adapter
assemblies or adapter plates. More gaskets may be
required when establishing proper backlash.
7. Secure PTO to the transmission.
• Use Self-Locking nuts and/or capscrews provided with
PTO (Fig. 9).
CAUTION: When installing the 489 Series PTO several
direct mount pump flange options may interfere with the
mounting fasteners directly under the flange. The nut must be
threaded far enough onto the stud before the remaining (6) six
capscrews and other nut are tightened to prevent interference
with the flange and possible breakage of the PTO housing.
Fig. 7
Fig. 8
Fig. 9
Threads
Aperture Surface
Stud Shank
Fig. 6
 Loading...