Bulletin HY25-1135-M1/US
Owner’s Manual
Parker Hannifin Corporation
Chelsea Products Division
Olive Branch, MS 38654 USA
7
General Installation
6 and 8-Bolt PTOs
Mounting the PTO
CAUTION: Oil may be hot.
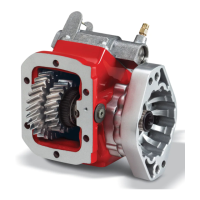
WARNING: PTOs for the EATON ENDURANT™ transmission
(including PACCAR models) which include the 489, 680, 880
Series (Fig. 1) have UNIQUE main housings, gears, piloting
studs, as well as, a special molded PTO-to-transmission
mounting seal. See Supplemental Installation Instructions
(P/N 69-P-27) included in the Installation Kit (328948-48X) for
proper installation. These special PTOs do NOT require the
addition of extra gaskets/shims for backlash adjustment!
If there are any questions during the installation, stop and call
your local Chelsea Distributor for assistance.
1. Drain the oil from the transmission and remove the PTO
aperture cover plate (Fig. 2).
2. Discard the cover plate and cover plate gasket then clean
the aperture pad using a putty knife or wire brush (Fig. 3).
NOTE: Stuff a rag in the aperture opening to prevent dirt from
entering the transmission while you are cleaning it.
3. Using your hand, rock the PTO driver gear in the
transmission (Fig. 4) and the driven gear in the PTO
assembly (Fig. 5). Rocking the gears provides two
important factors.
a) It shows you the amount of backlash that has been
designed into each unit.
b) It is helpful in establishing the proper backlash when
installing the PTO.
Fig. 1
Fig. 2
Fig. 3
Fig. 4
Fig. 5
O-Ring
489 Series
680 Series
660
Series
 Loading...