Parker Hannifin Corporation
Hose Products Division
Wickliffe, OH
7
Technical Manual
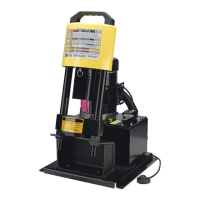
Karrykrimp
Bulletin 4480-T30-US
1. Remove crimper and all accessories from shipping
crates. Verify that you have received the following items:
• Crimp Head 82C-CHD
• Silver Die Ring 82C-R01
• Black Die Ring 82C-R02
• Power Unit Assembly 85C-1PH
• Technical Manual 4480-T30-US
• Grease
• Training DVD
2. Place the power unit assembly on a sturdy bench.
Assemble the crimp head to power unit bracket and
secure with the provided one inch jam nuts (2), as shown
on page 13. Connect hose to cylinder coupler and power
unit adapter. Install protective sleeving over the hose
and adapters. It is recommended that the machine be
bolted to the bench. Four 7/16” holes are provided in the
mounting plate for this purpose. Make sure the crimper
base plate overhangs the bench to allow access.
3. Plug power unit into a properly rated power source. Do
not use an extension cord to operate this machine. Note
the power unit is supplied with a 115 volt, 20 amp plug. A
20 amp circuit is required for frequent full pressure use.
This machine has a power on/off switch located on top
of the electrical box attached to the motor. This switch
is also a thermal overload circuit breaker for added
protection. The pneumatic start/stop pendant switch is
used to operate the power unit, which turns the motor on
when pressed and turns the motor off when released.
4. This machine may have been shipped with a plug in the
reservoir breather port. Remove this plug and replace
with the included breather cap. Check reservoir oil level
prior to startup. Oil should be visible through sight glass
on the side of reservoir. Add ISO grade 46 hydraulic oil if
necessary.
5. Place a die ring in position on crimper base. Press
and hold the start pendant switch to turn motor on and
advance cylinder. Release the pendant switch to turn
motor off, cylinder will automatically retract. Cycle
cylinder up and down a few times to purge air from the
system. Recheck oil level in power unit, make sure
cylinder is fully retracted before adding oil. The power
unit is equipped with a hold/release valve which can be
used to keep cylinder from retracting when the pendant
switch is released. The use of this valve is not required
in most of the crimping operations, but can be used if
having difficulty locating the fitting into dies.
6. Your machine is now ready for use. Please read the
remainder of this manual before proceeding to crimp
hose assemblies.
Figure 3
Installation and Operation 82C-KKB
www.comoso.com
 Loading...