Page 2
Installation Instructions
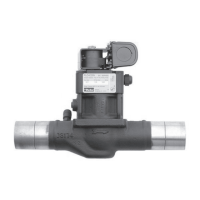
Mounting position and pressure limits: Valves can be mounted
directly on piping and are designed to operate in any position. The
valves may be installed in any line regardless of the direction in
which the line runs. However, for optimum life and performance the
valves should be mounted vertically with the actuator upright to
minimize wear and reduce the possibility of foreign matter
accumulating inside the stem area.
Line pressure and pilot pressure must conform to Actuator
nameplate rating.
WARNING: Depressurize system and turn off electrical power to
the pilot valve before attempting to remove valve from piping.
Failure to depressurize the system could result in injury.
CAUTION: When the valve is to be removed from the piping
system, the pipeline must be drained completely before removing
the valve, especially with hazardous or aggressive media that can
be hazardous to health.
Installation Steps
Installation must be done according to all applicable Safety Codes
and Standards and by qualified personnel.
Inspect valve prior to installation. Damaged valves or actuators
must not be installed.
Ensure that the valves are installed whose pressure class, line
pressure, type of connection and connection dimensions
correspond to the usage conditions.
WARNING: Do not install a valve whose permitted pressure /
temperature ratings are inadequate to meet the operating
conditions.
Threaded connections are the most common. ANSI flanges,
welded ends and tri-clamps are also available.
Piping: Remove any protective enclosures from the body ports
and connect supply line to the inlet port of the valve. An arrow on
the body indicates direction of flow. Use of Teflon tape, thread
compound or sealant is permissible, but should be used sparingly
to male pipe threads only. Connect outlet line to the opposite port.
Ports should not be subjected to excessive torque by use of an
oversized wrench, wrench extension or by impacting the wrench
handle. Do not use the valve to “stretch” or “align” the pipe.
Using
the pipe to close a large gap can distort the valve or at least stress
it unduly, and possibly cause it to malfunction, or the threaded ports
may be damaged or stripped.
Flanges: For flanged mounted valves, follow applicable ANSI, DIN,
JIS specifications for bolting and torque recommendations. The
bolt should pass first through the mounting flange before engaging
the valve flange. Allow proper spacing for installing the valve. Do
not use the valve to “stretch” or “align” the pipe. Using flange bolts
to close a large gap can distort the valve or at least stress it unduly,
and possibly cause it to malfunction, or the bolts may be damaged
or stripped.
The flange endings on the pipeline must align with the connection
flanges on the valve and the faces must be parallel. Flanges which
are out of alignment or not parallel may result in unacceptable
stresses in the pipeline during installation and could thereby
damage the valve.
Welding: Care should be taken when welding connections to avoid
damage to synthetic internal parts. If pipeline welding is to be
performed, care must be taken to ensure the cleanliness of both
joints. It is recommended that the flame be directed away from the
valve body. Cool body with a wet cloth or heat sink on the
extensions on the body to prevent overheating while welding.
Pressure and Valve Function Tests
It is recommended that newly installed pipeline systems first be
flushed thoroughly to wash out all foreign matter.
The test pressure of an open valve must not exceed 1.5 times the
maximum rated pressure of the angle seat valve. The test pressure
of a closed valve must not exceed 1.1 times the maximum rated
pressure of the angle seat valve.
Normal Operation and Maintenance
The angle seat pneumatic valves are operated by pneumatic
control signals from the digital positioner. The valves do not require
regular maintenance work. During routine system checks, no
leakage should be found in the valve. If unacceptable leakage
occurs, reference “Troubleshooting” section for recommended
solutions.
CAUTION: When the valve is to be removed from the piping
system, the pipeline must be drained completely before removing
the valve, especially with hazardous or aggressive media that can
be hazardous to health.
NOTE: Depending on service conditions, fluid being used, filtration,
and lubrication, it may be required to periodically clean or replace
the valve.
CAUTION: Do not expose plastic or elastomeric materials to any
type of commercial cleaning fluid. Parts should be cleaned with a
mild soap and water solution.
Approval
Parker Hannifin Fluid Control Division certifies its valve appliance
products comply with the essential requirements of the applicable
European Directives.
We hereby confirm that the appliance has been manufactured in
compliance with the applicable standards and is intended for
installation in a machine or application where commissioning is
prohibited until evidence has been provided that the machine or
application is also in compliance with EC directives.
The angle seat valve family complies with European Pressure
Equipment Directive 2014/68/EU in accordance with Annex II,
Category II, Group 2, Module A1.
WARNING: THIS PRODUCT HAS NO AGENCY APPROVAL FOR USE
IN HAZARDOUS LOCATIONS.

 Loading...