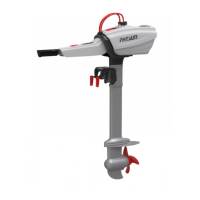
The PARSUN Electric Outboard Motor, specifically the Joy1.2BS(BL) model, is a convenient and efficient electric outboard motor designed for marine propulsion. It is equipped with a high-energy-density ternary lithium battery, offering a maximum speed of 8.5 km/h. The motor's handle features a liquid crystal display (LCD) screen, which provides important operational parameters to the user.
Function Description
The primary function of the PARSUN Electric Outboard Motor is to propel a boat using electric power. It operates by converting electrical energy from its lithium battery into mechanical thrust via a DC brushless motor and propeller. The motor is controlled through a tiller handle, which allows for stepless speed regulation and directional control (forward, reverse, and stop). The integrated LCD display provides real-time information such as battery power, current speed, running power, and remaining operating time, enhancing user awareness and control.
Usage Features
Installation:
The installation process involves securing the outboard motor to the stern plate of the boat. It is crucial to install the motor at the center line of the stern plate to ensure the boat's balance. If the stern plate is asymmetrical, consulting a local dealer is recommended. The height of the vortex plate of the outboard motor should be positioned at least 150mm from the bottom of the ship. Incorrect installation height can lead to reduced thrust due to eddy currents (if too high) or increased water resistance and reduced engine efficiency (if too low). The clamping screw on the stern plate must be tightened clockwise to secure the motor, and it should be checked periodically for looseness due to engine vibration.
Battery Installation:
The battery is installed by lifting its upper snap, aligning the slot under the battery with the post on the outboard motor, then lowering the battery and releasing the snap. Power and communication cords from the outboard motor are then connected to the battery. The interface automatically locks upon connection.
Pre-use Inspection:
Before operation, a thorough inspection is required. This includes checking if the battery is fully charged, ensuring the motor is correctly locked on the stern plate, verifying the propeller is locked, confirming the battery module is fastened and its interface is correctly connected, and making sure the throttle is in the zero position and rotates smoothly. All joints should be in good condition without aging, and the battery interface must be dry to prevent short circuits.
Startup and Driving:
To start the motor, the user presses and holds the power key at the bottom of the handle screen until a prompt tone is heard, at which point the screen lights up and the motor starts. For driving, the handle must be set to the zero position, and the magnetic induction emergency stop switch should be fastened to the operator's hand for safety. It is critical to ensure no swimmers or obstacles are in the water before driving.
When the handle is in the zero position, the motor is stopped. Turning the handle counterclockwise from zero initiates forward movement and acceleration, while turning it clockwise initiates reverse movement and acceleration. Deceleration occurs by moving the handle back towards the zero position. The speed control handle must be in the zero position before turning on the power supply to ensure the motor operates correctly.
Shutdown:
The motor can be shut down manually or automatically. Manual shutdown involves pressing and holding the power button below the screen on the handle for 2 seconds until a prompt tone is heard and the screen goes out. Automatic shutdown occurs when the outboard motor is stopped, and the screen will turn off after 1 hour.
Trim Angle Adjustment:
The trim angle of the outboard motor can be adjusted using a trim adjusting rod on the clamping bracket, which has four holes. The motor is adjusted to a suitable position, and the rod is then inserted into the corresponding hole. It is important not to turn on the power supply during this adjustment.
Handle Angle Adjustment:
The handle can be adjusted up or down by up to 45 degrees. When rotating upward, the handle can be lifted directly. When rotating downward, the handle needs to be stretched outward before rotating down. If rotated 45 degrees down, the handle will automatically hold its position; further downward rotation requires pressing it down. For transportation, the handle can be rotated downward by 90 degrees by stretching it outward first. The handle is not detachable.
Liquid Crystal Display (LCD):
The LCD provides various indicators:
- Battery Power: Displays the charging sign and electric quantity in five grids (0-20%, 20-40%, 40-60%, 60-80%, 80-100%).
- Speed: Shows the current speed when the boat speed exceeds 3 km/h, varying with boat speed.
- Fault Code: Displays alarm codes when a fault occurs (e.g., E08), otherwise not shown.
- Running Power: Indicates the current power, which changes with handle rotation.
- Remaining Time: Displays the estimated remaining operating time, varying with motor power.
- Power ON/OFF Button: Used to start (press and hold for 2 seconds when off) or shut down (press and hold for 2 seconds when on) the motor.
- Backlight ON/OFF Button: Used to turn the screen backlight on or off with a single press when the product is on.
Battery Charging:
When the battery power is low, it needs charging. The battery can be charged either separately or while connected to the outboard motor. For optimal battery life, the outboard motor should be in a shutdown state during charging. The charger is connected to the socket and the battery charging port. The charger indicator light shows red when charging and green when charging is complete or if battery temperature protection is triggered. Charging will not occur if the battery temperature exceeds 45°C, but will resume automatically once it cools down. After charging, the charging port must be covered to prevent damage.
Sleep Mode and Awakening:
To conserve power, the battery enters sleep mode when the communication cable is unplugged from the battery box socket. To wake it up, the communication cable is reconnected or the battery is connected to the charger. If the battery remains connected but unused for 48 hours, it will also enter sleep mode, preventing the LCD from lighting up and the motor from running. To wake it in this scenario, unplug and replug the communication cable (waiting 15 seconds before replugging) or connect it to the charger.
Maintenance Features
General Maintenance:
Regular maintenance is essential to ensure the outboard motor remains in optimal working condition and to prolong its service life. This includes avoiding starting the motor in shallow water near the shore; if necessary, adjust the motor to 70 degrees to prevent touching the bottom. Once the water depth is sufficient, adjust to the appropriate gear and start. After use in seawater, the underwater part should be cleaned with fresh water to reduce corrosion.
Propeller Inspection and Replacement:
Before inspecting, removing, or installing the propeller, it is crucial to ensure the engine cannot start accidentally. This can be done by cutting off the power supply and removing the emergency stop switch. When loosening or tightening the propeller nut, a board should be placed between the anti-vortex plate and the propeller to prevent it from rotating.
Inspection Steps:
- Check each propeller blade for wear, eddy current, exhaust erosion, or other damage.
- Inspect the propeller shaft for damage.
- Check the spline safety pin for wear or damage.
- Look for any fishing line winding on the propeller shaft.
- Examine the oil seal on the propeller shaft for damage.
Removing Propeller:
- Straighten and pull out the cotter pin with a tool.
- Remove the propeller nut, gasket, and any mounting pad.
- Remove the propeller and thrust washer.
Installing Propeller:
- Apply marine grease or anti-corrosion grease to the propeller shaft.
- Install any mounting pad, thrust washer, and the propeller onto the propeller shaft.
- Install any mounting pad and gasket.
- Screw on the propeller nut and align it with the hole in the propeller shaft.
- Insert a new cotter pin into the hole and bend its end firmly to prevent the propeller from falling off. Ensure the thrust washer is installed to prevent damage to the underwater device shell and propeller.
Transportation and Storage:
For transportation, the original packaging should be used to prevent collision damage. Batteries must be carried or transported according to national and local regulations, and damaged or abnormal lithium batteries should not be transported.
For long-term storage (two months or more), several procedures are recommended. While an authorized dealer can perform maintenance, users can also follow these steps:
- Clean the exterior of the outboard motor with clear water.
- Install the motor on a test water tank.
- Fill the water tank with clear water to a level above the vortex plate.
- Start the engine to flush the cooling system.
- Store the outboard motor in a dry, well-ventilated area away from direct sunlight.
Battery Storage Precautions:
- Do not use damaged, knocked, or squeezed batteries.
- Only use official chargers.
- Avoid prolonged exposure of the battery to wet or immersed environments.
- Do not disassemble or repair the battery without permission; contact a local dealer if needed.
- Keep conductors away from the battery interface to prevent damage.
- Cover the battery interface with a protection cover after use.
- Do not use the battery below 26V.
- For long-term storage, charge the battery to 60% and store it at an ambient temperature of 15°C-25°C.
- Every 3 months, fully charge and discharge the battery to keep it active, then recharge to about 60% for storage to improve battery life.
- Before using after long-term storage, charge the battery to 100%.
- Do not leave the battery in high-temperature or high-pressure environments, such as in a car exposed to the sun.
- Dispose of discarded batteries properly according to local laws.
Emergency Handling:
- Impact Damage: If the motor impacts an underwater object, stop it immediately, check for mechanical damage and control system functionality. Drive slowly to the nearest dock and contact an authorized agent for maintenance before reuse.
- Accidental Falling into Water: If the motor falls into water, stop the machine immediately and disconnect the power supply. Contact an authorized agent for maintenance before reuse.
- Low Voltage Protection: The motor automatically stops if battery voltage drops below the minimum operating level to prevent over-discharge. If far from shore, waiting about 10 minutes may allow the voltage to recover enough to operate the motor at less than 100W to return to shore.
Troubleshooting:
The manual provides solutions for common problems like the propeller not rotating (check for obstructions, low battery, or emergency stop switch placement) and excessive noise/shaking (check propeller fixation, motor shaft deformation, or propeller rotation by hand). It also lists fault codes (e.g., DTC:E01 for high battery temperature, DTC:E02 for high motor temperature, DTC:E03/E04 for low cell voltage, DTC:E05 for motor control circuit fault, DTC:E07 for propeller jamming, DTC:E08/E09 for communication failures) and corresponding measures, usually involving waiting for temperatures to drop, charging the battery, clearing obstructions, or contacting an authorized dealer.