EasyManua.ls Logo

PEERLESS Smartmount ST650 User Manual

PEERLESS Smartmount ST650
27 pages
To Next Page IconTo Next Page
Page #1 background imageLoading...
Page #1 background image
3215 W. North Ave. • Melrose Park, IL 60160 • (800) 865-2112 or (708) 865-8870 • Fax: (708) 865-2941 • www.peerlessmounts.com
ISSUED: 11-21-07 SHEET #: 202-9255-2 02-22-08
R
This product is intended for use with UL
Listed products and must be installed by a
qualified professional installer.
Installation and Assembly:
Smartmount
®
Universal Tilt Wall Mount for LCD and
Plasma 32" to 50" Flat Panel Screens
Features:
Open wall plate design allows for additional wall access, increasing electrical access and cable management options
Universal screen mounting brackets hook onto the wall plate for quick, easy, and safe installation
Adjustable up to 15° of forward tilt and up to -5° backward tilt
One-touch tilt for effortless adjustment
Pre-tensioned universal tilt bracket allows for tilt angle adjustment in one easy motion.
Easy grip handle locks the screens position into place
Optional IncreLok feature offers fixed tilts at -5°, 0°, 5°, 10° and 15° increments
Includes Sorted-For-You™ fastener pack for installation to wood studs, concrete and cinder block
Optional horizontal adjustment of up to 8" (depending on screen model) for perfect screen placement
Available in Black and Silver
Models: ST650, ST650-S, ST650P, ST650P-S
Maximum UL Load Capacity: 175 lb (79kg)

Other manuals for PEERLESS Smartmount ST650

Question and Answer IconNeed help?

Do you have a question about the PEERLESS Smartmount ST650 and is the answer not in the manual?

PEERLESS Smartmount ST650 Specifications

General IconGeneral
BrandPEERLESS
ModelST650
CategoryTV Mount
Compatible Screen Size32" - 65"
Tilt+15° / -5°
MaterialSteel
ColorBlack
Swivel RangeNo
Mounting Pattern200x100 - 600x400 mm
Mounting Profile2.6" (66 mm)
Profile from Wall2.6" (66 mm)

Summary

Installation and Assembly: SmartMount Universal Tilt Wall Mount

Tools Needed for Assembly

Accessories

Parts List

Non-Security Adapter Bracket Fasteners

Details and illustrations of fasteners for non-security adapter brackets.

Security Adapter Bracket Fasteners

Installation to Double Wood Stud Wall

Installation to Solid Concrete or Cinder Block

Installing Adapter Brackets

Flat Back Screen Installation

Bump-out or Recessed Back Screen Installation

Mounting and Removing Flat Panel Screen

Tension Adjustment of Ratchet Handle

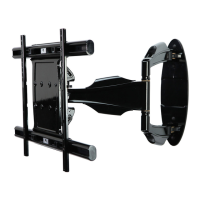
Adjusting tension in tilt brackets by rotating the ratchet handle for proper screen stability.

Mounting Screen

Hooking tilt brackets onto wall plate and securing with safety screws.

Screen Adjustment

Adjusting screen horizontally by loosening safety screws on tilt brackets.

Removing Screen

Detaching the screen from the mount by loosening safety screws.

Adjusting the Tilt Angle of the Flat Panel Screen

Using IncreLok™ for Preset Tilt Angles

Locking screen into preset tilt positions using IncreLok™ tilt locking screws.

Using Ratchet Handle for Custom Tilt Angle

Adjusting screen tilt angle manually using the ratchet handle.

Related product manuals