Do you have a question about the Pfaff 1471 E1 and is the answer not in the manual?
Machine construction according to European regulations and general statutory requirements.
Operating instructions, safety measures, and personnel responsibilities for machine use.
Responsibilities and safety obligations for operating and specialist personnel.
Warnings and potential hazards associated with machine operation and parts.
Information on intended use, limitations, and manufacturer's liability regarding machine operation.
Technical specifications for PFAFF sewing machine models 1471 E1 and 1474 E1.
Guidelines for selecting needles and threads based on material and machine type.
Lists machine models and their associated subclasses or features.
Guidelines for proper disposal of machine waste and related materials.
Procedures and considerations for transporting the machine to the customer.
Information on the proper disposal of the machine's packaging materials.
Recommendations for storing the machine when not in use to prevent damage.
Explains the meaning of various symbols used throughout the instruction manual.
Instructions for operating the machine's main power switch.
Description of the functions of the keys located on the sewing machine head.
Explanation of the pedal functions for controlling machine operations like sewing and presser foot.
Functionality of the knee switch for signaling seam sections during programmed sewing.
Operation of the knee lever to raise the roller-presser.
How to use the lever to lift the roller-presser.
Operation and control of the edge trimmer for the 1471E1 model.
Operation and control of the edge trimmer for the 1474E1 model.
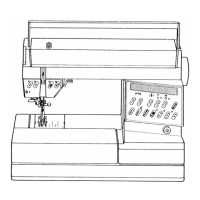
Overview of the control panel, including display and key panels.
Details on the display sections: status line, text field, and pictogram bar.
Explanation of the two operation modes: SEWING and ENTER.
Description of various function keys like arrow, plus/minus, Esc, Clear, and Enter.
Functions of the number keys used for various operations and selections.
Steps for mounting the machine, including electrical supply and floor requirements.
Procedure for adjusting the height of the table top for transport.
Instructions for installing the tilt lock mechanism for safety.
Steps for adjusting the tension of the V-belt for proper operation.
Instructions for attaching the upper and lower protective guards for the V-belt.
Steps for installing the synchronizer and mounting the spool holder.
Steps for commissioning the machine after mounting, including checks.
How to turn the sewing machine on and off using the appropriate switch.
Step-by-step guide for inserting a needle into the 1471E1 sewing machine.
Step-by-step guide for inserting needles into the 1474E1 sewing machine.
Instructions for winding the bobbin and adjusting the primary thread tension.
Procedures for safely removing and inserting the bobbin case.
Guide for threading the needle and adjusting needle thread tension on the 1471E1.
Guide for threading needles and adjusting needle thread tension on the 1474E1.
How to select and set the desired stitch length for the sewing machine.
Instructions for changing the machine's display language.
Guide to performing manual sewing operations on the machine.
How to use pre-programmed stitch patterns for sewing.
Steps for selecting and executing pre-programmed seam patterns.
Information on programming and sewing decorative seams.
How to interrupt and resume programmed sewing sequences.
Understanding and correcting error messages displayed by the machine.
Explanation of symbols used in the machine's display interface.
Explanation of symbols displayed in the machine's status bar.
Interpretation of symbols shown in the text and graphic fields of the display.
Meaning of symbols presented in the pictogram bar for function selection.
Overview of functions available in different operating modes.
Overview of all functions available in SEWING mode.
Overview of all functions available in INPUT mode.
Overview of functions for the "Teach In" programming method.
Functions related to managing and administering sewing programs.
Overview of functions accessible via the input menu.
Details on various service functions available for machine maintenance.
How to navigate and select functions across different menu levels.
Steps and methods for creating custom seam programs.
How to modify existing pre-set sewing programs.
Detailed steps for programming new seam sections and comments.
Using the "Teach In" function to record and create seam programs.
Overview of specific menus for programming tasks.
Functions for setting and programming bartack parameters.
How to enable, disable, and set parameters for the placed-stitch function.
Setting functions to be performed automatically at the end of a seam section.
Practical examples demonstrating how to program various seams.
A step-by-step example of programming a standard seam.
An example illustrating the programming of decorative seam patterns.
An example showing how to use Teach In for creating seam programs.
Instructions for daily cleaning of the hook and hook compartment.
Procedure for applying oil to the hook gib and hook race.
Steps to check and refill the machine's main oil reservoir.
Guide for lubricating the bevel gears for the hook and rack annually.
Procedure for filling the oil reservoir for the thread lubrication system.
Instructions for cleaning the air filter located on the control box.
General notes and warnings regarding machine adjustments by trained specialists.
List of necessary tools and adjustment aids for machine setup.
Glossary of abbreviations used in the adjustment section.
Procedures for adjusting fundamental machine components.
Steps for adjusting the synchronizer to the correct needle position.
How to set the machine's configuration based on its model and fitted aids.
Adjusting needle position for the 1471 E1 model in the direction of sewing.
Setting the needle bar frame limitation for the 1471E1 model.
Adjusting needle position for the 1474E1 model in the direction of sewing.
Adjusting the needle height to the correct position relative to the needle plate.
Adjustments for needle rise, hook clearance, height, and needle guard on 1471E1.
Adjustments for needle rise, hook clearance, height, and needle guards on 1474E1.
Setting the needle position transverse to the sewing direction for 1471E1.
Setting the needle position transverse to the sewing direction for 1474E1.
Adjusting the height of the bobbin case opener.
Setting the stroke or travel of the bobbin case opener.
Adjusting the height of the feed wheel for the 1471E1 model.
Adjusting the height of the feed wheel for the 1474E1 model.
Adjusting the clearance between the roller-presser and the feed wheel.
Adjusting the roller-presser for proper alignment and contact.
Adjusting the holding-down clamp for the 1474E1 model.
Adjusting the automatic presser-foot lifter mechanism.
Adjusting the knee lever for proper operation and angle.
Adjusting the tension release mechanism for proper thread tension.
Adjusting the thread check spring for the 1471E1 model.
Adjusting the thread check springs for the 1474E1 model.
Adjusting the bobbin winder for reliable engagement and auto shut-off.
Adjusting the roller-presser pressure for reliable feeding without marks.
Adjusting the edge trimmer attachment for the 1471E1 model.
Setting the correct position of the knife carrier for the edge trimmer.
Adjusting the knife stroke for optimal material adaptation.
Setting the knife motion for balanced front/back movement.
Adjusting the knife position for light contact with the needle plate.
Adjusting the edge trimmer attachment for the 1474E1 model.
Procedure for replacing the knife in the edge trimmer.
Adjusting the knife height relative to the needle plate edge.
Setting the knife stroke for ideal adaptation to materials.
Adjusting the knife motion for balanced front/back movement.
Setting the knife position for light contact with the needle plate insert.
Adjusting the thread trimmer attachment.
Steps for safely removing the scissor mechanism from the thread trimmer.
Aligning control cam with bobbin opener and tripping lever.
Setting the radial position of the tripping lever relative to the control cam.
Adjusting the solenoid for proper engagement with the thread trimmer.
Adjusting the scissor drive lever for correct clearance.
Using a gauge to adjust control cams relative to bobbin opener and scissor.
Setting the radial position of the control cam relative to the bobbin opener.
Aligning the tripping lever of the scissor with its control cam.
Adjusting the control cam's position relative to the scissor.
Adjusting the scissor return lever for proper cam engagement.
Setting the scissor return control for correct clearances.
Steps for fitting the scissor mechanism correctly.
Adjusting the eccentric sleeve for flush alignment with the needle plate.
Adjusting the scissor driving rod for proper position and clearance.
Testing the scissor mechanism for proper cutting and thread trapping.
Adjusting the tension release mechanism on specific models.
Overview and adjustment of various machine parameters.
Adjusting specific positional parameters of machine components.
Setting and configuring the machine's stitch counter.
Adjusting various speed settings for different machine operations.
| Needle Threader | Yes |
|---|---|
| Adjustable Stitch Length | Yes |
| Adjustable Stitch Width | Yes |
| Free Arm | Yes |
| Built-in Needle Threader | Yes |
| Type | Electronic |
| Presser Feet | buttonhole, blind hem |