23
Preparations
21
22
23
24
Stitch length or stitch density (13)
Increase or decrease the stitch length using the “-” and “+” buttons.
For satin stitches, use the “-” and “+” buttons to change the density for the selected stitch.
Information (14)
Press this button to display sewing recommendations for the currently selected stitch.
Settings menu (15)
Press this button to open the menu for machine settings.
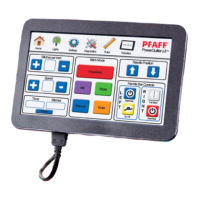
Touch screen (9)
The touch screen lets you view all your selections
and options. Stitches are shown in real size.
Direct selection (16)
Touch the stitch number in the top left corner of
the screen to open the direct selection keypad.
By touching one of, or a combination of, the 0 to
9 icons, you select the stitch represented by that
number.
Settings & functions tabs
Some of the main functions on your machine are
available through the tabs at the bottom of the
screen.
Sewing mode (17)
Touch this tab to go to sewing mode. Sewing mode
LVWKHÀUVWYLHZRQWKHWRXFKVFUHHQDIWHU\RXWXUQ
on the machine.
Sequencing (18)
Touch this tab to enter sequencing.
Alphabet mode (19)
In alphabet mode, you can create text sequences
from various characters in four different fonts.
Tie-off options (20)
Touch to set the tie-off options.
Sequencing
Move cursor (21)
Touch to move the cursor when inserting, deleting
and adjusting stitches in a sequence.
Delete (22)
Touch to delete stitches in a sequence. Long touch
to delete the whole sequence.
16
Load personal stitch or sequence (23)
Touch to load a previously saved stitch or
sequence.
Save personal stitch or sequence (24)
Touch to save a stitch or sequence to the machine
memory.
2017 18 19
Sewing mode
Sequencing
 Loading...