5HSDLU7LSV
0. Warnin
All ICs and man other semi -conductors are susceptible to
electrostatic dischares (ESD). Careless handlin durin repair can
reduce life drasticall . When repairin make sure that ou are
connected with the same potential as the mass of the unit via a wrist
wrap with resistance. Keep components and tools also at the same
potential
1. Servicin of SMDs (Surface Mounted Devices)
1.1 General cautions on handlin and storae
- Oidation on the terminals of SMDs results in poor solderin.
Do not handle SMDs with bare hands.
- Avoid usin storae places that are sensitive to oidation such as
places with sulphur or chlorine as direct sunliht hih temperatures
or a hih deree of humidit. The capacitance or resistance value of
the SMDs ma be affected b this.
- Rouh handlin of circuit boards containin SMDs ma cause
damae to the components as well as the circuit boards. Circuit boards
containin SMDs should never be bent or fleed. Different circuit board
materials epand and contract at different rates when heated or cooled
and the components and/or solder connections ma be damaed due
to the stress. Never rub or scrape chip components as this ma cause
the value of the component to chane.
Similarl do not slide the circuit board across an surface.
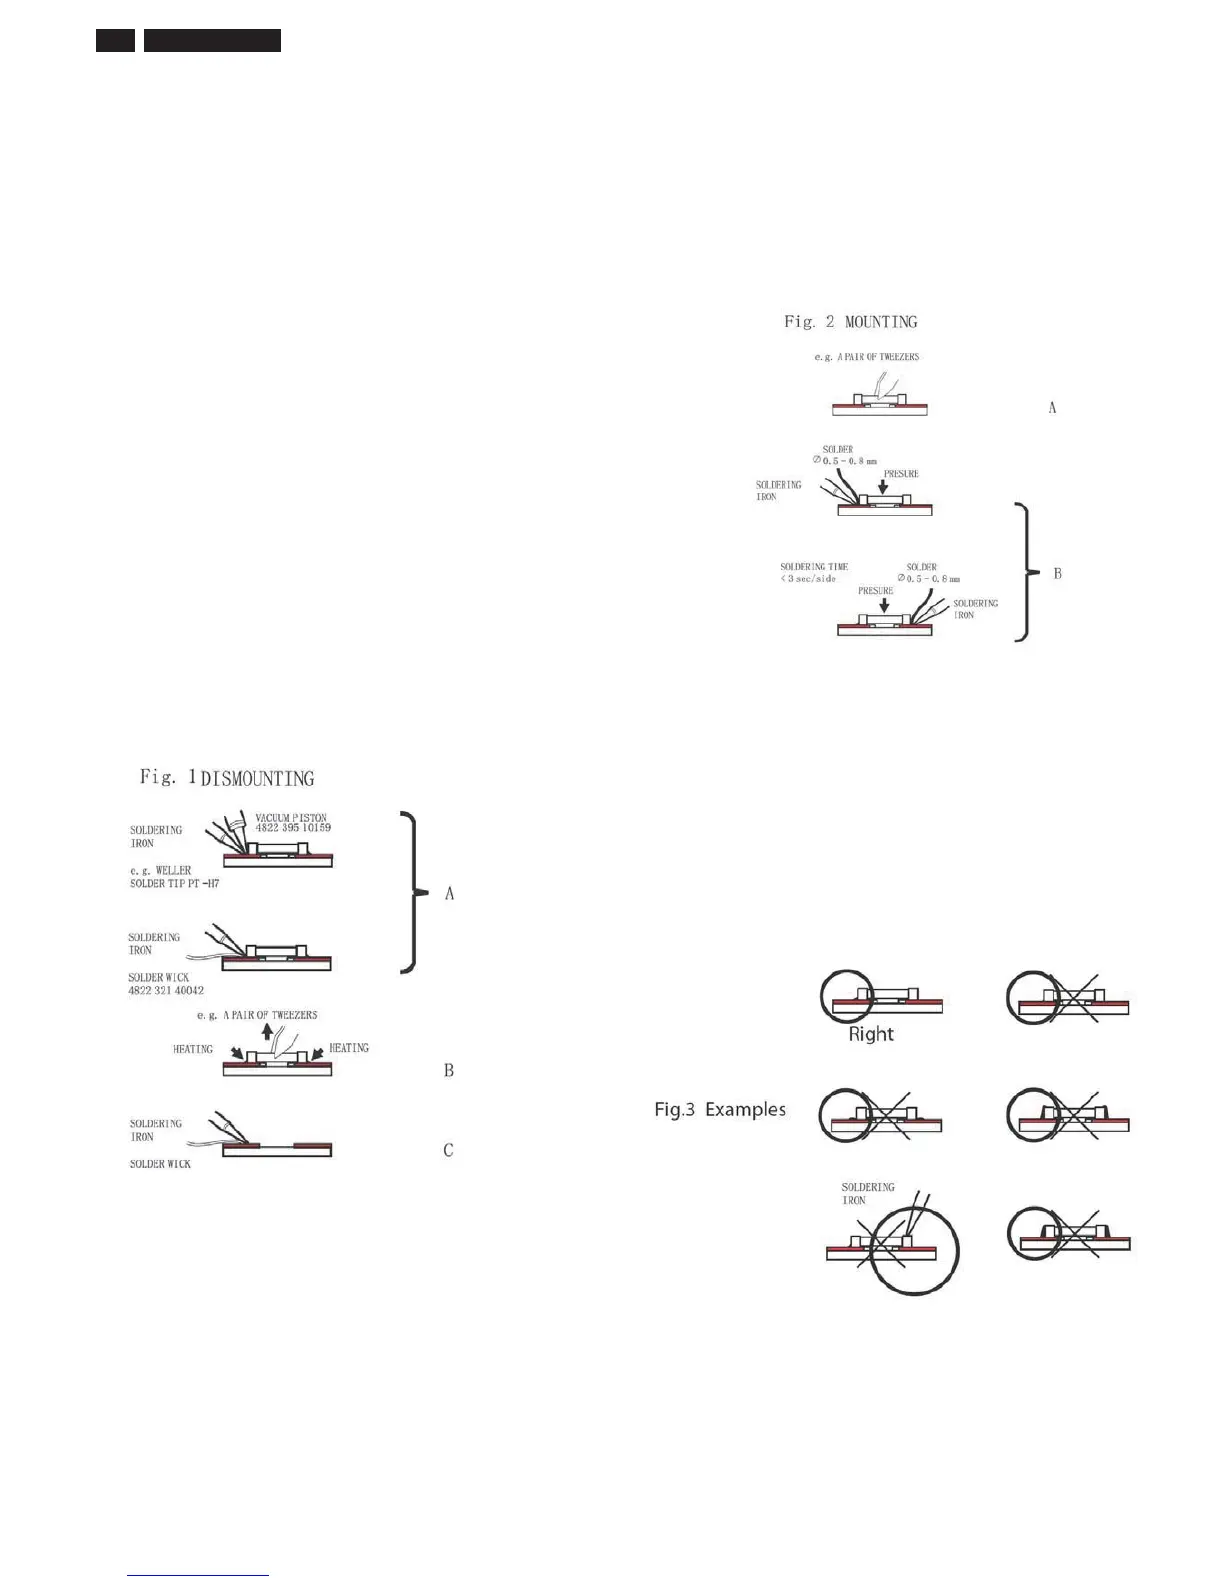
1.2 Removal of SMDs
- Heat the solde r (for 2-3 seconds) at each terminal of the chip. B
means of lit wire and a sliht horiontal force small components can
be removed with the solderin iron.
The can also be removed with a solder sucker (see Fi. 1A)
While holdin the SMD with a pair of tweeers take it off entl usin
the solderin iron's heat applied to each terminal (see Fi. 1 B).
- Remove the ecess solder on the solder lands b means of lit wire or
a solder sucker (see Fi. 1C).
While holdin the SMD with a pair of tweeers take it off entl usin
the solderin iron's heat applied to each terminal (see Fi. 1 B).
- Remove the ecess solder on the solder lands b means of lit wire or
a solder sucker (see Fi. 1C).
1.3 Caution on removal
- When handlin the solderin.iron. use suitable pressur e and be
careful.
- When removin the chip do not use undue force with the pair of
tweeers.
- The solderin iron to be used (appro. 30 W) should preferabl be
euipped with a thermal control (solderin temperature 225 to 250 C).
7KHFKLSRQFHUHPRYHGPXVWQHYHUEHUHXVHG
1.4 Attachment of SMDs
- Locate the SMD on the solder lands b means of tweeers and solder
the component on one side. Ensure that the component is positioned
correctl on the solder lands (see Fi.2A).
- Net complete the solderin of the terminals of the component (see
Fi. 2B).
2. Caution when attachin SMDs
- When solderin the SMD terminals do not touch them directl with
the solderin iron. The solderin should be done as uickl as possible
care must be taken to avoid damae to the terminals of the SMDs
themselves.
- Keep the SMD's bod in contact with the printed board when
solderin.
- The solderin iron to be used (appro. 30 W ) should preferabl be
euipped with a thermal control (solderin temperature 225 to 250 C).
- Solderin should not be done outside the solder land.
- Solderin flu (of rosin) ma be used but should not be acidic.
- After solderin let the SMD cool down raduall at room temperature.
- The uantit of solder must be proportional to the sie of the solder
land. If the uantit is too reat the SMD miht crack or the solder
lands miht be torn loose from the printed board (see Fi. 3).
241%4L3 LCD