7
English
3 Press the On/Off button (Fig. 11) to switch on the machine.
-
On/Off and Espresso buttons will light up.
4 Ensure that the steam wand is aligned with the hole of the drip tray (Fig. 12).
5 Press the Espresso button (Fig. 13) to flush.
-
Hot water will begin to flow out of the brewing head and the steam wand.
6 After the water stops dispensing, the On/Off button starts blinking and the machine will heat up.
During the flushing the hot water/steam wand, portafilter may become hot. To avoid the risk of
burns, let them cool down first.
Making coffee
Setting the grinder
The coarseness of ground coffee significantly influences brewing dynamics, like the pressure and flow rate,
and ultimately, the flavor of espresso.
This machine offers 15 coarseness levels (1-15). The lower the grind setting, the finer the coffee beans are
ground and the stronger the coffee.
Adjustments may be needed for different beans with varying roast degrees, impacting the amount of
ground coffee produced.
For Espresso/Americano grinder levels 1-4 are recommended. For longer coffee recipes (e.g. Lungo) levels
5-10 are best (Fig. 5).
Choosing the filter basket
-
Basket single/double cup dual wall:
The supplied basket single/double cup dual walls (Fig. 14) allow you to brew an espresso with crema even
when using the machine for the first time, and facilitate achieving the optimal pressure range.
-
Basket single/double cup single wall:
The supplied basket single/double cup single walls (Fig. 15) are like those used in professional bar machines
and require manual skills and experience. Allow for greater customization of your coffee, resulting in
improved extraction, taste and consistency once you find the right setup.
Grinding beans
1 Select a single or dual wall filter and install it into the portafilter.
-
When changing the filter, you can easily pry off the installed filter with the edge of the other filter
(Fig. 16).
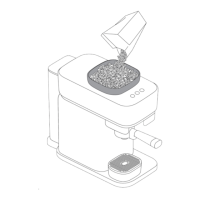
2 Attach the powder ring onto the portafilter (Fig. 17).
3 Align the portafilter with the grinder bracket and push it horizontally (Fig. 18).
-
Use the Grind Amount knob to grind more or less beans
4 For automatic grinding, long press the Grinder button for three seconds to select 1x or 2x dose. Then
press the Grinder button once again to start grinding. To stop the grinding process midway, simply press
the Grinder button again.
5 For manual grinding, hold the portafilter with one hand and press and hold the portafilter into the
bracket until the required amount of coffee is ground.