5
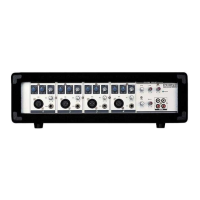
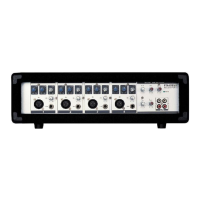
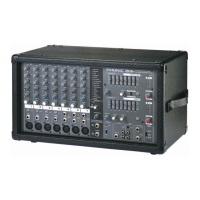
PM 801
BASIC SETUP
Getting Started
1. Ensure all power is turned off on the PM 801
Personal Mixer. To totally ensure this, the AC
cable should not be connected to the unit.
2. All level controls should be set at all the way
to the left and all channels muted to ensure
no sound is inadvertently sent through the
outputs when the device is switched on.
All levels can be changed to acceptable
degrees after the device is turned on.
3. Plug all necessary instruments and
equipment into the device's various inputs
as required. This may include line level
devices, as well as microphones and/or
guitars, keyboards, etc.
4. Plug any necessary equipment into the PM
801’s output jack and pre-fader output. These
outputs can be sent to various devices, such
as ampliers, active speakers or monitors,
signal processors, and/or recording devices.
5. Plug the supplied AC cable into the AC inlet
on the back of the device ensuring the local
voltage level is identical to that required on
your device.
6. Plug the supplied AC cable into a power
outlet of a suitable voltage.
7. Turn the power switch on.
Channel Setup
1. To ensure the correct audio levels of each
input channel is selected, every channel
should rst be muted and all VRs turned all
the way to the left (including the main output
control).
2. Choose the channel that you wish to set
the level of, and ensure that channel has a
signal sent to it similar to the signal that will
be sent when in common use. For example,
if the channel is using a microphone, then
you should speak or sing at the same level
the performer normally would during a
performance. If a guitar is plugged into that
channel, then the guitar should also be used
as it normally would be.
4. Set the level control of the selected channel
to a level that allows the clip LED to illuminate
occasionally; then turn it back slightly to
ensure the LED does not illuminate. This will
allow you to make full use of the channel’s
signal.
5. This channel is now ready to be used; you
can stop making the test audio signal.
6. To activate the channel, release the mute
button.
7. You should now select the next channel to
set and go back to follow steps 1 through 5.
Note: it is possible to connect two PM 801’s together
through the Prefader Outputs and AUX Bus
Inputs of each, allowing a total of 16 inputs to
be used, all controlled through a single fader (or
both faders, and sending the same signal to 2
separate external devices).