Do you have a question about the Pitco W14S-S WF and is the answer not in the manual?
Crucial safety advice on handling flammable materials near the appliance.
Instruction to post emergency procedures for gas leaks for purchasers.
Collection of critical warnings regarding open flames, gas leaks, hot oil, and carbon monoxide hazards.
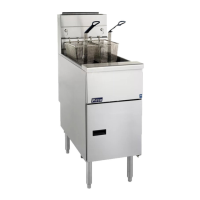
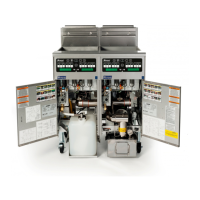
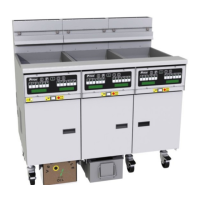
Lists the characteristics and specifications of the Pitco Model W14S-3 WF fryer.
Instructions for inspecting the fryer and its components upon delivery for damage or missing parts.
Details the items that should be included in the crate with the fryer unit.
Provides guidance and warnings for the safe installation of the fryer.
Specifies required clearances around the fryer for safe operation and servicing.
Instructions on how to level the fryer using its casters after placement.
Outlines requirements and procedures for connecting the fryer to the gas supply line.
Explains how to identify the correct fuel type for the fryer based on the data plate.
Details the connection of the gas supply line to the fryer, including connector standards.
Instructions for installing quick disconnect devices for gas connections on fryers with casters.
Procedures for testing the fuel supply system for leaks and correct pressure.
Guidelines for connecting the fryer to the electrical power supply, including voltage requirements.
Describes the single power supply for controls and the UFM filter module.
Emphasizes the importance of proper ventilation and fire safety systems for fryer operation.
Details the necessary adjustments after installation for optimal fryer performance.
Steps for performing visual checks before filling and adjusting the fryer.
Explains the manual pilot ignition system and the procedure for lighting the pilot.
Step-by-step instructions for manually lighting the pilot light on the fryer.
Procedure for adjusting the pilot flame to achieve proper millivolt output.
Information on how the main burners operate and common flame conditions.
Specifies gas line pressure requirements for natural gas and LP.
Step-by-step guide to adjusting the main burner flame for optimal performance.
Procedures for cleaning the fryer before its first use to remove protective oil coatings.
Instructions for filling the fryer with either liquid or solid shortening.
Specific steps for filling the fryer with liquid shortening.
Procedures for filling the fryer with solid shortening, including packing instructions.
General guidance for operating the fryer using the Intellifry computer.
Steps to start up the fryer, including initial computer displays and melt cycles.
How to view actual and set temperatures on the Intellifry computer display.
Procedure to display the current temperature of the shortening in the fryer.
Procedure to view the target cooking temperature setpoint for the fryer.
How to view cook, shake, and hold times programmed for different products.
Steps to access and view the programmed cook, shake, and hold times for products.
Basic steps for cooking products using the Intellifry computer.
Procedures for safely shutting down the fryer in standby or complete shutdown modes.
Instructions on what to do in case of a power outage and how to restart the fryer.
Overview of the three programming levels (user, service, factory) for the Intellifry computer.
Covers routine changes like shortening temperature and product times.
Step-by-step guide to setting the desired shortening temperature in the computer.
Instructions for programming cook, shake, and hold times for various products.
Details various low-level computer settings like temperature units, password, and volume.
How to toggle between Celsius (°C) and Fahrenheit (°F) temperature units.
Procedures for setting, removing, or changing the computer access password.
How to adjust the volume level for the fryer's beeper alerts.
Instructions for setting the display language for the Intellifry computer.
How to select the appropriate melt cycle (No Melt, Liquid, Solid) for the shortening.
Procedure to view recovery test data for fryer heat-up performance.
How to switch between computer control mode and timer mode.
Overview of the procedures for filtering the fryer's shortening.
Tips and important considerations for effective shortening filtration.
Detailed step-by-step instructions for performing the shortening filtration process.
Procedure for draining fryer tanks using the Shortening Shuttle.
Steps for replacing the filter media in the filter module.
Procedures for daily and weekly cleaning of the fryer.
Daily cleaning tasks to maintain the fryer's performance and appearance.
Instructions for weekly deep cleaning, including boil-out procedures.
Recommendation for periodic inspection of the fryer's flue and baffles.
Overview of the chapter covering maintenance and troubleshooting by qualified technicians.
Guide for qualified technicians on replacing various fryer components.
Steps for removing and reinstalling the main burner assembly.
Procedure for replacing the main burner orifice.
Instructions on how to remove and replace the heat baffles within the fryer.
Steps for removing and reinstalling the pilot burner assembly.
Procedure for replacing the pilot orifice.
Steps for removing and replacing the thermopile component.
Procedure for replacing the high limit control and its sensor.
Introduction to the troubleshooting section for fryer and filter issues.
Guides users in correcting common problems encountered during fryer operation.
A flowchart guiding users through diagnosing and resolving pilot system issues.
A flowchart for diagnosing and resolving problems with the fryer's filter unit.
An index of parts shown in the exploded view diagram, with descriptions and part numbers.
A list of fryer components organized alphabetically by part description.
A list of fryer components organized numerically by Pitco Frialator part number.
Provides the schematic diagram number for the W14S-WF model.
| Model | W14S-S WF |
|---|---|
| Category | Fryer |
| Heating Method | Gas |
| Weight | 220 lbs |
| Gas Type | Natural Gas or Propane |
| Construction | Stainless Steel |
| Voltage | 120V |
| Number of Fry Pots | 1 |
| Type | Gas |
| Phase | 1 Phase |
| Tank Size | 14 lbs |