7
Press until
“0” appears
Release
Press
Press
START
ENGINE
STOP
Before
Using
Features
Connecting
The Wires
Installing
The Product
How to
Operate
Speed Pulse
Settings
Trouble-
Shooting
Initial
Settings
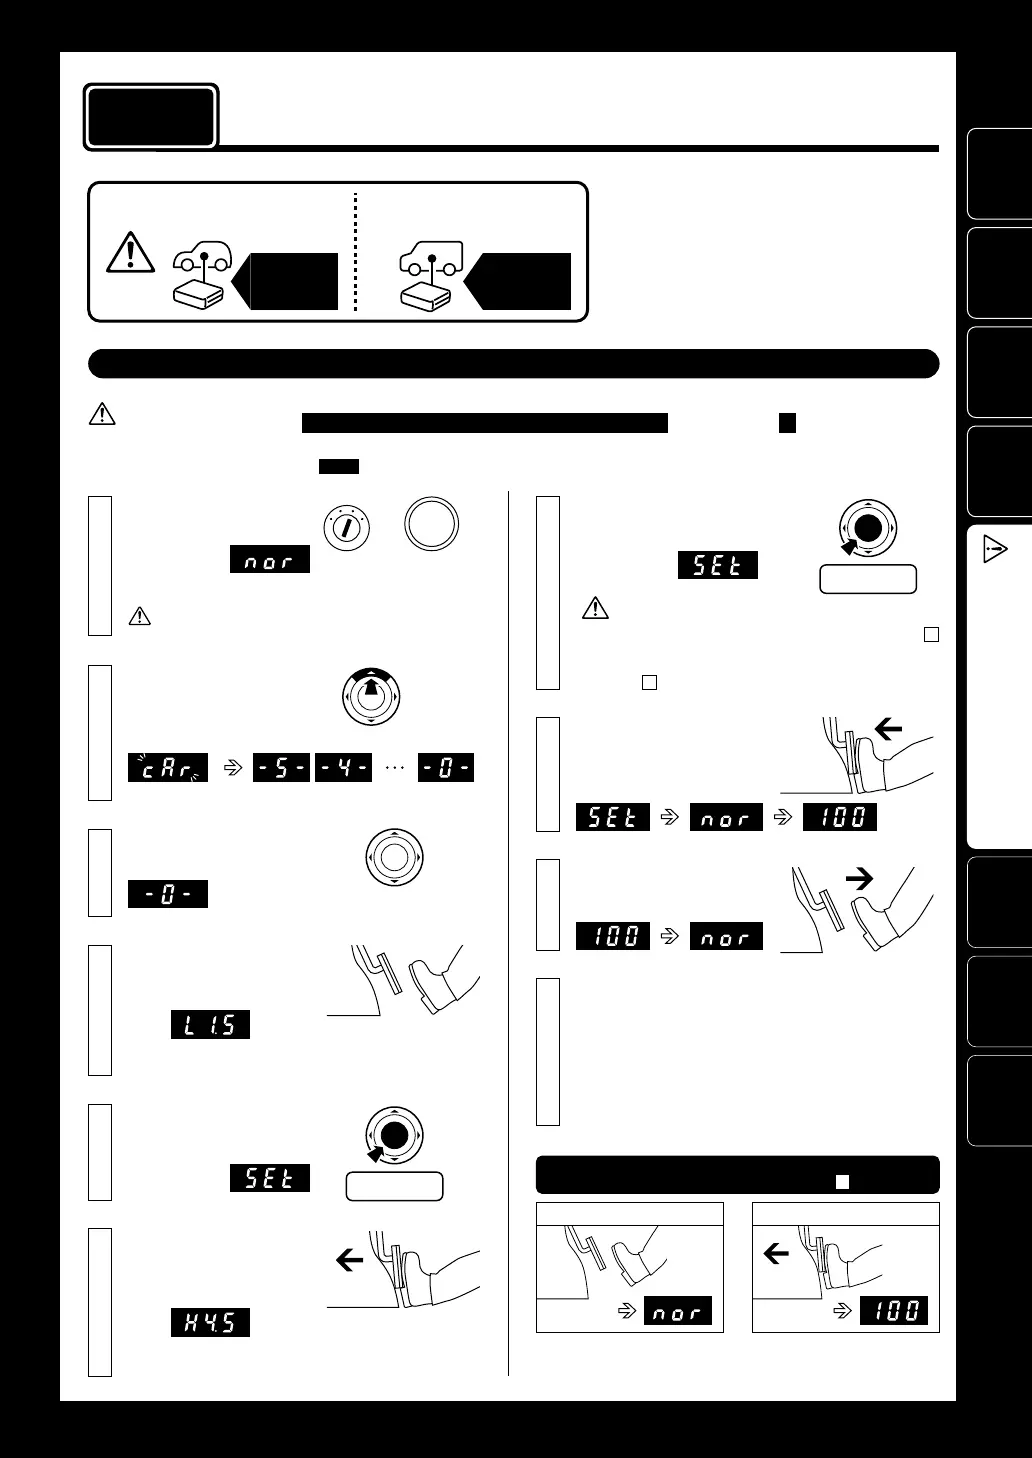
Make sure to carry out
this operation.
If after the
Err
is shown the display returns to as shown in 4
(
L1.5
or so on), it means that the degree of acceleration
settings have not been confirmed properly. Re-do the settings
from step 4 .
0%
(Engine not running)
Turn the ignition ON.
Setting Completed
: Controller Display Area, ( ) contains additional explanation
Set to 0%
1. Make settings only after having completed all wiring (connector installation).
2. Make settings with the
ignition in the ON position (engine not running) and the gear in N (Neutral).
When installing for
the first time
When installing into a
different car
(NORMAL Mode)
0%
Do not press in on pedal
100%
100%
Check the Settings
Press down on pedal
If
Err
is displayed
Note: Depending on characteristics of the accelerator or on how the
accelerator is stepped on the display may read
A95
(95%).
Initial
Settings
Initial
Settings
Before making the “Initial Settings”
• This operation sets the car’s accelerator
characteristics into the controller unit.
• If the “Initial Settings” are not carried out,
the unit will remain in NORMAL Mode even
if the Mode is switched.
• If this settings have been improperly made
a Check Engine Light may go on.
If the device is re-installed into a different vehicle,
make sure to carry out these settings again.
After having finished settings and the bat-
tery or wires have been disconnected it is
not necessary to carry out “Initial Settings”.
If
nor
does not appear, press the MODE switch until
nor
appears.
(Release the accelerator to 0%)
(e.g.)
Press the UP switch for
10 seconds or longer to
change the display to
0
.
With the accelerator at
0%, press the BLP switch.
Pedal is completely
pressed down.
When
0
appears release
the UP switch.
4
5
Set to 100%
With the accelerator at 100%,
press the BLP switch.
7
6
Press down on the accel-
erator pedal until
100
appears.
8
Once the display
changes to 100 release
the accelerator.
9
10
1
2
3
[Making the Settings]
ON
(Count down from 5 to 0 after the
cAr
blink.)
(e.g.)
or
Initial Settings (Degree of Acceleration Setting)
Make sure to carry out these settings.
procedure 3
(If the display is incorrect start
again from step 2 above.)
(Voltage Display: e.g., 4.5V. The values shown in the display will
vary depending on the type of car.)
(Voltage Display: e.g., 1.5V. The values shown in the display will
vary depending on the type of car.)
(Press in on the accelerator to
100%)
Accelerator pedal is not
pressed down.
•
nor
will
appear.
Without press the
clutch pedal,
press down twice
•
SEt
will
appear.
•
SEt
will
appear.
(See Note)
Metal part
Wire tip
Plastic part
(Example of Installation)
Fasten the cables not to disconnect connectors
by getting caught on cables.