15
Installation
EN
DE
ES
FR
IT
JP
KO
NL
PTB
RU
ZH
ZHT
▶ Install the charging pedestal on a firm surface
in a location protected from rain. Avoid locations
with direct exposure to sunlight.
▶ When using the 2.5 m-long vehicle cable, install
the charging pedestal as close to the vehicle as
possible. Bear in mind your preferred parking
position and vehicle orientation.
▶Do not install the charging pedestal:
– in potentially explosive atmospheres
– in the way of emergency or recovery services
or walkways (also make sure the cable does
not cross these routes)
– in locations exposed to hose water (e.g. from
pressure washers or garden irrigation)
– under hanging objects
– in stables, barns and other places where
ammonia gas occurs
Recommended installation
sequence
1. Prepare the foundation (with empty conduit
and anchor rods).
2. Lay the cable from the circuit breaker to the
foundation.
3. Install the charging pedestal.
4. Have the power supply installed by a qualified
electrician.
Preparing the foundation
▶ For secure fastening: Check the condition of the
foundation before installation!
If a firm surface with sufficient load-bearing capacity
as per the static calculation is available and the cable
can be routed correctly, you do not need to produce
a separate foundation. In this case, you can install the
charging pedestal directly on the existing surface.
Installation on an existing surface
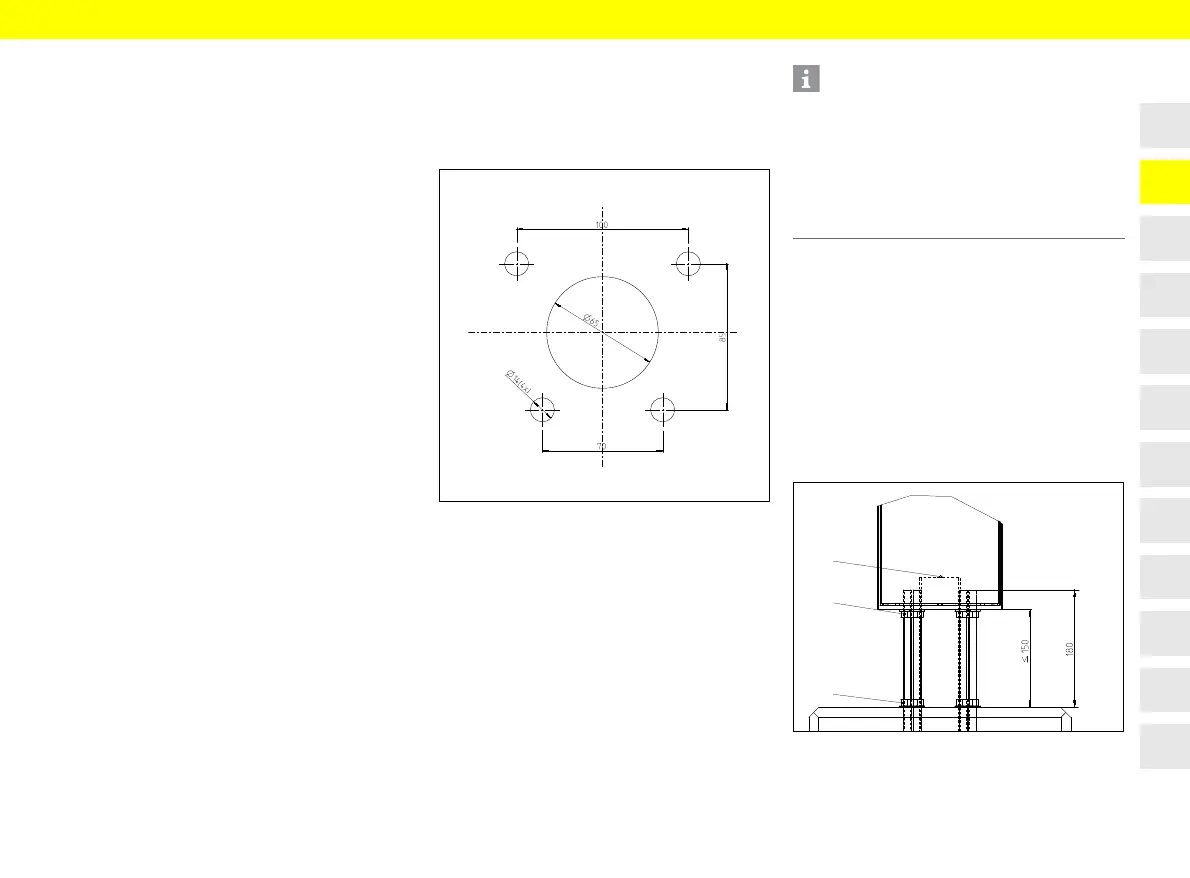
1. Mark drill holes on the ground for the cable entry.
2. Drill holes with ø 14 mm and insert the
foundation fastening kit as described in the
product manual.
Fig. 2: Drilling dimensions
Installing the charging pedestal
▶ Produce the foundation at the site in the correct
manner.
Secure with HILTI HVA, for example (see Appendix:
Hilti Foundation Fastening Kit on page 20) or similar.
Preparing for installation with
clearance
1. Brace the anchor rods in the foundation with
four A13 washers and four M12 nuts.
Max. tightening torque: 40 Nm.
2. Adjust the desired height between 30 mm
and 150 mm with the aid of four M12 nuts
and A13 washers.
3. Empty conduit: Minimum projection of 250 mm
above the foundation.
Fig. 3: Installation with clearance
Information
The charging pedestal is generally installed directly
(without clearance) on prepared reinforced concrete
surfaced with e.g. plaster, tarmac, etc. (see Fig. 7).
If the surface of the foundation is to be finished later,
installation with ground clearance is possible, so that
the charging pedestal can be installed above the
planned surface in advance (see Fig. 3).