27
ŏ Do not use this saw to cut small pieces. If
the workpiece being cut would cause your
KDQGRU¿QJHUVWREHZLWKLQLQRI
the saw blade the workpiece is too small.
.HHSKDQGVDQG¿QJHUVRXWRIWKH
“no-hands zone” area marked on the
saw table.
ŏ When cutting odd shaped workpieces,
plan your work so it will not bind in the
blade and cause possible injury. Molding,
IRUH[DPSOHPXVWOLHÀDWRUEHKHOGE\
D¿[WXUHRUMLJWKDWZLOOQRWOHWLWPRYH
when cut.
ŏ Properly support round material such
as dowel rods, or tubing, which have a
tendency to roll when cut.
7RDYRLGLQMXU\IROORZDOODSSOLFDEOHVDIHW\
LQVWUXFWLRQVZKHQFXWWLQJQRQIHUURXV
metals:
ŏ 8VHRQO\VDZEODGHVVSHFL¿FDOO\
recommended for non-ferrous metal
cutting.
ŏ Do not cut metal workpieces that must be
hand held. Clamp workpieces securely.
ŏ Cut non-ferrous metals only if you are
under the supervision of an experienced
person and the dust bag has been
removed from the saw.
WHEN SAW IS RUNNING
'RQRWDOORZIDPLOLDULW\IURPIUHTXHQWXVH
RI\RXUPLWHUVDZWRUHVXOWLQDFDUHOHVV
PLVWDNH$FDUHOHVVIUDFWLRQRIDVHFRQGLV
HQRXJKWRFDXVHDVHYHUHLQMXU\
%HIRUHFXWWLQJLIWKHVDZPDNHVDQ
XQIDPLOLDUQRLVHRUYLEUDWHVVWRS
LPPHGLDWHO\7XUQWKHVDZ2))8QSOXJ
WKHVDZ'RQRWUHVWDUWXQWLO¿QGLQJDQG
FRUUHFWLQJWKHSUREOHP
MAKING A BASIC CUT
WARNING
!
WARNING
!
WARNING
!
7RHQVXUHWKHEODGHSDWKLVFOHDURI
REVWUXFWLRQVDOZD\VPDNHDGU\UXQRIWKH
FXWZLWKRXWSRZHUEHIRUHPDNLQJDQ\FXWV
RQWKHZRUNSLHFH
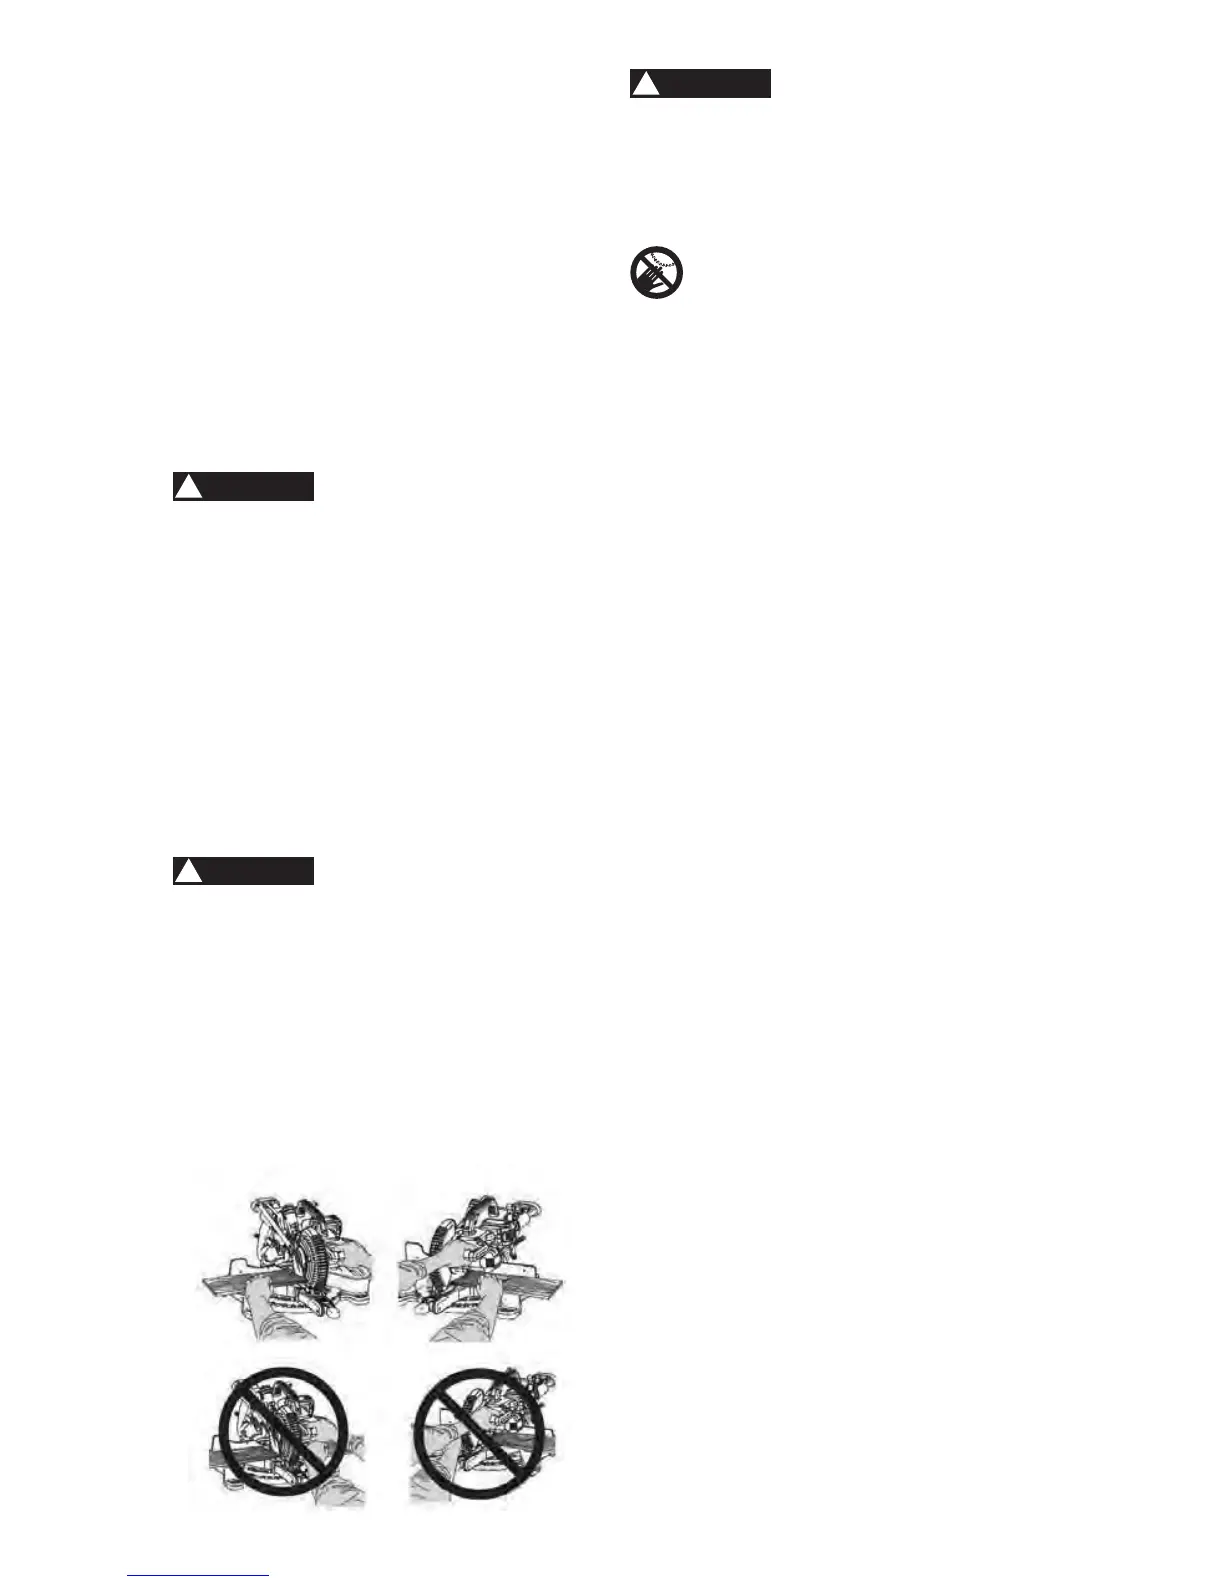
%RG\DQG+DQG3RVLWLRQ)LJ''
1HYHUSODFHKDQGVQHDUWKHFXWWLQJ
DUHD3URSHUSRVLWLRQLQJRI\RXU
ERG\DQGKDQGVZKHQRSHUDWLQJ
WKHPLWHUVDZZLOOPDNHFXWWLQJHDVLHU
DQGVDIHU.HHSFKLOGUHQDZD\.HHSDOO
YLVLWRUVDWDVDIHGLVWDQFHIURPWKHPLWHU
VDZ0DNHVXUHE\VWDQGHUVDUHFOHDURIWKH
VDZDQGZRUNSLHFH'RQ¶WIRUFHWKHVDZ
6WDUWLQJDFXW
ŏ Place hands at least 7-5/16 in. away from
the path of the blade – out of the “no-
hands zone” (1) shown in Fig. DD on the
next page.
ŏ $OZD\VXVHWKHFODPSWR¿UPO\KROGWKH
workpiece against the fence and table to
prevent movement toward the blade.
ŏ
Turn the
laser guide
on for pre-alignment
of your cut.
ŏ With the power switch OFF, bring the saw
blade down to the workpiece to see the
cutting path of the blade. Raise the saw
blade back up before turning the saw on.
ŏ 6TXHH]HWULJJHUVZLWFKWRVWDUWVDZ
ŏ /RZHUEODGHLQWRZRUNSLHFHZLWKD¿UP
downward motion.
)LQLVKLQJDFXW
ŏ Hold the cutting arm in the down position.
ŏ Release trigger switch and wait for all
moving parts to stop before moving your
hands and raising the cutting arm.
ŏ
If the blade doesn’t stop within 10 seconds,
unplug the saw and follow the instructions
in TROUBLESHOOTING GUIDE section.
%HIRUHIUHHLQJMDPPHGPDWHULDO
ŏ Release trigger switch.
ŏ Wait for all moving parts to stop.
ŏ Unplug the miter saw.