EasyManua.ls Logo

Powermatic 54A - User Manual

Powermatic 54A
40 pages
Print Icon
To Next Page IconTo Next Page
Loading...
Operating Instructions and Parts Manual
6-inch Woodworking Jointer
Models 54A and 54HH
54A (1791279DXK) serial # 8040543557 and up
54HH (1791317K) serial # 8010540313 and up
WMH TOOL GROUP, Inc.
2420 Vantage Drive
Elgin, Illinois 60123 Part No. M-1791279DX
Ph.: 800-274-6848 Revision C 06/08
www.powermatic.com Copyright © 2008 WMH Tool Group, Inc.

Other manuals for Powermatic 54A

Questions and Answers

  • J
    Jerry MurrayAug 12, 2025
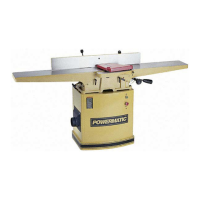
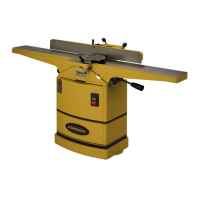
    Why does my Powermatic 54A Power Tool cutterhead slow down during operation?
    • S
      Stephanie MillerAug 12, 2025
      The cutterhead on your Powermatic Power Tool might slow down while operating if you are feeding the workpiece too quickly or applying too much pressure. Try feeding more slowly or applying less pressure to the workpiece.
  • S
    Sean MooreAug 16, 2025
    What causes uneven knife marks on a Powermatic 54A Power Tool workpiece?
    • T
      thomasfernandezAug 16, 2025
      Uneven knife marks on a Powermatic Power Tool workpiece may be due to knives that are nicked or out of alignment. Align the knives. Replace nicked knives or correct for small nicks.
  • J
    James MunozAug 20, 2025
    Why won't my Powermatic Power Tool start or keeps tripping the breaker?
    • M
      moralesbrianAug 20, 2025
      There are several reasons why your Powermatic Power Tool might not start, restart, or repeatedly trip the circuit breaker: * **No incoming power:** Verify the unit is connected to power, the on-button is completely pushed in, and the stop-button is disengaged. * **Building circuit breaker trips or fuse blows:** Ensure the jointer is on a circuit of the correct size. If the circuit size is correct, there may be a loose electrical lead. Check the amp setting on the motor starter. * **Motor overheated:** Clean the motor of dust or debris to allow proper air circulation. Allow the motor to cool down before restarting.
  • A
    Aaron JohnsonAug 23, 2025
    What to do if my Powermatic 54A Power Tool is causing chip out?
    • K
      Kim ToddAug 25, 2025
      If your Powermatic Power Tool is causing chip out, consider these solutions: * Cut with the grain whenever possible. * Sharpen or replace dull knives. * Use a slower rate of feed. * Make shallower cuts. * Inspect wood closely for imperfections; use different stock if necessary if there are knots or imperfections in the wood.
  • J
    Jordan JonesAug 27, 2025
    How to fix “chatter” marks on my Powermatic 54A Power Tool workpiece?
    • T
      Teresa DiazAug 27, 2025
      If you notice “chatter” marks on your workpiece when using your Powermatic Power Tool, it could be due to: * **Knives incorrectly set:** Set the knives properly, ensuring knife slots are clean and free of dust or debris. * **Feeding workpiece too fast:** Feed the workpiece slowly and consistently.
  • A
    Adrian CarterAug 31, 2025
    What causes fuzzy grain when using my Powermatic Power Tool?
    • J
      justin23Aug 31, 2025
      Fuzzy grain when using your Powermatic Power Tool can be caused by: * **Wood has high moisture content:** Allow the wood to dry or use different stock. * **Dull knives:** Sharpen or replace knives/inserts.
  • R
    Richard Martin PhDSep 4, 2025
    How to fix concave back end on Powermatic 54A Power Tool stock?
    • F
      frances82Sep 4, 2025
      If the finished stock is concave on the back end when using your Powermatic Power Tool, it's likely because the knife is higher than the outfeed table. Raise the outfeed table until it aligns with the tip of the knife.
  • T
    Travis LittleSep 7, 2025
    How to fix concave front end on Powermatic Power Tool stock?
    • J
      Jacob BradshawSep 8, 2025
      If the finished stock is concave on the front end when using your Powermatic Power Tool, it is because the outfeed table is higher than the knife. Lower the outfeed table until it aligns with the tip of the knife.

Summary

Powermatic 6-inch Woodworking Jointer Operating Instructions and Parts Manual

Warranty and Service Information

Obtaining Service

Procedure for getting service and repair for the jointer.

Safety Guidelines and Precautions

General Safety Instructions

Essential safety rules for jointer operation and setup.

Electrical Safety and Grounding

Proper electrical connections, grounding, and voltage operation.

Assembly and Setup

Electrical System Configuration

Grounding Instructions

Critical steps for proper machine grounding to prevent shock.

Machine Adjustments

Infeed Table Height Adjustment

Adjusting the infeed table for the desired depth of cut.

Outfeed Table Height Adjustment

Setting the outfeed table relative to the cutterhead knives.

Cutterhead and Knife Maintenance

Setting Cutterhead Knives (Model 54 A)

Procedure for adjusting knives using cams for precise cuts.

Replacing or Rotating Knife Inserts (Model 54 HH)

How to replace or rotate knife inserts on the 54HH model.

Operation and Techniques

Basic Jointer Operations

Fundamental techniques for using the jointer safely.

Maintenance and Troubleshooting

Troubleshooting Operating Problems

Solutions for common issues like chip out or chatter marks.

Troubleshooting Electrical Issues

Diagnosing and resolving machine starting or electrical faults.

Powermatic 54A Specifications

General IconGeneral
TypeJointer
Number of Knives3
Cutting Capacity Width6 inches
Fence Tilt45 degrees
Motor Power1 HP
Dust Port Size4 inches
Cutting Capacity Depth1/2 inch
Motor Voltage115/230V
Cutterhead Width6 inches
Maximum Depth of Cut1/8 inch
Voltage120V/240V

Related product manuals