This document is the owner's manual for the Viper 150-E Dirt Bike manufactured by Ricky Power Sports LLC. It provides essential information for safe operation, maintenance, and technical specifications of the dirt bike.
Function Description
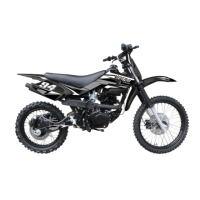
The Viper 150-E Dirt Bike is designed for off-road use. It is a motorized vehicle intended for recreational riding on unpaved surfaces. The manual emphasizes that the dirt bike is not suitable for children under 16 years of age and requires adult supervision for operation by individuals under this age. It also highlights the importance of wearing a DOT-approved motorcycle helmet and protective clothing (goggles or face shield, gloves, boots, long sleeve shirt or jacket, and long pants) during operation to ensure rider safety. The manual strongly advises against operating the dirt bike without proper safety gear and training.
Important Technical Specifications
The manual provides a detailed table of technical specifications for the Viper 150-E Dirt Bike:
- Overall length: 1540mm
- Overall width: 640mm
- Overall height: 880mm
- Wheelbase: 1270mm
- Curb mass: 92kg
- Payload: 113kg
- Ground Clearance: 230mm
- Max speed: 80km/h (approximately 50 MPH)
- Transmission: 5 gear mesh
- Capacity of fuel tank: 6.0L
- Oil capacity: 1.0L
- Lubrication method: Pressure, splash
- Cylinder bore x stroke: 62mm x 49.5mm
- Compression ratio: 9.0 : 1
- Related Power: 8.0kW/8500rpm
- Related torque: 10.0N.m/6500rpm
- Idle speed: 1500 ± 150 r/min
- Displacement of cylinder: 149cc
- Spark plug: D8RTC (Torch) with a gap of 0.6~0.8mm
- Front wheel: 70/100-19
- Rear wheel: 90/100-16
- Ignition means: C.D.I.
- Brake: Front: Disc, Rear: Disc
- Clutch: Manual / wet
The manual also specifies tire pressure: 15 psi for the front tire and 20 psi for the rear tire, not to exceed 32 psi.
Usage Features
The manual details various usage features and operational procedures:
- Starting the Engine:
- Verify oil level and check for leaks.
- Tighten filler cap securely.
- Add oil if required.
- Ensure adequate fuel.
- Do not overfill the fuel tank.
- Do not mix oil with gas.
- Replace cap tightly.
- Do not refuel a hot engine.
- Ensure all warning decals are legible and securely attached.
- Replace necessary decals.
- Ensure both tires are in safe riding condition and inflated to recommended pressure.
- Check chain condition and tension.
- Lubricate and adjust tension as necessary.
- Check for smooth throttle operation.
- Turn the ignition key to the "ON" position.
- Make sure the transmission is in "NEUTRAL".
- Turn the engine stop switch to "RUN".
- Turn fuel valve to "ON".
- For cold starts, pull up the choke lever, kick start, and gradually return the choke lever as the engine warms up.
- For warm starts, the choke may not be necessary.
- The manual warns against operating the engine in a closed space due to toxic carbon monoxide.
- Stopping the Engine:
- Release the throttle twist grip.
- Shift to neutral.
- Set the ignition switch key to "OFF".
- Set the fuel valve handle to "OFF".
- Gear Shifting:
- The dirt bike has a 5-speed manual transmission.
- To shift, reduce throttle, pull in the clutch lever, depress the shift lever to engage the next gear, and then release the clutch lever while increasing throttle.
- The shifting sequence is 1st gear, Neutral, 2nd gear, 3rd gear, 4th gear, 5th gear.
- The manual warns against operating the dirt bike to avoid clutch damage caused by accidental gear shifting.
- Breaking in the Engine: The first 600 miles are considered the "Break-in" period.
- Avoid increasing RPMs while climbing steep slopes.
- Do not drive continuously for more than 50km (30 miles) without varying the throttle.
- Warm up the engine for 3-5 minutes before operation.
- Driving speed should not exceed 40 kmph (25 MPH) for the first 500 km (300 miles) and 65 kmph (40 MPH) for the remaining 500 km (300 miles) of the break-in period.
- Fuel Valve Operation: The fuel valve has "ON", "OFF", and "RESERVE" positions. "ON" supplies fuel to the carburetor, "OFF" stops fuel flow, and "RESERVE" allows access to the last 1L of fuel in the tank.
- Battery: The battery is located under the right side cover. It should be trickle charged every 30 days if stored for a long period. When disconnecting, remove the negative terminal first, then the positive. When connecting, connect the positive terminal first, then the negative.
Maintenance Features
The manual outlines a comprehensive maintenance schedule and procedures:
- Check-ups, Adjustment, and Maintenance:
- Engine Oil: Check oil level each time prior to operating. The oil level should be between the upper and lower lines of the oil sight gauge. Add lubricating oil up to the upper line when needed. Recommended oil is SAE 15W-40.
- Changing Oil Filter Screen: Drain the old oil, clean the oil filter screen and spring, and replace with new oil.
- Check-up of Spark Plug: Remove the spark plug and check for corrosion or dirt. The gap should be 0.6-0.8mm. Replace if necessary.
- Valve Inspection: Refer to the maintenance schedule for valve adjustment intervals. Valve clearance should be 0.02-0.03mm for intake and 0.03-0.05mm for exhaust.
- Checking & Cleaning the Air Filter: The air filter is located under the left side plastic cowling. It should be removed, washed with water and mild detergent, squeezed dry, and reinstalled. The manual warns against using gasoline, alkaline, or organic volatile oil for cleaning.
- Adjusting the Throttle Cable: Ensure the throttle works normally. The free operating movement should be 2-6mm.
- Adjusting the Carburetor: Adjust the idling speed to 1500 ± 150r/min when the engine is warmed up.
- Inspection of Front Hydraulic Disk Brake: Check the brake caliper for leakage and the brake fluid level. Add DOT3 or DOT4 brake fluid if needed.
- Inspection of Rear Hydraulic Disk Brake: Similar to the front brake, check for leakage and fluid level.
- Clutch Adjustment: Adjust the clutch lever play to 3.0-5.0mm.
- Adjustment of Chain: Loosen the rear axle nut, adjust the chain tension to 15-20mm, and then tighten the rear axle nut to 50-60Nm (37-44 ft.lb.).
- Greasing Procedures to the Driving Chain: Shut off the engine, add machine oil or chain grease to the driving chain.
- Troubleshooting: Provides guidance for common complaints such as engine hard to start or does not start at all.
- Fuel Supplying Check: Ensure adequate fuel, check the engine stop switch, fuel valve, and carburetor for proper function.
- Ignition System Check: Remove the spark plug and reattach it to the spark plug lead. Turn the ignition key to "RUN", slide the engine stop switch to "Run", and kick start. A blue spark should jump across the spark plug gap.
- Vehicle Washing: Wash the vehicle with clean water and a mild detergent. Avoid high-pressure washers.
- Instructions for Storage: For long-term storage, drain fuel from the tank and carburetor, spray anti-rust oil into the inside wall of the tank, and clean the vehicle.
- Resumption of Service After Storage: Remove covers, fill fuel, drain anti-rust oil from the fuel tank, and perform required check-ups.
- Table of Torque of Fasteners: Provides specific torque values for critical fasteners, such as the nut for tightening the upper joining plate of the front fork with vertical tube (40-50 Nm), nuts for fixing the engine (20-25 Nm), and bolt for tightening the upper joining plate or front fork with shock absorber (15-20 Nm).
- Inspection and Maintenance Schedule: A detailed table outlines maintenance intervals (Initial 1 month/20hrs, Initial 3 months/50hrs, Every 3 months/50hrs, Every 6 months/100hrs) for various components including valves, spark plug, valve clearance, air filter, carburetor, exhaust system, spark arrester, fuel hose, engine oil, engine oil filter, engine oil strainer, brake fluid level, brake hose and joints, brakes, clutch, wheels, wheel bearings, brake caliper linings, front and rear suspension, steering system, steering shaft lubrication, fittings and fasteners. I=Inspect and clean, adjust, lubricate or replace, if necessary. C=Clean R=Replace T=Tighten.
The manual also includes a Warranty Coverage section, stating that the bike is warranted for 90 days from the date of purchase against manufacturing defects. It specifies that the warranty is void if the frame, wheels, or fender are bent or broken due to abuse, or if there is any sign of impact, accident, jumping, spin-outs, or roll over. Ricky Power Sports LLC is not liable for any damage or liability claims resulting from the operation of the product. The emission control system warranty is also detailed, covering parts and labor for a specified period.