24
25
W W W . D Y E P A I N T B A L L . C O M W W W . D Y E P A I N T B A L L . C O M
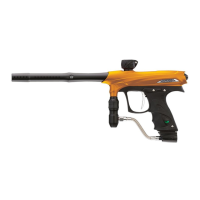
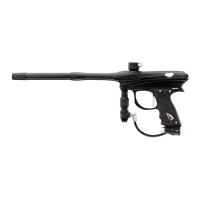
AIRPORT ADJUSTMENT AND MAINTENANCE
The locatio n of the airp ort ad ap ter can be moved
approximately 11⁄4 ” back o r forward from the stock
po sition to fit your ind ivid ual p reference. To chang e the
po sition:
1. Op en the three, right side grip p anel screws with
a 3⁄32” A llen key.
2. Remove the 9V b attery by p ulling on the rib bo n.
3. Using a 3⁄32” A llen key, loosen the airp ort locking
screw until airp ort slid
es b ack and forth loosely.
4. Set the airp ort to the d esired p osition.
5. Tighten airp ort lo cking screw, install the 9V battery
and tig hten the three g rip p anel screws.
When screwing the air system into the airp ort, always check that the thread s on the air system and
the airp ort are clean and not worn out. If you think the thread s are not in g ood cond ition, contact
DYE Precisio n or a p rofessional store
b efo re screwing in the air system.
The RIZE
RIZE
RIZE
™ airp ort will wo rk with both 30 0 0 psi,
450 0 psi air systems and CO
2
tanks fitted with an
anti - sip ho n. It is recommend ed that you use the
DYE Thro ttle® air system, although the airp ort on
the ™ is d esig ned to work with mo st o ther air
systems. A lways ensure that the o-ring at the top
of the preset regulator is in good condition b efo re
connecting it to the ™ marker.
AIR LEAKS
AIR LEAKING FROM THE AIRPORT
• Check the o- ring on the air system. If need ed
change the O- ring and try again. The O- ring
normally used is # 15 b ut some manufacturers
mig ht use a different siz e. Consult the manual
of the air system you are using
AIR LEAKING FROM THE HYPER3™ REGULATOR
• F irst locate the p ositio n o f the lea k.
• Fo r d isa ssemb ly instructio ns consult the
technical sectio n und er Hy per 3™
reg ulato r.
• If the leak is coming from the b otto m o f the
reg ulator you will need to d isassemb le the
reg ulator and chang e the # 0 10 O- ring a nd
the seat o n the b rass sea t retainer mounted
insid e the Hyp er3™ reg ulator.
• If the leak co mes fro m the small ho le in the
mid dle o f the reg ula to r there a re two p ossible
O- ring s. Cha ng e the # 0 15 O- ring o n the
p isto n and the # 0 0 7 uretha ne O- ring insid e
the b od y o f t
he reg ulato r.
• If the leak is from the to p of the reg ulato r
cha ng e t he # 0 14 O- ring o n the outside
of the cap .
• Chang e the # 0 14O- ring on the to p cap of
the Hyper3™ and ap ply a small amount of lub e
to the O- ring .
AIR LEAKING BETW EEN BODY AND F RAME
• A leak between the b ody and the frame can b e
caused by a coup le o f things.
• First Check that the Hyp er3 reg is not set to o
hig h or too low.
• If ab ove d oesn’t help, remove the frame from
the RIZE ™ and check the hose co nnections
between the solenoid and the ho se fittings.
• Last p ossibility is that one of the hose fitting s
is leaking . Gas up the RIZE ™ without the frame
attached and try to lo cate the exact p oint of
leakag e. If the leak is coming from one
of the
hose fitting s, remove the screw, check and
rep lace any d amaged o- ring s and re- attach
screw to the b ody.
AIR LEAKING FROM BACK OF THE RIZE ™
• Check that the bolt kit is tightened all the way
into the ™. If the bolt kit is loose, it will
start to leak.
• If ab ove d oes not solve the leak, remove the
bolt kit and chang e the # 0 20 O- ring on the
back cap of the b olt kit. Also change the two
# 0 0 9 O- ring s
lo cated on the tail of the b olt.
Lub e well and re- insert the b olt kit into the
™. Check b olt kit b reak d own p icture on
pag e 19 for O- ring locations
AIR LEAKING FROM FRONT OF THE
RIZE
™
• Remove the Bolt kit from the marker and
change the # 0 17 O- ring located inside of the
Can and the # 0 14 O- ring lo cated inside
the Manifold. Lube well and re- assem
TRO UBL E SHOOTI NG GUID EAIRPO R T
ASSEMBLY A ND MAI NTENA NC E
RIZE
RIZE
• If above doesn’t help, try changing the
 Loading...