5
III. OPERATING INSTRUCTIONS
III.1. Measurement of AC mA and A
NOTE:
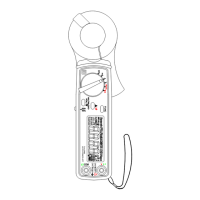
1. Select the correct fundamental frequency (50 or 60 Hz) of current by moving the
sliding switch at the side of the tester. Or hold the
▲
button to select AUTO Hz.
2. Select the proper position of the rotary switch for the range of current. If the AC
current is less than 0.6A, then set the rotary switch at the position of mA. If the
AC current is greater than 0.6A, then set the rotary switch at the position of A.
3. If the peak value of the input AC current is greater than the maximum value of
the range, then symbol of OL will be displayed.
4. If users hold the
▲
button and turn the power on, the unit enters the AUTO Hz
mode. The unit will automatically detect the frequency between 45 to 65Hz.
Additional error occurs if the measured frequency is not 50 or 60 Hz.
NOTE: Whenever the rotary switch is set at a new position, the CT ratio and
fundamental frequency will be displayed first.
WARNING: If the unit clamps on to a load (current) about twice the range, the unit
not only display OL, but also display Low Battery.
NOTE: If the CT ratio is not 1, a symbol of “CT” will be shown in the LCD display
for the measurement of mA or A. The reading of current shown in LCD is equal to
the true RMS value measured by the tester multiplied by CT ratio (A
LCD
= A
RMS
×
CT).