4
USER MANUAL FOR AXION THERMAL IMAGING SCOPE
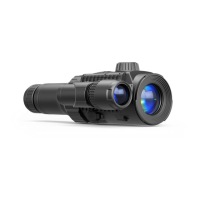
COMPONENTS AND CONTROLS
1. Eyepiece focus ring
2. DOWN/REC button
3. MENU button
4. UP/ZOOM button
5. Power ON/CALIBRATION button
6. Lens focus ring
7. Lens cover
8. Tripod adapter
9. USB Type-C connector
10. Laser rangender
LED indicator displays the current status of the device:
LED Indicator Operating Mode
Device is turned on
The device is turned on/battery charge < 10%
BUTTONS OPERATION
Button Operating Mode First short press Subsequent short
presses
Long press
Bouton ON/
OFF
(5)
Device is turned off Turn device on Device calibration Turn device on
Display is turned off Turn display on Device calibration Turn device off
Device is turned on,
quick menu, main
menu
Device calibration Turn display off / Turn
device off
Bouton UP/
ZOOM
(4)
Device is turned on Toggle between observation modes Zoom
Quick menu Increase value Increase value
Main menu Navigate up / right Navigate up / right
Bouton MENU
(3)
Device is turned on Access quick menu Enter main menu
Quick menu Switch between quick menu options Exit quick menu
Main menu Conrm selection, enter menu items Exit menu items, main
menu
Bouton
DOWN/ REC
(2)
Device is turned on Turn on rangender Single distance
measurement
Quick change of color
palettes
The device is on, the
rangender is on
Single distance measurement Activate rangender
scan mode
The device is on,
the rangender is in
scanning mode
Deactivate rangender scan mode Turn off rangender
Quick menu Decrease value Decrease value
Main menu Navigation down / left Navigation down / left
BATTERY PACK CHARGING
The AXION LRF XQ thermal imager comes with an APS 5 rechargeable Lithium-ion battery. APS 5 batteries
support USB Power Delivery fast charging technology when using a standard charging set (charger, USB Type-C
cable, power adapter). Before rst use, make sure the battery is fully charged.
Option 1
•
Install the APS 5 battery (11) in the battery compartment (19) of the device.
•
Connect the USB cable (16) to the USB Type-C connector (9) of the device.
•
Connect the other end of the USB cable (16) to the Power Adapter (15).
•
Plug the Power Adapter (15) into a 100-240 V socket (17).
Option 2
•
Insert the APS 5 battery (11) along the guide into the APS 5 charger (12) slot as far as it
will go (see Fig.). The APS charger is supplied with your device and sold separately.
•
Connect the plug of the USB Type-C cable (16) to the USB Type-C connector of the Power
Adapter (15).
•
Plug the Power Adapter (15) into a 100-240 V socket (17).
•
Connect the other end of the USB Type-C cable (16) to the USB Type-C connector (14) of
the charger.
•
LED indicators (13) will display the battery charge level (see Table).
Note: two batteries can be charged at the same time, a second slot is provided for it.
LED indication (12) in the battery charging mode:
Battery Level
Battery level is from 0% to 25%
Battery level is from 26% to 50%
Battery level is from 51% to 80%
Battery level is from 81% to 99%
The battery is fully charged. It can be
disconnected from the charger.
Defective battery. It is forbidden to
use the battery.
LED indication (12) in the standby mode*:
Battery Level
Battery level is from 0% to 25%
Battery level is from 26% to 50%
Battery level is from 51% to 80%
Battery level is from 81% to 99%
The battery is fully charged. It can be
disconnected from the charger.
Defective battery. It is forbidden to use
the battery.
* Standby mode – operating mode when the batteries in the charger, but the power adapter is not connected.
In this mode, the indication is on for 10 seconds.
Attention! When using a power adapter that does not support USB Power Delivery fast charging technology, the
icker frequency of LED indicators decreases by 3 times and charge time increases.
Attention! The charger heats up during fast charging. Excess heat is removed through the radiator and does not
affect the device operation.
INSTALLING BATTERY PACK
•
Put the Lock-cover (18) on the rechargeable APS 5 battery (11).
•
Insert the APS 5 battery (11) along the guide into the battery compartment (19).
 Loading...