5
USER MANUAL FOR AXION THERMAL IMAGING SCOPE
•
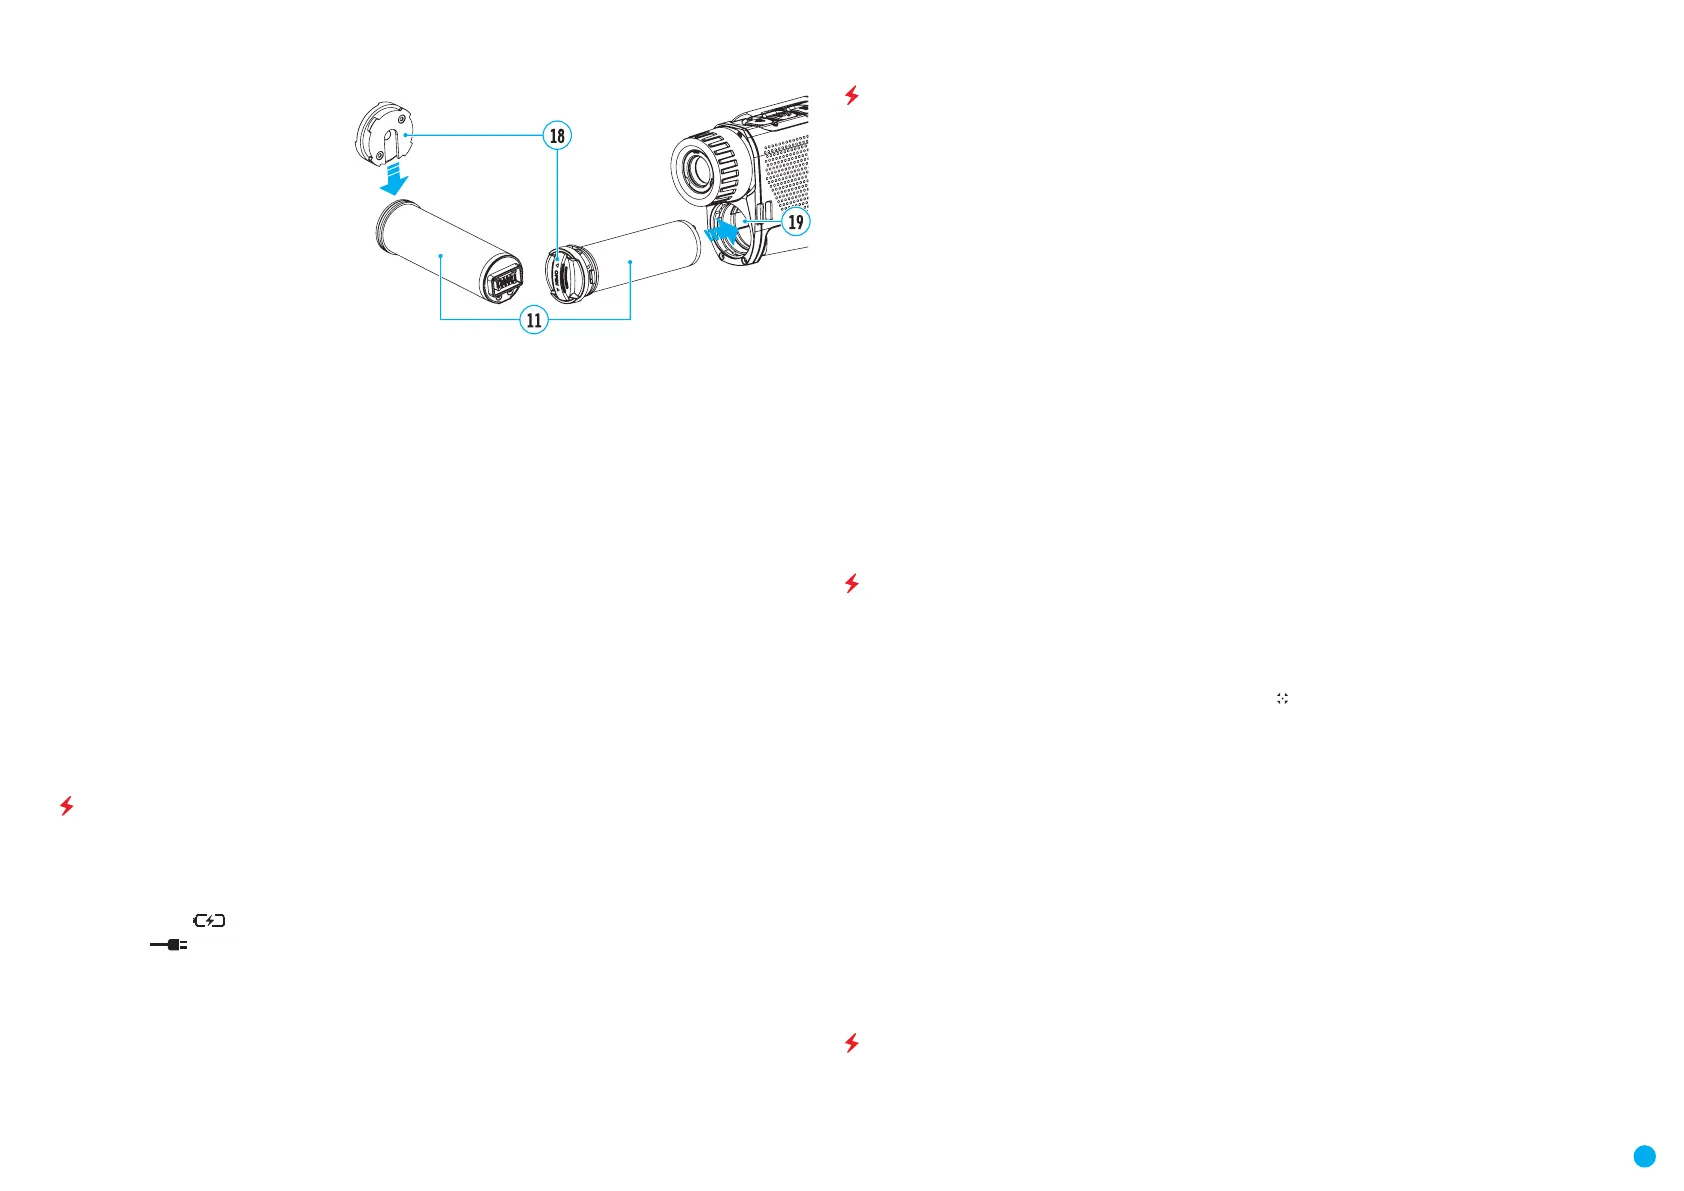
Lock the battery (11) by turning the
Lock-cover (18) clockwise until it stops.
•
Turn the Lock-cover (18) counter-
clockwise to remove the batteries (11).
PRECAUTIONS:
•
Always use the APS 5 charger supplied
with the device (or purchased
separately) to charge APS 5 batteries.
Using an unsuitable charger can cause
irreparable damage to the battery and
re.
•
Do not charge the battery immediately
after brining it from cold to warm. Wait
at least 30 minutes for the battery to
warm up.
•
Do not leave the battery unattended while charging.
•
Do not use the charger if it has been modied or damaged.
•
Do not leave the battery in a charger connected to the mains after charging is complete.
•
Do not expose the battery to high temperatures or naked ames.
•
Do not use the battery as a power source for devices that do not support APS 5 batteries.
•
Do not disassemble or deform the battery or charger.
•
Do not drop or strike the battery or charger.
•
The battery and charger must not be immersed in water.
•
Keep the battery out of the reach of children.
RECOMMENDATIONS FOR USE:
•
The batteries should be partially charged (50 to 80 %) for long-term storage.
•
The battery is to be charged at an ambient temperature of 0°C to +35°C or the lifespan of the battery will
decrease signicantly.
•
When using the battery at sub-zero ambient temperatures, the battery capacity decreases. This is normal and
not a defect.
•
Do not use the battery at temperatures outside the range of -25°C to +40 °С or it may reduce battery life.
•
The battery is short circuit protected. However, any situation that may cause short-circuiting should be
avoided.
EXTERNAL POWER SUPPLY
External power can be supplied from an external source, such as a Power Bank (5 V).
•
Connect the external power source to the USB Type-C connector (9) on the device.
•
The device will switch to draw power from the external source while the АPS 5 battery will be gradually
recharged.
•
A battery icon will appear on the display showing the percentage charge level.
•
An icon will be displayed when the device is powered by an external power source and the АPS 5
battery is not connected.
•
The device automatically switches to the APS 5 battery when the external power supply is disconnected.
Attention! Charging APS 5 batteries from an external source at temperatures below 0°C can reduce battery life.
When using external power, connect the Power Bank to the device only after it has been turned on and working
for at least several minutes.
OPERATION
WARNING! Never point the lens at intensive energy sources such as laser radiation emitting devices or the sun.
It can damage electronic components in the device. The warranty does not cover damage arising from failure to
comply with the operating rules.
POWERING ON AND IMAGE SETTING
•
Open the lens cover (7). The lens cover can be secured to the strap using the built-in magnet.
•
Press the ON/OFF (5) button briey to turn on the device.
•
Adjust the eyepiece focus ring (1) of the device until the symbols on the display are sharp.
•
Rotate the lens focus ring (6) to focus on the object being observed.
•
Enter the main menu with a long press of the MENU (3) button and select the desired calibration mode:
Manual (M), Semi-Automatic (SA) or Automatic (A).
•
Calibrate the image by briey pressing the ON/OFF button (5). If the SA or A calibration mode has been
selected the microbolometer is closed with an internal shutter automatically. However, if the M calibration
mode has been selected you must close the lens cover before calibrating manually.
•
Select the desired observation mode (Forest, Identication, Rocks, User) by briey pressing the UP (4) button.
User mode allows you to change and save user dened brightness and contrast settings in the quick menu.
•
Enter the main menu with a long press of the MENU (3) button and select the desired color palette (for more
details see the Main Menu Functions section).
•
Activate the quick menu by briey pressing the MENU (3) button to adjust the brightness, contrast and
smooth digital zoom (for more details see the Quick Menu Functions section).
•
Upon completion of use, turn the device off by a long press of the ON (5) button.
MICROBOLOMETER CALIBRATION
Calibration enables the device to equalize the microbolometer background temperature and eliminate the
image aws (such as vertical bars, phantom images, etc.).
During calibration, the image on the display briey freezes for up to 1 second.
There are three calibration modes: Manual (M), Semi-Automatic (SA) and Automatic (A).
Select the required mode in the Calibration mode menu item
.
M mode (manual).
•
Close the lens cover and press the ON (5) button briey.
•
Open the lens cover after the calibration is completed.
SA mode (semi-automatic)
•
Press the ON (5) button briey to activate calibration.
•
There is no need to close the lens cover because an internal shutter covers the microbolometer
automatically.
A mode (automatic)
•
The device is calibrated autonomously according to rmware algorithms.
•
There is no need to close the lens cover because an internal shutter covers the microbolometer
automatically.
•
In this mode, the user can still choose to calibrate the device using the ON (5) button if required (as in the SA
mode).
DISCRETE DIGITAL ZOOM
The device functionality allows you to quickly increase the base magnication by 2 or 4 times as well as return
to the base magnication. Press and hold the UP (4) button to change the digital zoom.
 Loading...