Manual No. 016-5033-151 Rev C. EC30597 12/17 11
TERRAGATOR B RAVEN RS1™ ISO GUIDANCE AND STEERING INSTALLATION GUIDE
REPLACEMENT WHEEL ANGLE SENSOR INSTALLATION (TERRAGATOR 7300/8300/9300B
ONLY)
1. Verify the machine is parked with the front wheel pointing straight ahead.
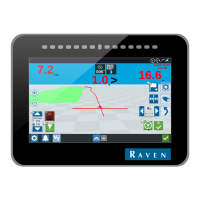
2. Locate and remove the machines existing Wheel Angle Sensor (WAS).
FIGURE 20. Existing Wheel Angle Sensor
3. Remove the four bolts securing the WAS mounting plate to the machine.
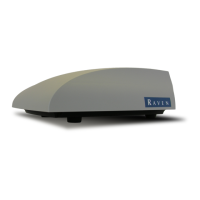
4. Remove the OEM WAS shaft and replace it with the provided WAS shaft (P/N 019-519-622). Do not tighten the
jam nut at this time.
NOTE: One of the flat faces on the square stub must face directly towards the cab.
FIGURE 21. Installed WAS Shaft
5. Install the plastic coupler (P/N 307-0159-419) onto the square stub with the flat of the D-profile facing
rearward, towards the cab.
Existing Wheel Angle Sensor
WAS Mounting Plate Bolts
 Loading...