Evolutionautopilotset-upand
commissioningwithp70/p70R
p70&p70RandEvolutionautopilot—
overview
Thisdocumentwillguideyouthroughthestepsrequiredin
setting-upandcommissioningyourEvolutionautopilotsystem
usingaRaymarinep70/p70Rautopilotcontrolhead.
IfyouareanexistinguserofRaymarineautopilotsystems,
thisdocumentwillalsohelpyoutounderstandthedifferences
betweenthecommissioningprocessforexistingSPXautopilot
systems,andtheEvolutionautopilotsystem.Forexample,there
areanumberofexistingset-upandcommissioningstepsthat
youmightalreadybefamiliarwithforSPXsystems,whichare
nolongerrequiredorareslightlydifferentforEvolutionautopilot
systems.
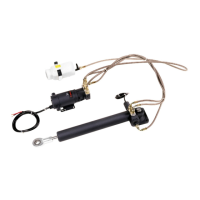
Evolutionautopilotinstallation
ForinformationoninstallingandconnectinganEvolutionautopilot
system,refertotheinstallationinstructionsthataccompanythe
EV-1andEV-2units,asappropriate.
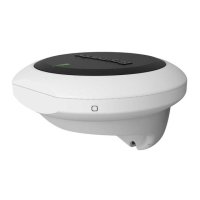
Evolutionautopilotoperationwithp70
&p70R
Generaloperationofthep70/p70RisthesameforEvolution
autopilotsystemsasitiswithexistingSPXautopilotsystems.
Refertodocumentnumber81355forp70/p70Roperation
instructions.Thisdocumentissuppliedwithallp70/p70Runits.
YoucandownloadthelatestversionfromtheRaymarinewebsite:
www.raymarine.com.
Autopilotcommissioning—main
differencesbetweenEvolutionand
SPXsystems
TheEvolutionsystemprovidesanumberoffeaturestoimprove
uponthecommissioningprocessrequiredbyexistingSPXand
someotherautopilotsystems.
•Built-inheadingandattitudesensor—noadditionaluxgate
compassrequired.
•Automaticset-up—theruddergain,counterrudder,manual
compasscalibrationandautolearnsettingsrequiredforexisting
SPXsystemsarenolongerrequired.Thisresultsinagreatly
simplieddocksidecalibrationprocessforEvolutionautopilot
systems.
Autopilotresponselevels
TheEvolutionautopilotsystemfeaturesanumberofdifferent
responselevelstohelpyouquicklycongurethesystemfor
optimumperformanceforthecurrentconditions.
Theavailableresponselevelsare:
•Leisure—suitableforlongpassageswheretightheading
controlisnotcritical.
•Cruising—goodcourse-keepingwithoutoverworkingthepilot.
•Performance—emphasisontightheadingcontrol.
YoucanchangetheresponselevelatanytimebyselectingMENU
>ResponseLevel.ThenselectSavetokeepthechanges.
Initialsetupandcommissioning
Commissioningpre-requisites
Beforecommissioningyoursystemforthersttime,checkthat
thefollowingprocesseshavebeencarriedoutcorrectly:
•Autopilotsysteminstallationcompletedinaccordancewiththe
Installationinstructions.
•SeaTalk
ng
networkinstalledinaccordancewiththeSeaTalk
ng
ReferenceManual.
•Wheretted,theGPSreceiverhasbeeninstalledand
connectedinaccordancewiththeassociatedInstallation
instructions.
Checkalsothatthecommissioningengineerisfamiliarwiththe
installationandcomponentsoftheautopilotsystemincluding:
•Vesseltype.
•Vesselsteeringsysteminformation.
•Whattheautopilotwillbeusedfor.
•Systemlayout:componentsandconnections(youshouldhave
aschematicofthevessel’sautopilotsystem).
Initialset-up
Initialset-upinvolvesthefollowingsteps:
Important:Beforeproceedingwiththeinitialset-upor
commissioningofap70/p70R,ensurethatyourp70/p70Ris
runningthelatestsoftware.p70/p70RoperationwithEvolution
systemsrequiresp70/p70Rsoftwareversion2orlater.Refer
tohttp://www.raymarine.co.uk/view/?id=797todownloadthe
latestsoftwareandviewinstructionsonhowtoupgradethe
softwareonyourp70/p70R,usingamultifunctiondisplay.
1.Power-upyourp70/p70R.
2.Specifyyourpreferredlanguageandappropriatevesseltype,
usingtheSet-upwizard.
3.Completethedocksidecalibrationprocess,usingthe
Docksidewizard:
Forvesselswithout
arudderreference
transducer:
Forvesselswitharudder
referencetransducer:
DriveTypeselectionDriveTypeselection
AlignRudder(rudderalignment)
RudderLimitsettingRudderLimitsetting
HardOverTime(ifyoudonot
alreadyknowyourhardovertime,
youshouldskipthisstepinthe
DocksideWizardandenterthe
valuemanuallyafterwards.
RudderDrivecheckRudderDrivecheck
4.Oncethedocksidewizardiscomplete,specifythehard-over
time(onlyappliestosystemsthatdoNOTincludearudder
referencetransducer).
5.Familiarizeyourselfwiththeimportantinformationinthis
documentrelatedtocompasslinearization.Followthe
guidelinesprovidedtoensurethattheprocessiscompleted
successfully.
6.Onceyou’vesuccessfullycompletedallthestepslistedabove,
youshouldalsofamiliarizeyourselfwiththeinformation
relatedtocompasslock.
Documentnumber:82285-5Date:04-2014