4
Remote Pairing
IF YOU HAVE A WIRELESS
REMOTE
IF YOU HAVE A WIRED REMOTE
Your power base has an emergency
lowering feature in the event that
your power base is in the raised
position and has lost power due to a
power outage.
Emergency Power Down
Feature
Locate and remove the cover for the
9 volt batteries on the control box or
power supply box.
Press the “FLAT” button or the
individual lowering buttons.
Once the bed returns to the at
position, remove the batteries from
the Control box.
Install the two (2) alkaline 9 volt
batteries and reinstall the battery
cover.
NOTE: DO NOT raise the base
when powered with only backup
batteries. The batteries are only
intended to lower the base in
case of emergency.
STEP 1
STEP 2
STEP 3
STEP 4
STEP 1
STEP 2
STEP 3
STEP 4
STEP 5
STEP 6
STEP 7
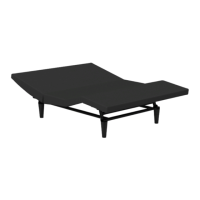
Plug in the “A” output of the Y-Cable
into Base A control port.
Unplug both wired remote
controls from their lift motors and set
aside.
Plug in the “B” output of the Y-Cable
into Base B control port.
Remove and extend one of the
provided Y-Cables.
Plug one of the provided hardwired
remote controls into the “Control Input”
side of the Y-Cable.
Route the control cable to your
preferred side of the bed.
Make sure both Base A and Base B
are set up and positioned closely
side-by-side together. (Ignore this step
for Split Top Queen setup. For the
following steps, Base A/B will refer to
Side A/B).
B
Control
Input
A
If you have a wired remote and want
to connect to 2 power bases that will
move in tandem as a single unit, follow
the below instructions. For reference,
bases will be refered to as “Base A”
and “Base B”, but are not acutally
label as such in person.
Your remote is already paired
with your power base. Follow
the below instructions for
replacement remote pairing.
How To Unpair a Remote
Press any button on the remote
control. When the control box light
turns solid, the remote should be
successfully paired.
Test and verify the remote is
correctly paried by activating
functions of the power base. You
have now completed the pairing
process.
To unpair a remote, simply pair
another remote twice, to unpair the
previously paired remote.
Place batteries into the remote
control (3 x AAA batteries).
Ensure the power base is plugged
into a functioning outlet.
Press and hold the pairing button on
the control box until the indication
light blinks.
STEP 1
STEP 2
STEP 3
STEP 4
STEP 5